Do you find your computer slow or unresponsive at times? Windows, with every new release, provides new features and updates that demand more system resources. This may result in increased resource consumption, resulting in system slowness or unresponsiveness.
Fortunately, there are numerous tips and tricks that can help minimize unnecessary resource usage giving a speed boost to your PC. In this post, we’re sharing various tips, techniques and tools to customize Windows 10, with step-by-step instructions, so you can experience a fast, smooth and better PC performance. (Source: hongkiat)
1. Disable Startup Apps
Your PC may be running slow because of a huge list of startup programs (apps that start along with the system). These apps slowdown the bootup process and degrade the device’s performance, hence disabling such apps speeds up the performance of the system and improves the overall responsiveness.
Although there is detailed information on how to manage the startup programs on Windows, however, for a short-cut to locate and disable the startup programs , do the following:
- Press Ctrl + Shift + Esc to open Task Manager
- Click the Startup tab to check the list of startup programs
- Right-click and select Disable on programs you only occasionally or ever rarely use

2. Disable Effects & Animations
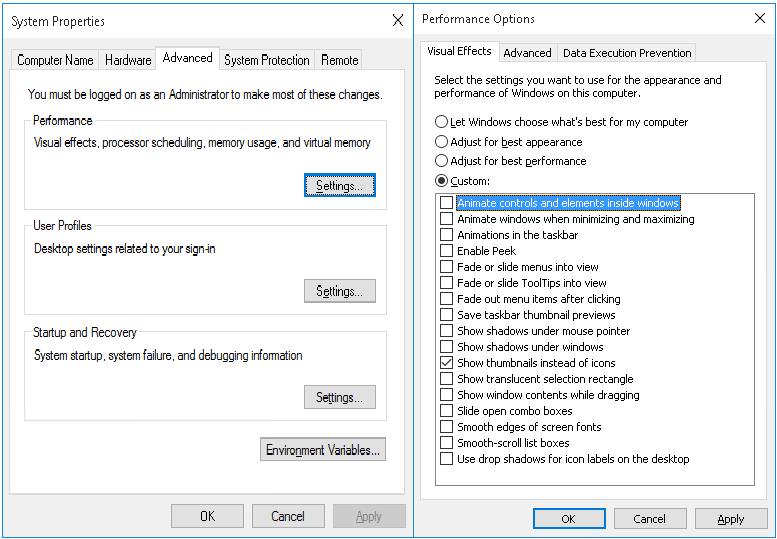
Another reason for your PC to be running slow can be visual effects and animations that increase the burden on the system resources. In the latest PCs, visual effects and animations may not cause a huge impact on power and speed. However, in older PCs, these do play a role so turning them off is your best option.
Here are the steps to disable visual effects and animations:
- Right-Click Start > System
- Select the last option on the left, Advanced system settings
- Switch to Advanced tab and click Settings under Performance
- Under Visual Effects, choose the option Adjust for best performance (or you may also select Custom and uncheck all the checkboxes)
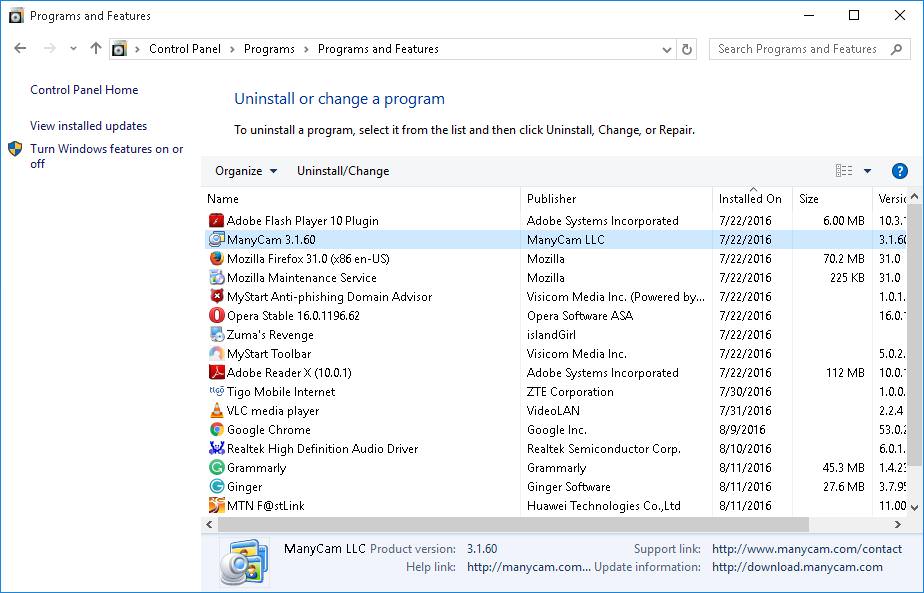
3. Uninstall Bloatware
One of the biggest factors that slow down any Windows-based system is unwanted software, aka bloatware. They book disk and memory space unnecessarily hindering other applications to perform at their full potential.
That’s why removing such apps boosts the system’s performance, especially if you download lots of programs but don’t or rarely use them. For rarely used apps, avoid installing the software, rather go for portable apps for using a tool once in a while.
To remove bloatware or unused apps, follow these steps:
- Right-click Start > Control Panel
- Select Programs > Programs and Features
- Select Uninstall/Change to remove unwanted programs, one at a time
- Follow the instructions in the uninstall dialog boxes to uninstall the software
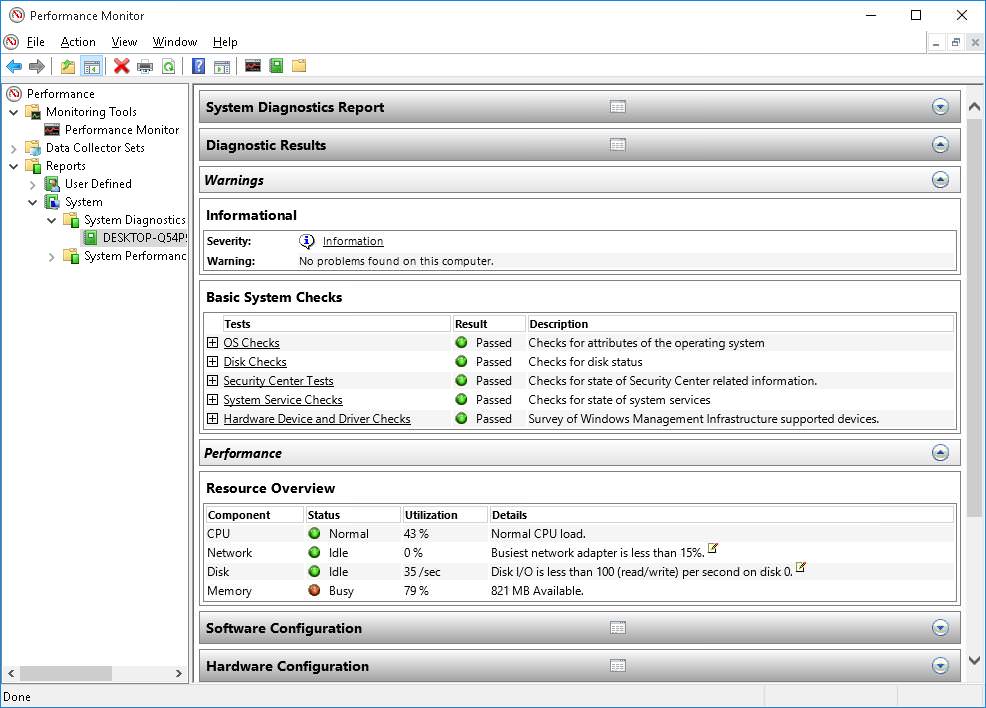
4. Use Performance Monitor
Windows 10 has a useful real-time performance monitoring tool called Performance Monitor. It details system and hardware resources, performance issues and services, and also suggests solutions for the listed problems.
Follow these steps to make use of the real-time monitoring tool:
- Type
Performance Monitorin the Start menu‘s search box and click the first result to launch the Performance Monitor tool - Select the last option Reports on the left > System > System Diagnostics option
The tool will work on your request and gather all the information about your system and produce a detailed performance report.
Do look under the Warnings section to find the issues present on your PC. Check their descriptions, use Windows 10’s Troubleshooter (given below) or search the web for their solution.
5. Enable Hibernate Mode
In the hibernate mode, the computer’s state (opened programs and their data) is written on the hard drive when you turn off your PC. When you switch on the system, Windows 10 takes seconds to open and lets you return to where you left off (as your programs remain open along with their sessions).
Perform the following steps to enable hibernate option:
- Press WinKey + I and then select System
- Select Power & sleep > Additional power settings, which will open Power Options
- On the left panel, select Choose what the power buttons do
- In the new window, click Change settings that are currently unavailable
- Enable the checkbox Hibernate and click Save changes button at the bottom
You can now select the Hibernate option from the Start menu whenever you wish to hibernate for getting back to work quickly.

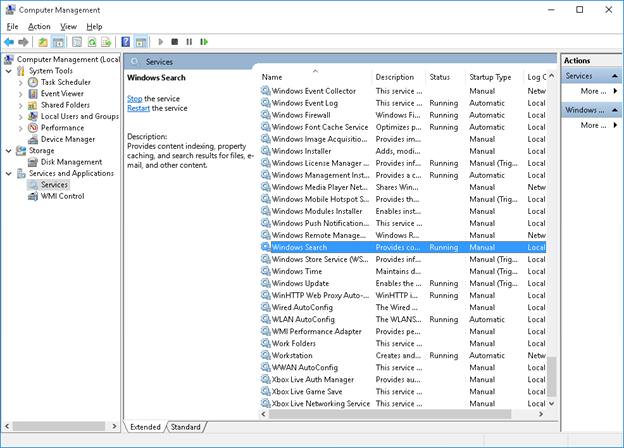
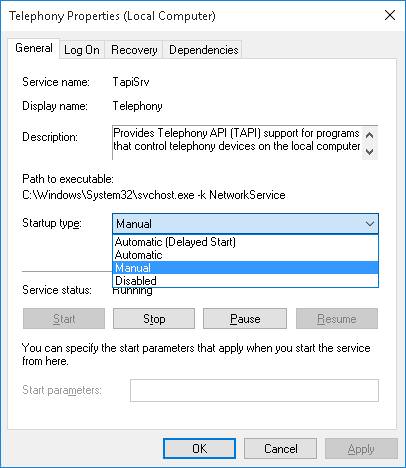
6. Disable Search Indexing
Search indexing improves the search tool’s responses and speeds up searching in Windows 10. It weakens the performance, however, as it runs in the background and utilizes a lot of system resources. Owing to this reason, if you do searches occasionally, then it’s best to disable it.
Follow the steps mentioned below to disable search indexing:
- Right-Click Start > Computer Management
- Double-click on Services and Applications > Services
- In the services list, look for Windows Search and double-click it
- In the new window, for Startup type , select Manual or Disabled and then click the OK button to save your changes
7. Minimize Browsers’ Load
Browser extensions and add-ons work for every opened tab or window and hence, utilizes a substantial amount of system resources. So, installing a lot of add-ons and browser extensions degrades your PC’s performance. So, to speed up your Windows 10, you must disable or remove all unused add-ons and extensions.
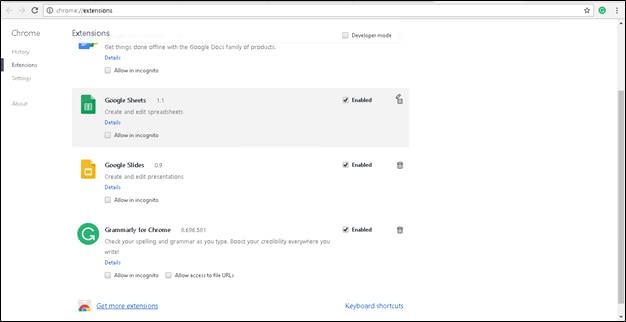
If you use Chrome as your web browser, follow these steps to remove extensions:
- Click the ≡ icon at top-right corner of the browser window
- Select More tools > Extensions
- Uncheck Enabled for every extension you want to disable temporarily or click the trash can icon to uninstall it completely
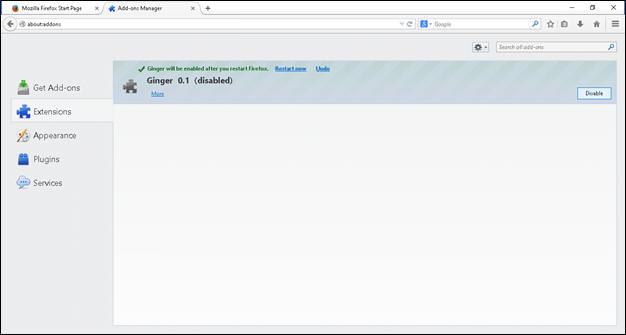
If you use Mozilla Firefox as your browser, follow these steps to remove add-ons:
- Click the ≡ icon at top-right corner of the browser window
- Choose Add-ons to open the Add-ons Manager tool
- Select Extensions from the left sidebar to view the list
- Click on the Disable button for the add-ons you wish to disable temporarily or click Remove button to uninstall the add-ons completely
8. Clean Up the Disk(s)
Over the time, your computer gets filled with lots of useless data that occupies space which could be utilized by programs, and slows down overall read/write operations. That’s why, it’s essential to get rid of unnecessary files using the Disk Cleanup tool.
To run Disk Cleanup to free up space on your system, perform these steps:
- Click Start > File Explorer > This PC
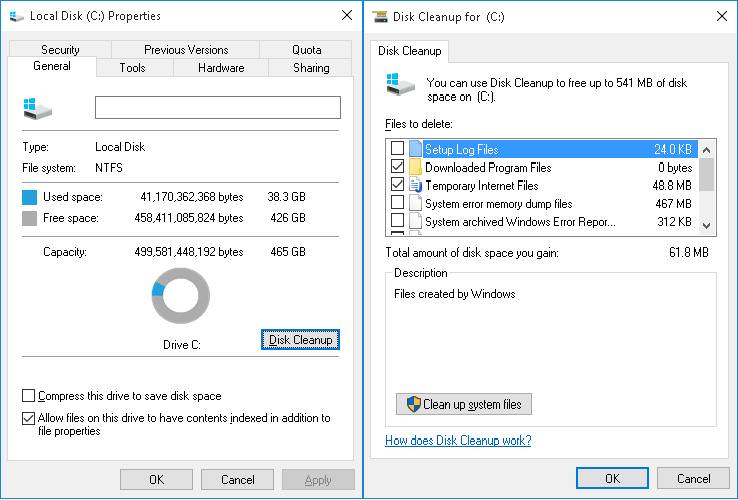
- On the right side, under Devices and Drives, select the Local Disk (C:) and then right-click and choose the last option Properties from context menu
- Switch to the General tab and under Capacity, click on Disk Cleanup button
- After the tool completes scanning your system for removable files, select the category of files you wish to delete and click OK to remove them
9. Defragment the Drive(s)
Your disks get fragmented over time, and increasing fragmentation also increases the time for Windows 10 to fetch data as their parts/chunks are spread all over the disk. This leads to slower performance and added disk failure risk.
Defragmentation cleans the hard disk of fragmentation, and combines fragments to create sequential data on the disk to speed up operations. Also, defragmenting the drives on regular basis improves performance and increases the life of your system.
To defragment and keep the hard drive healthy and efficient, follow these steps:
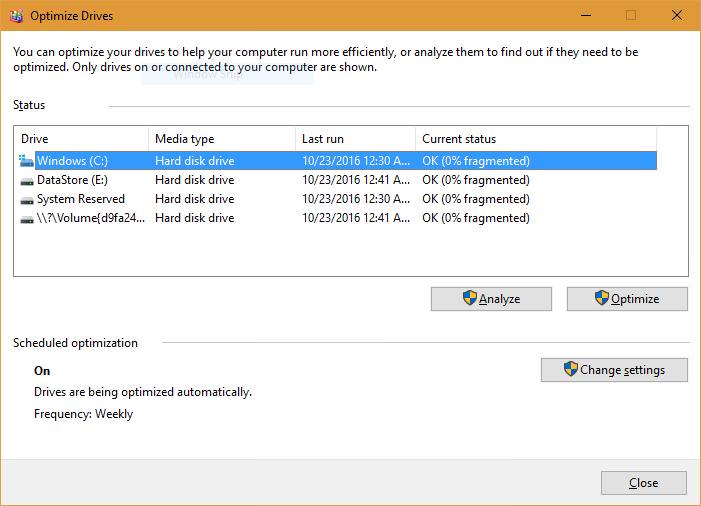
- Click Start > File Explorer
- Select the Local Disk (C:) and then right-click and choose Properties
- Click the Tools tab, look under Optimize and defragment drive and click the Optimize button to open the Optimize Drives tool
- Select the drives, one by one, and click on Optimize button for defragmenting each of the hard disk drives
10. Turn on Fast Startup
Fast Startup option helps in starting your PC faster after a shutdown by cutting down on boot-up time, using caching for some necessary resources into a single file on the hard disk.
At the time of startup, this master file is loaded back into the RAM that speeds up the process manifolds. Do note that this option does not affect the restart process.
Follow these steps to enable Fast Startup option in Windows 10:
- Right-Click Start > to bring up context menu and select Control Panel
- Click Hardware and Sound and look under Power Options in new window
- Click on the link Change what the power buttons do
- Now click on Change settings that are currently unavailable
- Tick the box next to Turn on fast startup (recommended)
- Click the Save changes button to enable the same

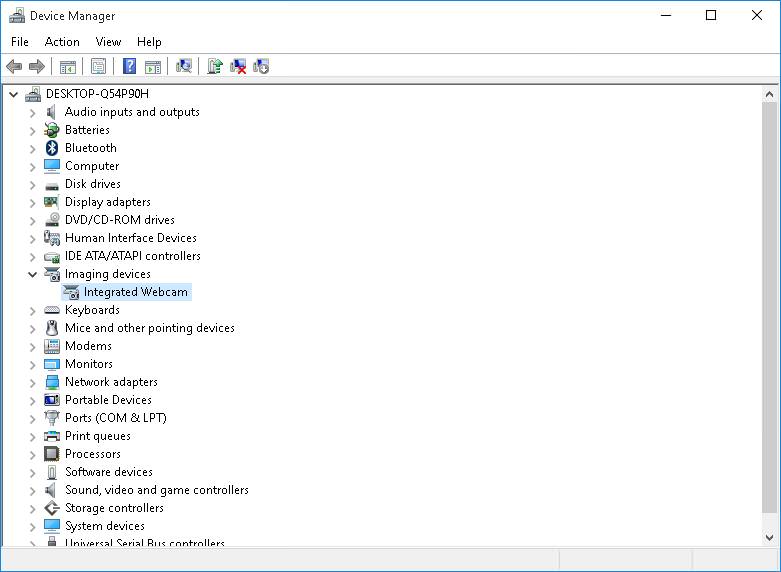
11. Uninstall Fonts and Drivers
Hardware drivers as well as fonts load and use resources causing a delay in system startup. Therefore, if you don’t need them, do remove them to improve your Windows 10 PC’s performance.
For uninstalling drivers, check the Uninstall Bloatware section above. In the Programs and Features tool, just select the drivers you wish to remove. If the drivers are not visible in Programs and Features, you can follow these steps:
- Right-Click Start >, select Device Manager to launch the window
- Locate the hardware for which you wish to uninstall the driver, then right-click on the same and select Uninstall option
- Check the option Delete the driver software for this device and click OK
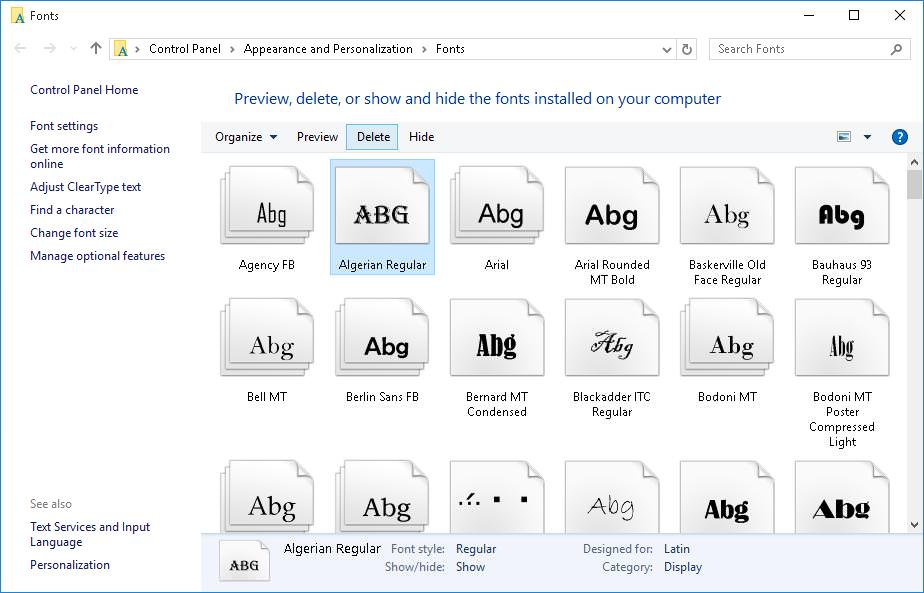
For removing fonts, follow the below steps:
- Right-Click Start > and choose Control Panel
- Select Category in View by and then choose Fonts
- Select the fonts you don’t use and then click on the Delete button
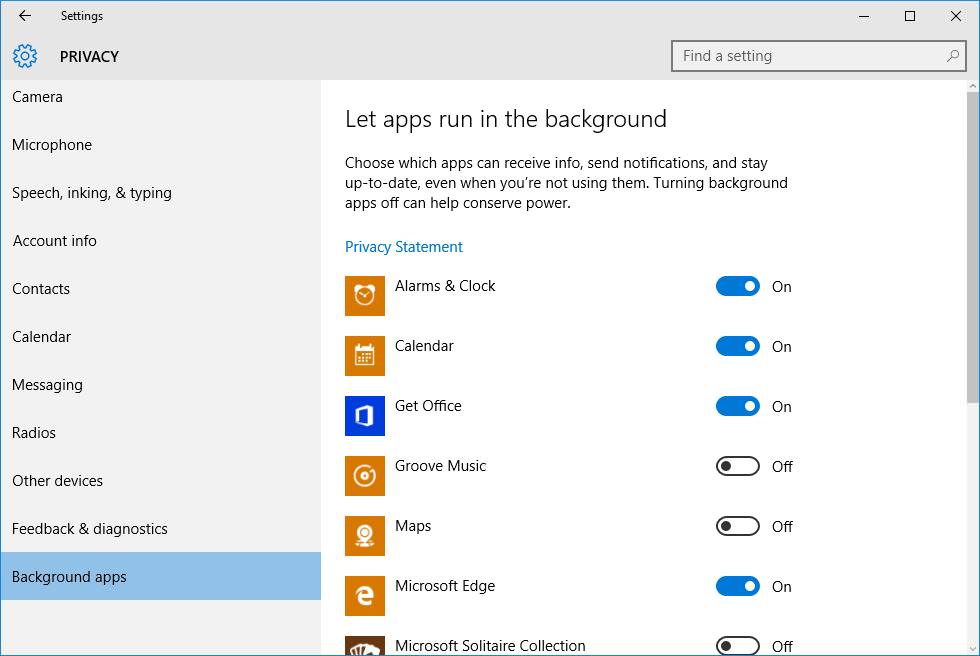
12. Disable Background Apps
Apps running in the background take system resources, heat up your PC and reduce its overall performance. That’s why, it’s better to disable them to speed up your Windows 10 and start them manually whenever you required. This reduces resource usage and helps speed up your system.
Follow these steps to turn off background-running apps:
- Select the Start button, go to Settings
- Click Privacy , go to the last option in the left panel – Background apps
- Switch off the toggles to turn off background apps you don’t need or use
13. Optimize Virtual Memory
With a low RAM, it’s difficult to multitask smoothly on Windows 10. The recommended solution is to either clean the RAM or upgrade it. However, if you’re not willing to spend money on it, then the other option is to allocate more virtual memory.
Virtual memory is a software-level optimization for improving responsiveness of any system. The operating system uses virtual memory whenever it’s short of actual memory (RAM). Though Windows 10 manages this setting, yet configuring it manually gives much better results.
Perform these steps to optimize the virtual memory:
- Right-Click Start, select Control Panel and then choose the option System and Security
- Click System in the window that appears, then choose Advanced system settings option from the left pane
- In the new window, click the Advanced tab and then click the Settings button under Performance
- Select the Advanced tab in the new window and click on the Change button under Virtual Memory
- In the new window that appears, uncheck Automatically manage paging file size for all drives
- Select the C: drive and then click the radio button for Custom size
- Now set the Initial size (MB) to the size of your RAM and Maximum size (MB) to double the size of your RAM (for ex., if the size of the RAM is 4GB, set the initial size to 4000 MB and maximum size to 8000 MB)
- Click the Set button and then OK (and restart when asked for)

14. Turn off Windows Tips
Windows 10’s tips feature proves helpful for newbies to understand the system and especially, to avoid changing unnecessary or dangerous configuration. However, the experienced ones can disable the tips feature and maximize system performance.
Do the following steps to turn off tips feature of Windows 10:
- Select the Start button, go to Settings
- Select System and from the left pane, select Notifications & actions
- Toggle off the option Show me tips about Windows

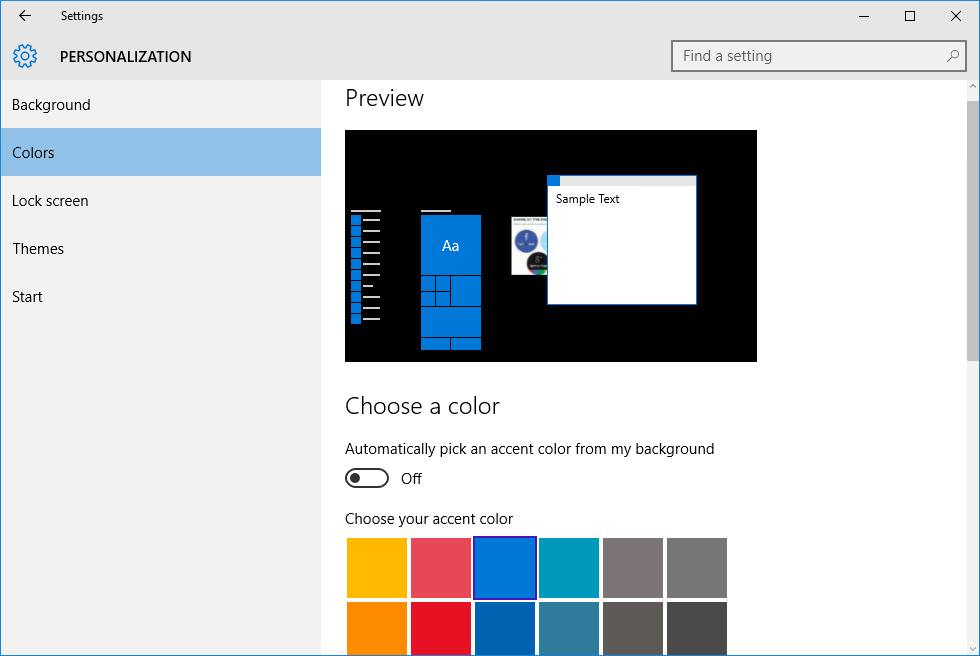
15. Turn off Dynamic Color Adaptation
Windows 10’s dynamic color adaptation feature automatically picks the color from your desktop’s wallpaper and adjusts the color scheme of the user interface accordingly.
This feature increases the resource usage and reduces performance of your Windows PC. That’s why, disabling this feature frees up resources and improves responsiveness.
Follow these steps to disable dynamic color adaptation:
- Click on the Start button and from the menu, select Settings
- Select Personalization from left sidebar, then select Colors
- Toggle off Automatically pick an accent color from my background
16. Disable Background Services
In Windows 10, there are several services running in the background that are used infrequently or never, and so it’s best to disable them or make them start manually. Disabling such unneeded background services unclog the system resources, and the system speeds up.
Disable the background services through the following steps:
- Type
services.mscin the Start menu’s search field and click the first search result to open the Services tool - Double-click each of the services you wish to disable and for their Startup type, select Disabled or Manual per your usage
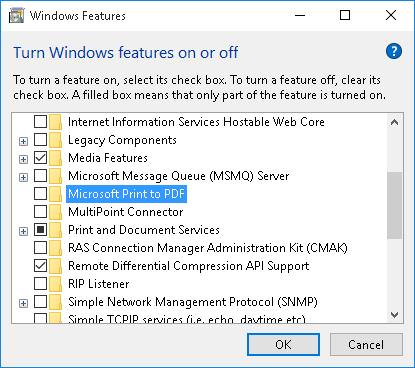
17. Turn off Windows Features
Windows brings many optional features such as .NET, PowerShell, Telnet and many more, which may or may not be useful to you, nevertheless, occupy memory and disk space. Owing to the same, if there are Windows features that you don’t use, then turn them off to make Windows 10 speedier.
Follow the steps below to turn off unnecessary features:
- Press WinKey + X and choose Programs and Features
- Click Turn Windows features on or off from right-side pane
- In the new window, uncheck the features you don’t use and click OK
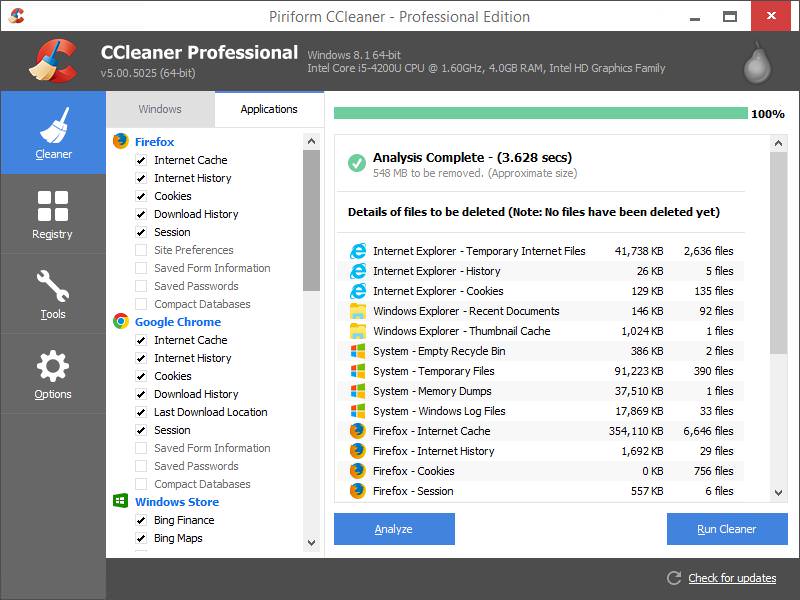
18. Use CCleaner Regularly
Over the time, every Windows system gets filled with temporary and junk data that increases file fragments and slows down the system. It’s best to get rid of such data on regular basis. However, the Disk Cleanup tool (discussed above) doesn’t clean all such data, and this is where CCleaner come in.
CCleaner is a disk cleanup tool that deletes temporary files, cookies, cache and other junk data that requires regular cleaning to keep the system running smoothly. To find and delete temporary and unneeded files using CCleaner, follow these steps:
- Download and install the CCleaner tool from its download page
- Launch CCleaner tool and then choose the Cleaner icon
- Select the things to clean and click Run Cleaner button
19. Fix Registry Errors
Windows Registry is a central repository of configurations of the complete system. With time, this database grows up significantly with unneeded or missing entries that results in slowdown of the registry, degrading overall performance of the system.
To avoid it, the registry should be cleaned regularly with a registry cleaner tool. CCleaner is one such tool that helps clean various types of problematic entries in the registry and even offers a backup for the registry before executing a clean up.
To fix registry errors using CCleaner, perform the following steps:
- Download and install CCleaner from its download page
- Open CCleaner and click on Registry icon on the right
- Select the issues to fix and click on Scan for Issues button
- After the scan is complete, click on Fix selected issues button

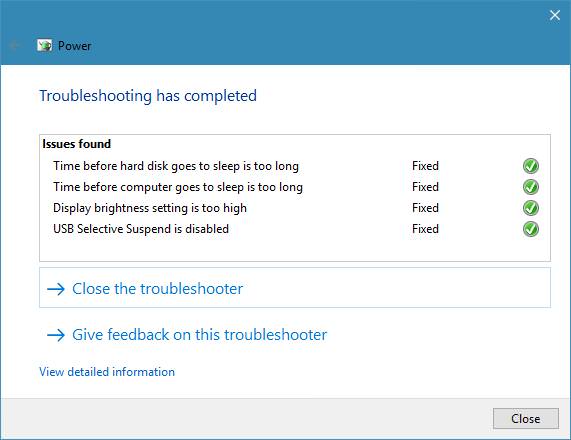
20. Use the Troubleshooter
Windows 10 has a built-in tool to find problems and solve them automatically without the user’s help. If there are issues affecting your PC but you can’t find them yourself, then it’s easy to find and fix those using the troubleshooting tool.
Moreover, if your system is under-performing, then there can be various reasons behind it, and finding these issues is a challenge in itself.
You can troubleshoot your system by following these steps:
- Right-click on the Start button and select Control Panel
- Click System and Security and under the Security and Maintenance, choose Troubleshoot computer problems option
- In the new window, look beneath the option System and Security, click on all three of them, one-by-one, and follow the onscreen instructions
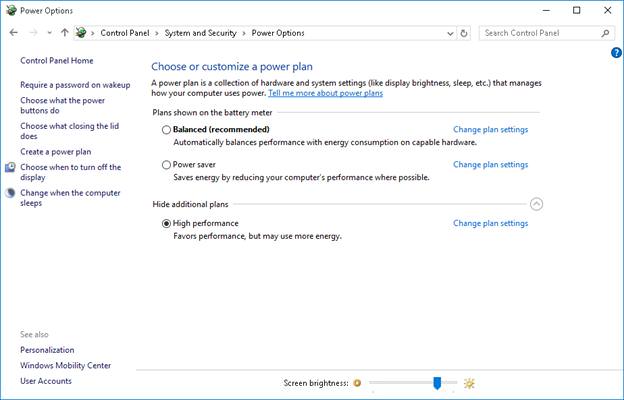
21. Opt High Performance Mode
Your PC might be working slow because you have diminished its capability to utilize the resources by opting for the power saving mode. To overcome this issue, use the power saving mode when it’s running on battery and go for high performance mode when it’s connected to a power socket.
To change power options to high performance mode, perform this:
- Right-click on the Start button, select the Control Panel, then click on System and Security
- Select Power Options and choose High performance (in case you don’t see this option, expand and look under Hide additional plans)
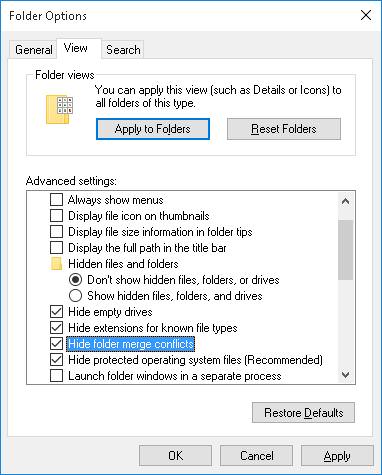
22. Customize File Explorer Options
Windows 10’s File Explorer has a number of options to improve the overall user experience that also affect the performance of the PC. Disabling the unrequired options improves the overall performance of your Windows and gives you a smooth experience, especially while using the explorer.
To configure file explorer options in Windows 10, follow these steps:
- Click Start, select File Explorer to open, and click the View tab
- Click on Options button and click on Change folder and search options
- A Folder Options dialog box opens, select the View tab and uncheck the following options under Advanced settings:
- Always show icons, never thumbnails
- Display file icon on thumbnails
- Display file size information in folder tips
- Show encrypted or compressed NTFS files in color
- Show pop-up description for folder and desktop items
- Show preview handlers in preview pane
- Under the same Advanced settings, check the following options:
- Hide empty drives
- Hide extensions for known file types
- Hide folder merge conflicts
- Hide protected operating system files (Recommended)
- Click OK to save the configuration changes
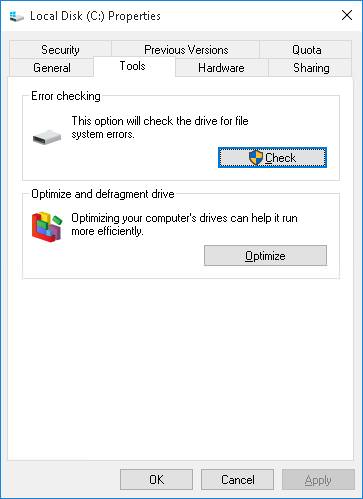
23. Error-check the Drive(s)
After tonnes of read/write operations, power failures and various other reasons, your computer’s disks may get corrupted or damaged at some of the places. This results in a slower system and can even cause hangups and freezes.
That’s why, it’s good to error-check the drives on regular basis with a disk checker. Follow these steps to run the error-checking on your disks:
- Open File Explorer, go to This PC and choose a drive
- Right-click the drive and select Properties from the context menu
- Switch to the Tools tab, then click on the Check button under Error checking
- Follow the on-screen instructions given on the new window to check the drive
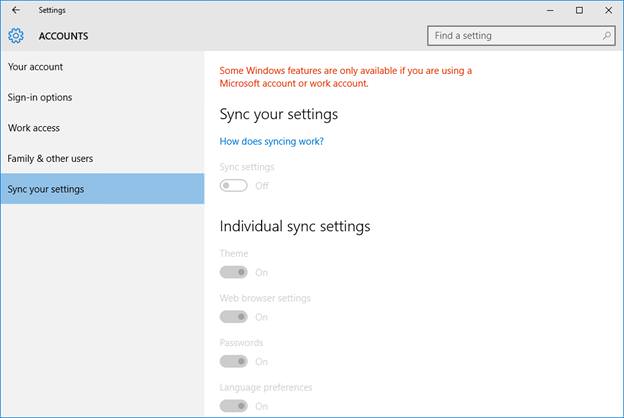
24. Disable Sync Feature
Windows 10 syncs many things like passwords, browser settings, system and language preferences etc. with your Microsoft account. Consequently, this feature consumes system resources and bandwidth of your web connection. So, consider disabling the sync feature, if you don’t need it, as it helps improve the performance.
To disable the Sync feature on a Windows 10 PC, perform these steps:
- Click on the Start > Settings > Accounts option
- In the left pane, select the last option Sync your settings
- Toggle off the Sync settings
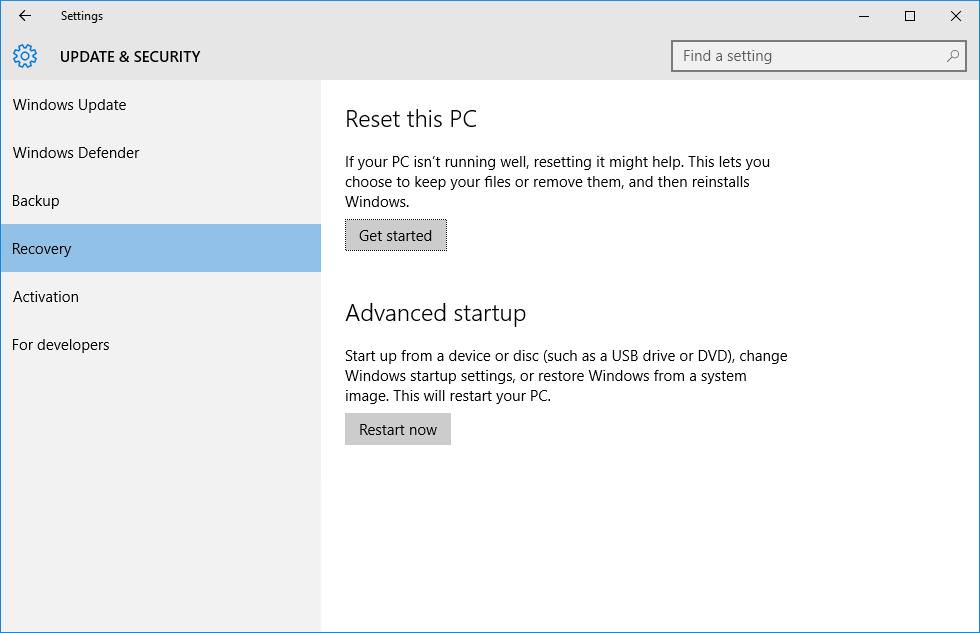
25. Reset your PC
If all of the above tips fail to help you fix your Windows 10, then the last solution is to reset your system. This option gets you a freshly installed configuration on your system. Note that although, this will cause no harm to your saved files, still, you won’t find your old software and configurations anymore.
Perform these steps to reset your PC:
- Open the Start menu > Setting > Update & Security
- In the window that appears, select Recovery in the left pane
- Under Reset this PC , click the Get started button to begin the process
Conclusion
Well, that was quite a detailed look at almost all the possible tips and tricks to speed up a Windows 10 system. Do share with us which among these helped you the most using the comments section. Also, if you know any more such tips, we’d love to hear from you as well.
Happy learning!
 !
!