
Ethical Hacking is fun and interesting, but there are a lot of things an Ethical hacker should be aware of. Such as, covering his tracks. And, one of the ways to do this is using a MacChanger. In this tutorial, I will teach you how to write a MacChanger with Python.
I will cover the following topics:
- Why Python for Ethical Hacking?
- What is a MacChanger?
- Installing PyCharm on Ubuntu
- Writing a MacChanger
Before writing a MacChanger, let’s see why we should use Python for Ethical Hacking.
Why Python for Ethical Hacking?
Ethical Hacking is the process of finding vulnerabilities in a system that an attacker can exploit and cause damage. And then, these results are used to improve the security of the network and the system. We already have many Ethical Hacking Tools available, so what’s the need for Python?
Python is used to Automate the process of Ethical Hacking . Ethical Hacking is not a one-step process. There are different Phases of Ethical Hacking and some of which you will have to conduct more than once. Ethical Hacking with Python makes this easy.
Suppose you want to test a website for vulnerabilities, you will have to run tests on the website. After you are done with this project, you might have to test another website. Now, you will have to follow the same steps from scratch. Python can be used here to automate these testing steps. So, you write the code once and use it every time you want to test a website.
Now that we know what we are dealing with, let’s understand what a MacChanger is!
What is a MacChanger?
Every networking device is assigned a MAC address by the device manufacturer which is helpful to communicate with other devices. A MAC address is hard-coded on the device and it is not possible to permanently change it. But, we can change it temporarily using a MacChanger. A MacChanger is a tool that changes the MAC address to the desired (or random) address until that device is rebooted. Once, the device is rebooted, the MAC address of that device will be set to its original MAC address.
Now that we know what a MacChanger is, let’s build this using Python!
For this tutorial on writing a MacChanger with Python, we will run our Python scripts in PyCharm, which is an integrated development environment. So, to run our Python Script, we need to install PyCharm first. Let’s see how to install PyCharm on Ubuntu.
Installing PyCharm on Ubuntu
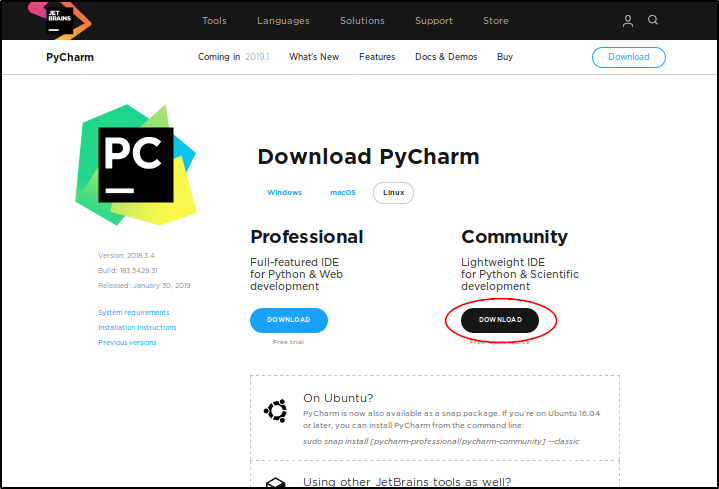
To install PyCharm on Ubuntu, first go to this link: https://www.jetbrains.com/pycharm/download/#section=linux
Here, you will find two Editions, and for this tutorial, we will use the Community Edition.
When you click on the download button, the download should start. After the download is completed, we will have to install PyCharm. By default, this file will be downloaded in the “ Downloads” directory. Open a terminal and run the following commands:
$ cd Downloads
$ tar -xvf pycharm-community-2018.3.4.tar.gz
Remember to replace the name of the file in the above command with the name of the file that is downloaded in your system.
The above command will extract the PyCharm files. And now, to run PyCharm, you will have to go into the pycharm-community-2018.3.4/bin folder and run the pycharm.sh file. To do this, run the following commands:
$ cd pycharm-community-2018.3.4/
$ cd bin/
$ ./pycharm.sh
When you run it for the first time, you will have to accept the Terms and Conditions. Once done, PyCharm will be up and running.
Now that we have installed PyCharm, let’s move on to writing a MacChanger.
Writing a MacChanger
You will write the MacChanger script in PyCharm. To start PyCharm, go to the directory where PyCharm was extracted and run the shell script.
$ cd pycharm-community-2018.3.4/
$ cd bin/
$ ./pycharm.sh
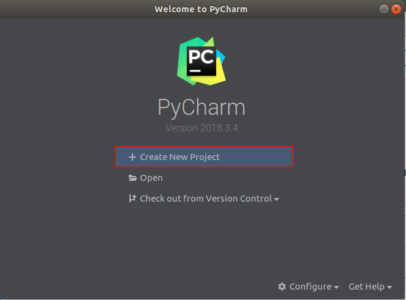
You will see the welcome screen of PyCharm. Click on “Create New Project”.

When you run it for the first time, you will have to accept the Terms and Conditions. Once done, PyCharm will be up and running.
Now that we have installed PyCharm, let’s move on to writing a MacChanger.
Writing a MacChanger
You will write the MacChanger script in PyCharm. To start PyCharm, go to the directory where PyCharm was extracted and run the shell script.
$ cd pycharm-community-2018.3.4/
$ cd bin/
$ ./pycharm.sh
You will see the welcome screen of PyCharm. Click on “Create New Project”.
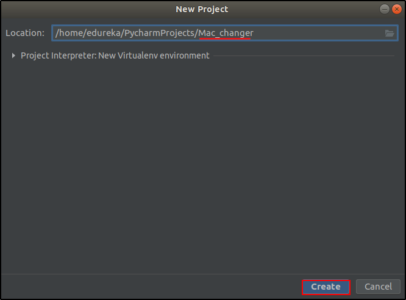
Enter a name for your project. I will name this Mac_changer. And then click “ Create “.
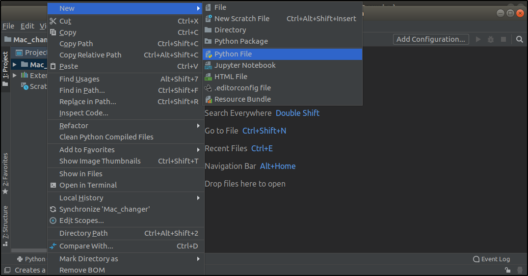
You will now see the workplace. Next, let’s create a Python file. To do this, right click on the project name, go to “ New ” and click on “ Python file “.
You can now write the python script here. But first, you should decide which network device you want to change the MAC address for. For this, open the terminal and run the following command:
$ ifconfig
You should see a list of the network interfaces and their respective MAC address. You might have different interface names or MAC addresses. When using the scripts in this blog, make sure you change the interface name to the one in your system. For this tutorial, I will change the MAC address of “ ens33 “.
The script to change the MAC Address is as follows:
import subprocess
subprocess.call([“sudo”,“ifconfig”,“ens33”,“down”]) subprocess.call([“sudo”,“ifconfig”,“ens33”,“hw”,“ether”,“00:11:22:33:44:55”])
subprocess.call([“sudo”,“ifconfig”,“ens33”,“up”])
I will be changing the MAC address to 00:11:22:33:44:55. Now run this script. To run the script, click on the “Run” tab at the top and click on “ Run “.
After running the script, to check whether the MAC address of the interface has changed or not, we will check the details again. Just run the ifconfig command in the terminal.
Do you see the change in the MAC address? The new MAC address is 00:11:22:33:44:55 . That’s how simple it is. Now whenever you need to change the MAC address, all you have to do is update the MAC address and/or the interface name in the Python script.
But this doesn’t make any difference or save much time right? I mean, it’s just 3 commands, we can do it manually. Why write a Python script for this?
Let me tell you how it can make a difference. Just think of the scenario where you will have to change the MAC address every 5 minutes. And suppose you are working for an hour, you will have to run these 3 commands 12 times. So, you will have to run 3 * 12 = 36 commands in total. Okay, now it seems too much, isn’t it?
Well, when you write the Python script, you can just run this script in a loop to change the MAC address every 5 minutes. Now you see how much time and effort you can save.
Congratulations! You have written a MacChanger in Python and seen it in action .