We’ve seen a rise in Virtual Private Network (VPN) usage over the last few years and the trend doesn’t seem to be slowing. More and more folks are wanting to get around region blocks, remote securely into their office network from the comfort of home, and play online games with servers located in different countries. With a VPN, this is all too easy.
The issues arise once you go looking for the right VPN. Which is the most efficient? The most secure? Do I go for a free setup or subscription plan? Figuring this sort of thing out can take up valuable time you simply don’t have. So why not create and connect to your own VPN?
Windows comes with the built-in ability to function as a VPN server, free of charge. It does this by using the point-to-point tunneling protocol (PPTP) and can be confusing to set up if you’re not too tech-savvy.
But to help you avoid the obstacle of finding “the perfect VPN” we’ll go ahead and walk you through how to set up and use Windows 10’s built-in VPN service.

How To Set Up & Use Windows 10’s Built-in VPN Service
The built-in Windows 10 VPN service is a rather interesting feature and one that comes with a few limitations. These limitations may make the process not very ideal for what you need a VPN for. As previously stated, a bit of tech knowledge is almost essential to move forward.
To get things rolling, it will take some network and port configuring on your end. The ability to forward ports from your router will be necessary. You also run the risk of exposing Windows and the port you choose for the server to malicious entry.
To help avoid this, you’ll want to consider using a different port than the default one used for PPTP. A strong password is also a must and should contain a mix of numbers, letters, and special characters.
The VPN Server
Creating a Windows 10 VPN server will take you into areas of which you may not be familiar.
- Begin by typing ncpa.cpl into the taskbar search and opening Network Connections . It may appear as a Control Panel item.
- With the Network Connections window opened, press the Alt key on your keyboard to reveal the menu tabs.
- Click the File tab to pull up the menu, and then select New Incoming Connection .

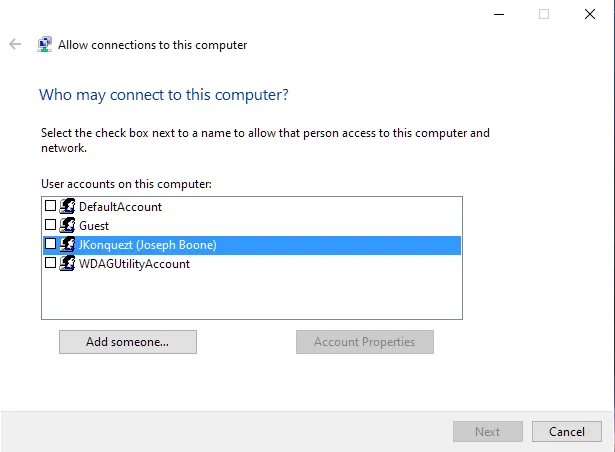
- Choose which user accounts you want to provide access to the VPN connection.
- From a security perspective, it may be wise to create a completely new, limited user account. This way you can protect your primary user account from potential exposure. To do this, click Add someone and fill out the username and password fields.
- With the user(s) selected, click the Next button.
- Select Through the Internet . Chances are good that it’s the only option but if you’re still unfortunate enough to have dial-up hardware, that option will be available too.
- The next window will have you selecting the network protocols you want to be enabled for incoming connections.
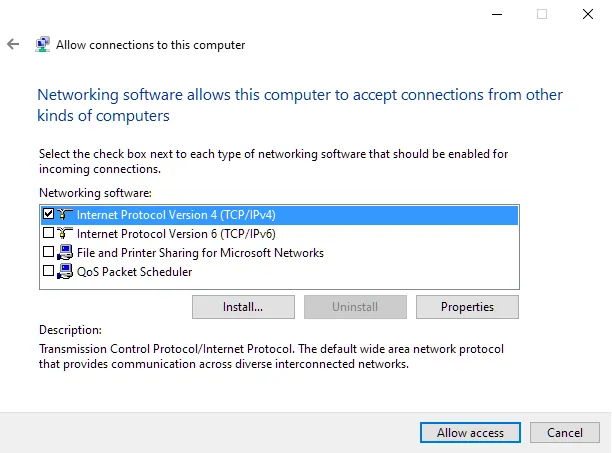
- Only check those you want access enabled and click Allow access .
- Access will be configured for the user(s) chosen and then display the information needed to do so. This could take a few seconds.
Your Windows 10 VPN server is now ready to go.
Configuring The Router
To ensure that the router knows which type of traffic to send out to the correct computer, you’ll need to set up port forwarding. This will require that you understand how to properly forward ports on your router.
Forward port 1723 to your computer’s (the one where the Windows 10 VPN server was set up) IP address. You can do all this by logging into your router’s setup page. To amp up your security, consider adding a port forwarding rule to the router. One which forwards a random external port to the internal port on your computer.
A firewall is also a valid option to allow only specified IP addresses access.
Creating a VPN Profile
Before you can create a VPN profile, you’re going to need either your computer’s public IP address or its dynamic DNS address. The former is your network’s IP address on the internet. The latter will only be available if you decided to set one up using a dynamic DNS service.
- Since we’re focusing on Windows 10, type VPN into the taskbar search and select the option that pops up.
- The “best match” will likely show as VPN options . Further down, if available, you can go directly to Add a VPN connection instead.
- In the Add a VPN connection window, you’ll need to fill out a few boxes.

- The “VPN provider” box should only have one option; Windows (built-in) .
- The “Connection name” can be anything you want. This will be what you see when you go to make the connection.
- In the “Server name or address” box, type the public IP address or dynamic DNS address.
- You can keep the “VPN type” as Automatic so long as you properly configured the port forwarding in the router. Point to Point Tunneling Protocol (PPTP) is also a viable option.
- Keep “Type of sign-in info” as User name and password .
- Once finished, click Save .
Making The Connection
Now that you have the server set up, the router configured, and a VPN profile, you can finally connect to your VPN.
- On the taskbar, to the far-right, select the Network icon.
- You may have to click on the Arrowhead (or Caret) icon to locate the Network icon.
- Select your recently created VPN profile and click on the Connect button.
- You should be prompted for a username and password. Use the ones you created for the user in the “The VPN server” section.
- If connected, you should see Connected just below the VPN connection name.
 !
!