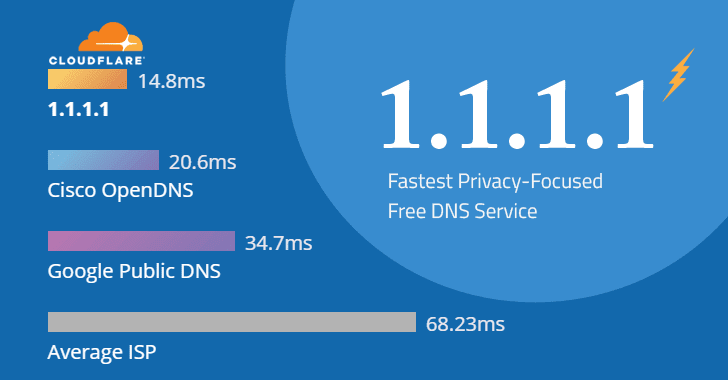
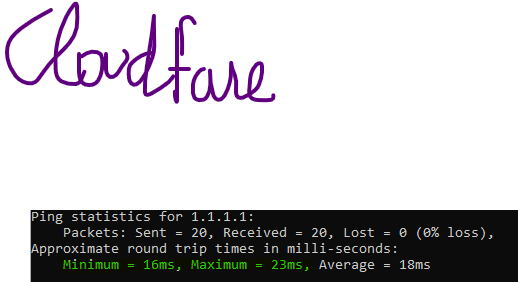
Cloudflare, a very well-known company launched 1.1.1.1—world’s fastest and privacy-focused secure DNS service that not only speeds up your internet connection but also makes it harder for ISPs to track your web history.
Cloudflare public DNS resolvers, 1.1.1.1 and 1.0.0.1 (as alternate DNS server for redundancy), support both DNS-over-TLS and DNS-over-HTTPS to ensure maximum privacy.
How To Setup 1.1.1.1 Privacy DNS Servers on your Device
Setup 1.1.1.1 DNS on Windows
- Click on the Start menu, then click on Control Panel .
- Click on Network and Internet .
- Click on Change Adapter Settings .
- Right click on the Wi-Fi network you are connected to, then click Properties .
- Select Internet Protocol Version 4 (or Version 6 if desired).
- Click Properties .
- Write down any existing DNS server entries for future reference.
- Click Use The Following DNS Server Addresses .
- Replace those addresses with the 1.1.1.1 DNS addresses:
- For IPv4: 1.1.1.1 and 1.0.0.1
- For IPv6: 2606:4700:4700::1111 and 2606:4700:4700::1001
- Click OK , then Close .
- Restart your browser.
- You’re all set! Your device now has faster, more private DNS servers

Setup 1.1.1.1 DNS Servers on Linux
While these steps are for Ubuntu, most Linux distributions configure DNS settings through the Network Manager. Alternatively, your DNS settings can be specified in /etc/resolv.conf
- Click the Applications icon on the left menu bar.
- Click Settings , then Network .
- Find your internet connection on the right pane, then click the gear icon.
- Click the IPv4 or IPv6 tab to view your DNS settings.
- Set the “Automatic” toggle on the DNS entry to Off .Provide the 1.1.1.1 DNS addresses in the DNS entries field:
- 1.0.0.1
- For IPv6: 2606:4700:4700::1111,2606:4700:4700::1001
- Click Apply , then restart your browser.
- You’re all set! Your device now has faster, more private DNS servers
Setup 1.1.1.1 DNS Servers on Android
Note that Android requires a static IP to use custom DNS servers. This setup requires additional setup on your router, affecting your network’s strategy for adding new devices to the network. We recommend configuring your Router’s DNS instead. This will give all devices on your network the full speed and privacy benefits of 1.1.1.1 DNS.
- Connect to your preferred wireless network.
- Enter your router’s gateway IP address in your browser.
- If prompted, fill in your username and password. This information may be labeled on the router.
- In your router’s configuration page, locate the DNS server settings.
- Write down any existing DNS server entries for future reference.
- Replace those addresses with the 1.1.1.1 DNS addresses:
- For IPv4: 1.1.1.1 and 1.0.0.1
- For IPv6: 2606:4700:4700::1111 and 2606:4700:4700::1001
- Save your settings, then restart your browser.
- You’re all set! Your device now has faster, more private DNS servers
Setup 1.1.1.1 DNS Servers for iOS / iPhones
- From your iPhone’s home screen, open the Settings app.
- Tap Wi-Fi , then tap your preferred network in the list.
- Tap Configure DNS , then tap Manual .
- If there are any existing entries, tap the – button, and Delete next to each one.
- Tap the + Add Server button, then type 1.1.1.1
- Tap the + Add Server button again, then type 1.0.0.1 . This is for redundancy.
- Tap the Save button on the top right.
- You’re all set! Your device now has faster, more private DNS servers
Setup 1.1.1.1 DNS Servers for MAC-OS
- Open System Preferences.
- Search for DNS Servers and select it from the dropdown.
- Click the + button to add a DNS Server and enter 1.1.1.1
- Click + again and enter 1.0.0.1 (This is for redundancy.)
- Click Ok , then click Apply .
- You’re all set! Your device now has faster, more private DNS servers
Setup 1.1.1.1 DNS Server for Routers
Your router’s configuration may vary. Consult your manual for more information.
- Connect to your preferred wireless network.
- Enter your router’s gateway IP address in your browser.
- If prompted, fill in your username and password. This information may be labeled on the router.
- In your router’s configuration page, locate the DNS server settings.
- Write down any existing DNS server entries for future reference.
- Replace those addresses with the 1.1.1.1 DNS addresses:
- For IPv4: 1.1.1.1 and 1.0.0.1
- For IPv6: 2606:4700:4700::1111 and 2606:4700:4700::1001
- Save your settings, then restart your browser.
- You’re all set! Your device now has faster, more private DNS servers

 !
!