What is Wireshark?
Wireshark is a network packet analyzer. A network packet analyzer presents recorded packet information as much detail as you can. You could think about a network packet analyzer as a measuring apparatus for analyzing what is happening within a network cable, exactly like an electrician utilizes a voltmeter for analyzing what is occurring inside an electrical cable (but in a high degree, obviously ). Previously, such tools were very costly, proprietary, or even both. But, with the dawn of Wireshark, that’s shifted. Wireshark is readily available free of charge, is open source, and is among the greatest package analyzers available now.
Running the Wireshark
When you run the Wireshark program, the Wireshark graphical user interface shown in Figure 2 will de displayed. Initially, no data will be displayed in the various windows.
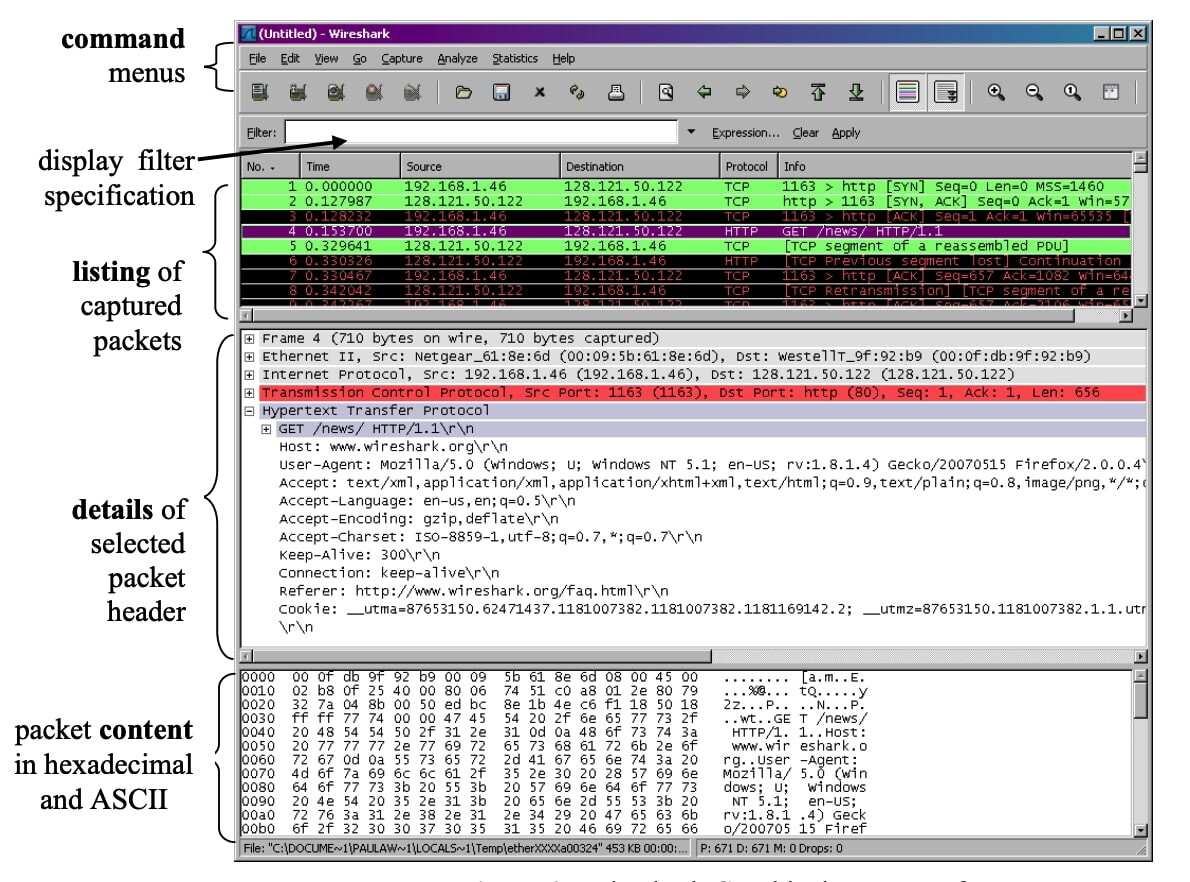
The Wireshark interface has five major components:
- The command menus are standard pulldown menus located at the top of the window. Of interest to us now are the File and Capture menus. The File menu allows you to save captured packet data or open a file containing previously captured packet data, and exit the Wireshark application. The Capture menu allows you to begin packet capture.
- The packet-listing window displays a one-line summary for each packet captured, including the packet number (assigned by Wireshark; this is not a packet number contained in any protocol’s header), the time at which the packet was captured, the packet’s source and destination addresses, the protocol type, and protocol-specific information contained in the packet. The packet listing can be sorted according to any of these categories by clicking on a column name. The protocol type field lists the highest level protocol that sent or received this packet, i.e., the protocol that is the source or ultimate sink for this packet.
- The packet-header details window provides details about the packet selected (highlighted) in the packet listing window. (To select a packet in the packet listing window, place the cursor over the packet’s one-line summary in the packet listing window and click with the left mouse button.). These details include information about the Ethernet frame (assuming the packet was sent/receiver over an Ethernet interface) and IP datagram that contains this packet. The amount of Ethernet and IP-layer detail displayed can be expanded or minimized by clicking on the plus-or-minus boxes to the left of the Ethernet frame or IP datagram line in the packet details window. If the packet has been carried over TCP or UDP, TCP or UDP details will also be displayed, which can similarly be expanded or minimized. Finally, details about the highest level protocol that sent or received this packet are also provided.
- The packet-contents window displays the entire contents of the captured frame, in both ASCII and hexadecimal format.
- Towards the top of the Wireshark graphical user interface, is the packet display filter field, into which a protocol name or other information can be entered in order to filter the information displayed in the packet-listing window (and hence the packet-header and packet-contents windows). In the example below, we’ll use the packet-display filter field to have Wireshark hide (not display) packets except those that correspond to HTTP messages.
Taking Wireshark for a Test Run – Wireshark Tutorial
The best way to learn about any new piece of software is to try it out! We’ll assume that your computer is connected to the Internet via a wired Ethernet interface. Do the following:
Step 1: Start up your favorite web browser, which will display your selected homepage.
Step 2: Start up the Wireshark software. You will initially see a window similar to that shown in Figure 2, except that no packet data will be displayed in the packetlisting, packet-header, or packet-contents window, since Wireshark has not yet begun capturing packets.
Step 3: To begin packet capture, select the Capture pull down menu and select Options. This will cause the “Wireshark: Capture Options” window to be displayed, as shown in Figure 3.

Step 4: You can use most of the default values in this window, but uncheck “Hide capture info dialog” under Display Options. The network interfaces (i.e., the physical connections) that your computer has to the network will be shown in the Interface pull down menu at the top of the Capture Options window. In case your computer has more than one active network interface (e.g., if you have both a wireless and a wired Ethernet connection), you will need to select an interface that is being used to send and receive packets (mostly likely the wired interface). After selecting the network interface (or using the default interface chosen by Wireshark), click Start. Packet capture will now begin – all packets being sent/received from/by your computer are now being captured by Wireshark!
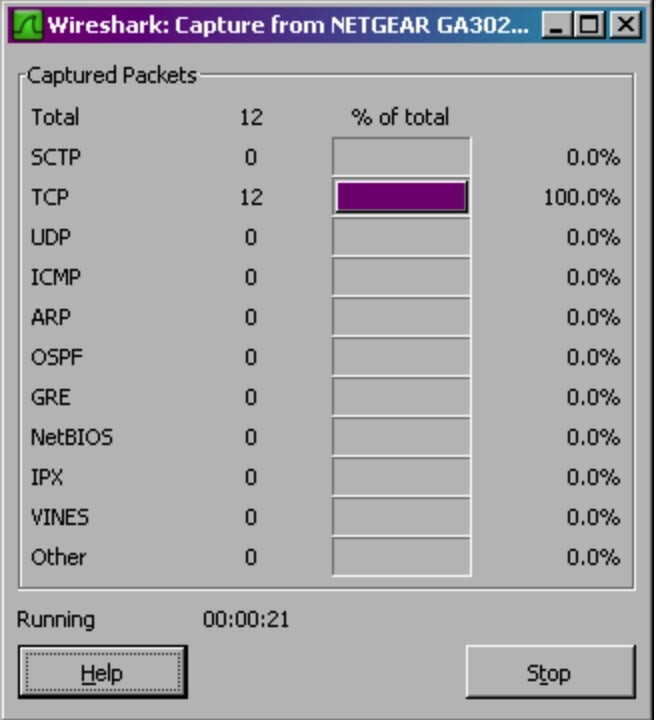
Step 5: Once you begin packet capture, a packet capture summary window will appear, as shown in Figure 4. This window summarizes the number of packets of various types that are being captured, and (importantly!) contains the Stop button that will allow you to stop packet capture. Don’t stop packet capture yet.
Step 6: While Wireshark is running, enter the URL: http://gaia.cs.umass.edu/wireshark-labs/INTRO-wireshark-file1.html and have that page displayed in your browser. In order to display this page, your browser will contact the HTTP server at gaia.cs.umass.edu and exchange HTTP messages with the server in order to download this page, as discussed in section 2.2 of the text. The Ethernet frames containing these HTTP messages will be captured by Wireshark.
Step 7: After your browser has displayed the INTRO-wireshark-file1.html page, stop Wireshark packet capture by selecting stop in the Wireshark capture window. This will cause the Wireshark capture window to disappear and the main Wireshark window to display all packets captured since you began packet capture. The main Wireshark window should now look similar to Figure 2. You now have live packet data that contains all protocol messages exchanged between your computer and other network entities! The HTTP message exchanges with the gaia.cs.umass.edu web server should appear somewhere in the listing of packets captured. But there will be many other types of packets displayed as well (see, e.g., the many different protocol types shown in the Protocol column in Figure 2).
Even though the only action you took was to download a web page, there were evidently many other protocols running on your computer that are unseen by the user. We’ll learn much more about these protocols as we progress through the text! For now, you should just be aware that there is often much more going on than “meet’s the eye”!
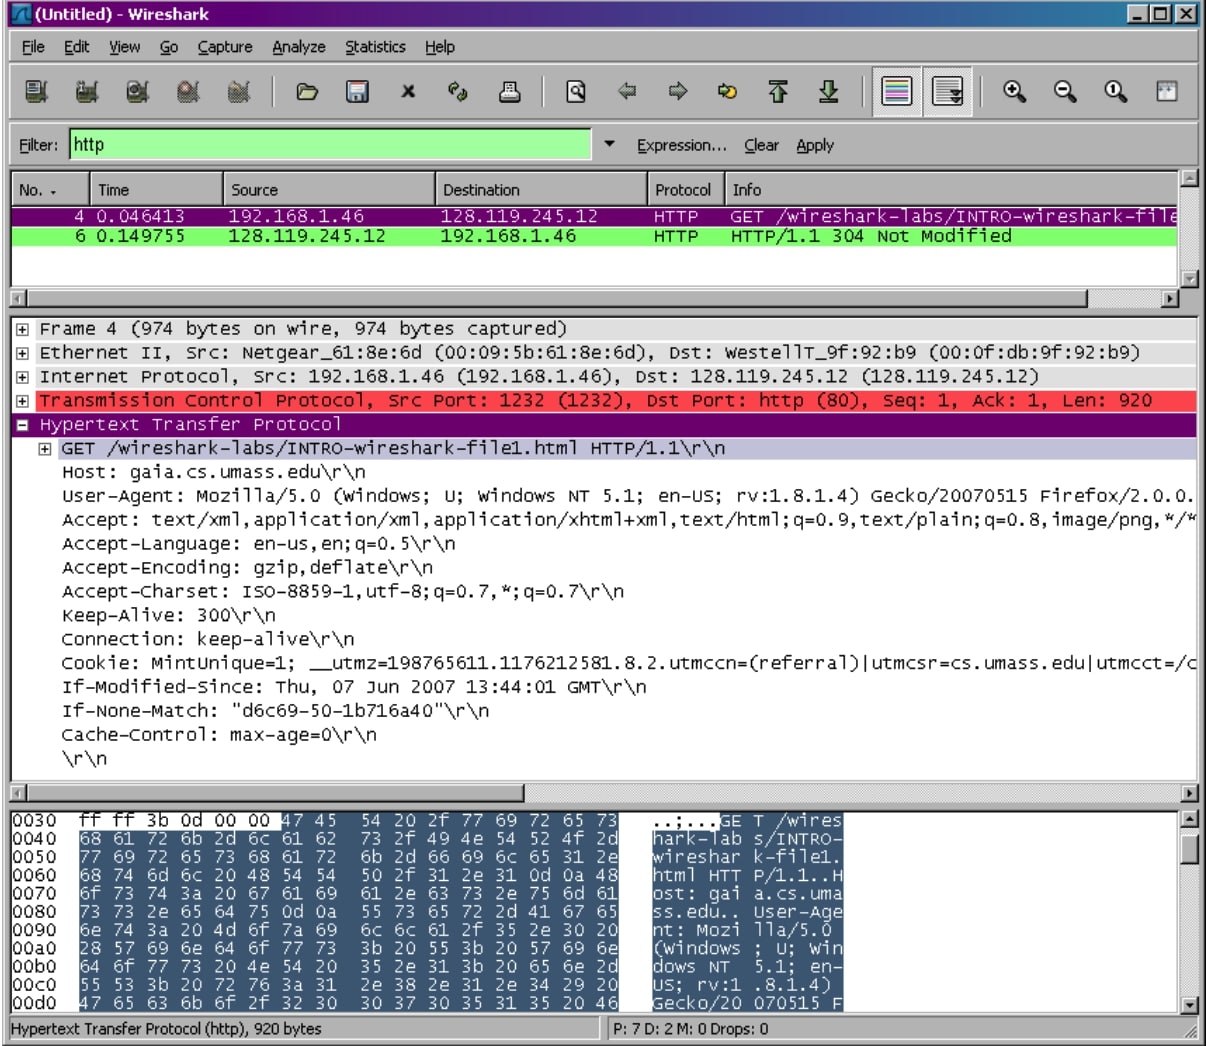
Step 8: Type in “http” (without the quotes, and in lower case – all protocol names are in lower case in Wireshark) into the display filter specification window at the top of the main Wireshark window. Then select Apply (to the right of where you entered “http”). This will cause only HTTP message to be displayed in the packet-listing window.
Step 9 : Select the first http message shown in the packet-listing window. This should be the HTTP GET message that was sent from your computer to the gaia.cs.umass.edu HTTP server. When you select the HTTP GET message, the Ethernet frame, IP datagram, TCP segment, and HTTP message header information will be displayed in the packet-header window3 . By clicking plusand-minus boxes to the left side of the packet details window, minimize the amount of Frame, Ethernet, Internet Protocol, and Transmission Control Protocol information displayed. Maximize the amount information displayed about the HTTP protocol. Your Wireshark display should now look roughly as shown in Figure 5. (Note, in particular, the minimized amount of protocol information for all protocols except HTTP, and the maximized amount of protocol information for HTTP in the packet-header window).
That’s it for the beginners Wireshark tutorial. Hope you have learned something from this tutorial. (Source: thetechrim)
Happy learning!