Windows File Explorer is one of the most-used native tools in Windows 10. Since it’s the go-to tool for browsing, finding, and managing your files, you must master its skills if you care about productivity. And I think you do, right?
Well, through this post, I’ll help you utilizes the File Explorer to its full potential. In this write-up, I am going to share the handiest tips and tricks for making the most use of this underused tool on Windows. (Source: hongkiat)
How to Delete File Browsing History
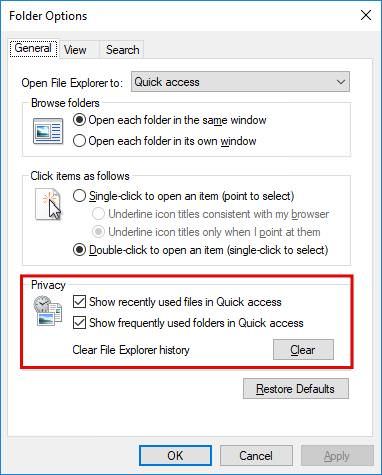
The File Explorer, by default, shows a list of recently accessed files and folders. Indeed, it is handy, but you might want to clear the file history if you share your computer with others and don’t wish them to check your files — for any reason. That said, here are the steps to delete the file history:
- Go to File Explorer > File > “Change folder and search options“.
- Switch to the General tab and check under Privacy.
- Click the Clear button to delete the current file history.
- Or you can uncheck “Show recently used files in Quick access” and “Show frequently used folders in Quick access” to disable history.
How to Disable Adverts from Microsoft
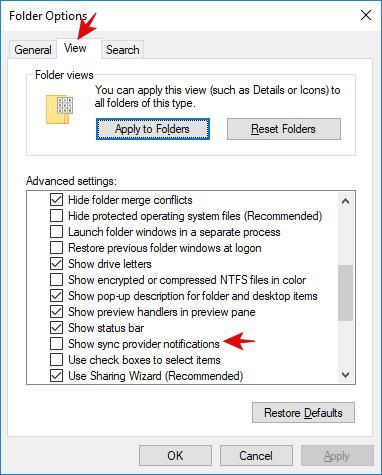
Do you see any type of ads in the File Explorer (maybe about Microsoft Office)? Even if you don’t see them, it is still a good idea to turn the option off and remain unbothered by any sort of advertisements in the future. It’s quick to do:
- Open the File Explorer, and click the menu named File.
- Click on “Change folder and search options“, then switch to the View tab.
- Under “Advanced Settings“, uncheck “Show sync provider notifications“.
- Then, click OK to save the changes.
How to Unlock Extra Items in Sidebar
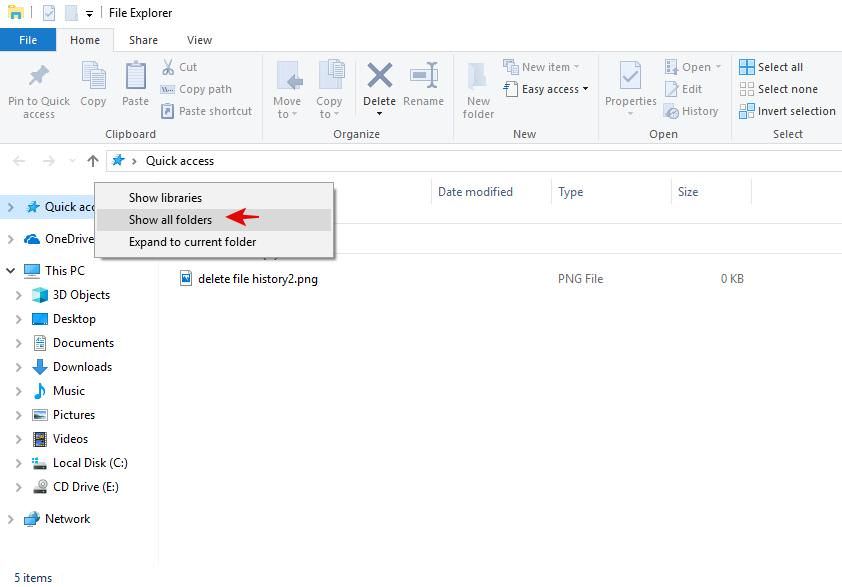
Do you find Recycle Bin and Control Panel missing in the File Explorer? By default, the File Explorer’s sidebar has categories like Quick Access, This PC, and Network. You can unlock a few hidden items by following these steps:
- In the File Explorer, right-click on any blank space in the sidebar.
- Then from the menu that appears, choose “Show all folders“.
How to Hide Cloud Services in Sidebar
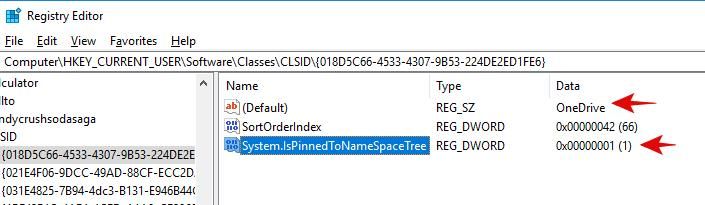
All the cloud services including OneDrive appear in the left-hand navigation pane of the File Explorer; however, you can remove them from the sidebar by tweaking the Windows Registry. Follow these steps carefully to do it:
- Press Win + R, then type
regedit. - In the Registry Editor, go to Edit > Find.
- Type “IsPinned” in the text field and click “Find Next“.
- Now, double-click System.IsPinnedToNameSpaceTree.
- Then, change “Value data” to 0. Finally, click the OK button.
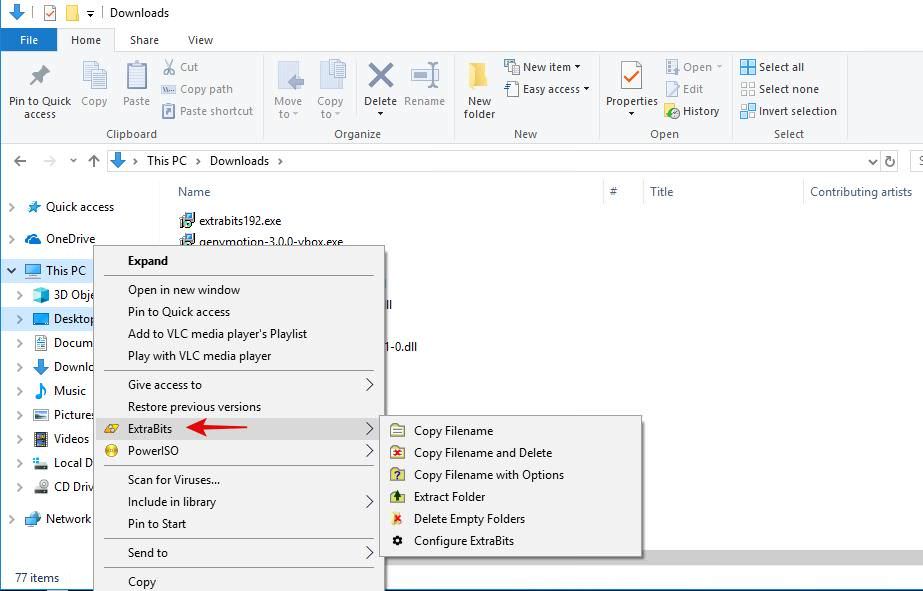
How to Add Context Options with ExtraBits
ExtraBits is an extension for File Explorer that enhances the right-click context menu with various features. These options can help you copy filenames, rename files in bulk, delete empty folders, extract an archive, and a lot more.
- First of all, you need to download ExtraBits and run its installer.
- Then, just right-click on a single file or folder or even multiple of them, go to ExtraBits, and select one of the commands.
- Moreover, you can click “Configure ExtraBits” among those options to customize the options shown under ExtraBits.
How to Add File Types to New Options
You can add a new file from anywhere in the File Explorer, thanks to the context menu named New. However, this list contains only a few certain file types, which may not fulfill your requirements — now and then. Fortunately, you can add more types; follow the below steps to add file types to the context menu:
- Open Notepad and paste the given code after replacing “ABC” with the required file type’s extension like CSS, HTML, PDF, ZIP, etc.
Windows Registry Editor Version 5.00 [HKEY_CLASSES_ROOT.ABC\ShellNew] “NullFile”=“”

- Now, save the file as “filetype.reg” anywhere and close it.
- Then, open the file again and click Yes to edit the registry.
- Great job! Finally, right-click and check the New options to find the new file type you just added (I added the option for quick-creating HTML files). In case you don’t find it, please restart your system, then check it.
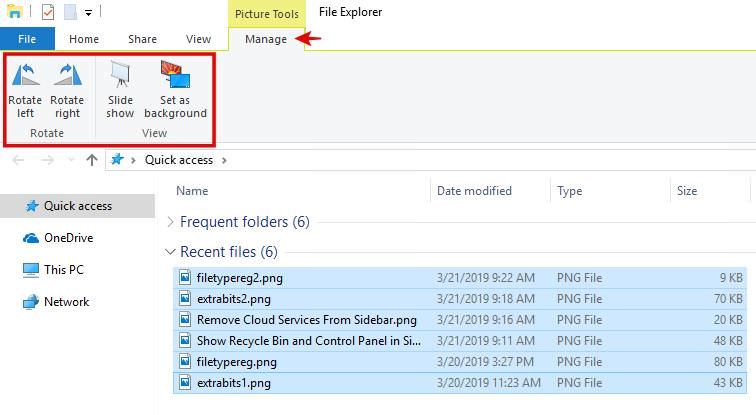
How to Rotate Pictures Quickly & Directly
Do you have pictures on your computer that you want to rotate? It is possible to rotate individual pictures or in bulk inside the File Explorer. Try these steps:
In the File Explorer, select the photos to rotate. On the Ribbons, under Manage, click “Rotate left” or “Rotate right” per your needs. It helps you to quickly rotate photos without opening them or using one of the third-party photo editors.
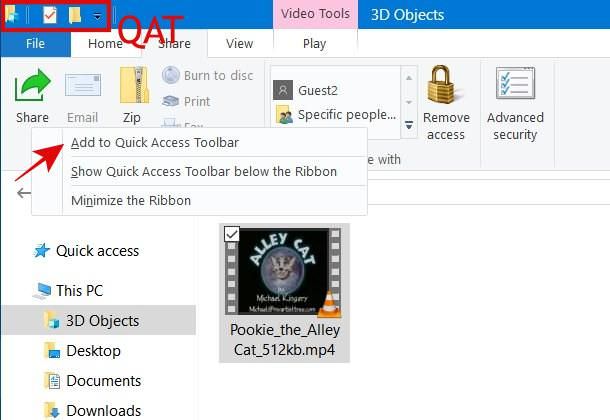
How to Add Options to Quick Access
The Quick Access Toolbar (QAT) is a customizable toolbar of quick actions present at the top left of the File Explorer. You can add a command or any folder-specific operation like “Empty Recycle Bin” from the Ribbon options. All you need to do is right-click it and select “Add to Quick Access Toolbar“.
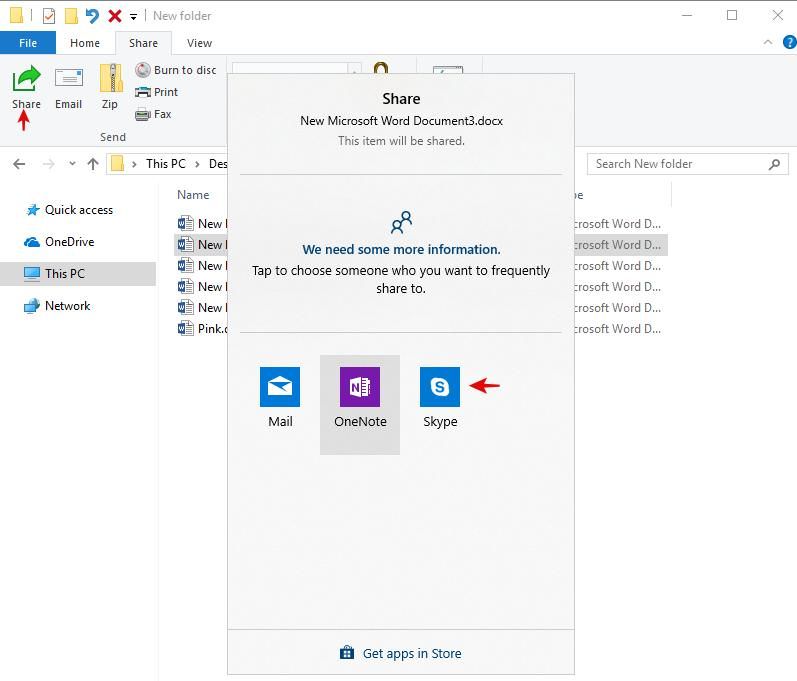
How to Share Files right from Explorer
Do you need to share a file quickly with someone? You can use the Share option in the File Explorer to share directly from your file explorer. Here are the steps to share files from the File Explorer in Windows 10:
- First, browse to and select the files or folders you want to share.
- Then, click the Share tab on the Ribbons > Share button.
- Now**,** select the sharing method and follow the directions.
How to Restore Explorer Windows at Logon
Do you have a list of folders — maybe your music or office folders — that you open every time you start your computer? You can save some time by asking the File Explorer to open them automatically for you. Do these steps to auto-open the folders that were opened during logging off or shutting down:
- In the File Explorer, under the File menu.
- Click “Change folder and search options“, then, click on View.
- Under “Advanced Settings“, check the option named “Restore previous folder windows at logon” and click the OK button.
- Finally, open a few folders in the File Explorer, then log off or shut down your system and log in again to see the magic yourself.

How to Experience Smoother File Explorer
What do you do when a folder window stops responding? You would restart the task using the Task Manager or restart Windows 10, right? What if I tell you that there is a handy trick to avoid it from crashing or getting stuck? You can improve the stability of the File Explorer by following these steps:
- Open the File menu in the File Explorer.
- Click “Change folder and search options“, then click on View.
- Under “Advanced Settings“, check “Launch folder windows in a separate process“, then click the OK button. That’s it; now enjoy!

How to Copy or Move via Address Bar
You can always cut or copy files and folders and paste them to a different folder. Do you usually cut-paste or copy-paste files from a child folder to a parent folder? Here’s a neat trick that will save you some time:
- In the File Explorer, select the file(s) you want to move and drag them to the parent in the address bar to move them.
- If you wish to copy them instead, just hold down Ctrl while you’re dragging and dropping the files or folders.
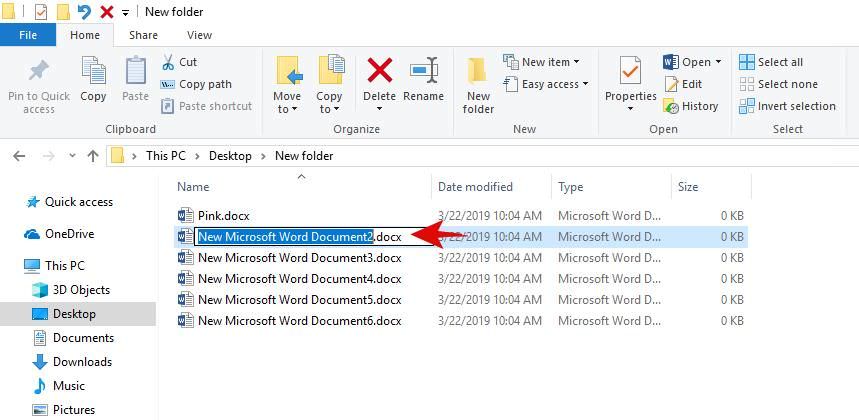
How to Rename Multiple Files Instantly
How do you rename files? Do you find it time-consuming? Windows File Explorer has a handy file-rename feature, which is hardly known, unfortunately. Among the two methods, the first one needs you to select all files or folders and click F2 to rename them in the numbered order like “File (1)”, “File (2)”, etc.
However, the second one is more sophisticated. It can help you rename all files individually but faster than the traditional method. It goes like this:
- In the File Explorer, copy or move all files or folders in a single folder.
- Then, press F2 to rename and then Tab to jump to the next file. Do note that you must press only Tab and not Enter after renaming a file.
- You need to keep renaming until all the files have been renamed.
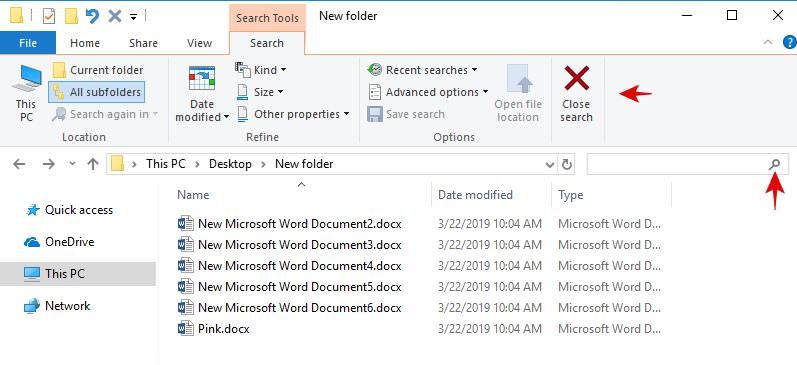
Using Advanced Search Options
Windows File Explorer has a powerful search box which lets you search files in any folder or the complete system. Moreover, you get additional features under Search in the Ribbons when you click the Search box. This toolbar helps you to add extra filters to your search like “Date Modified“, Kind, Size, etc.
The “Advanced options” option lets you extend your search to hidden or system folders. Additionally, once the required file appears in the search results, you can right-click it to choose “Open file location” to quick-jump to its directory.
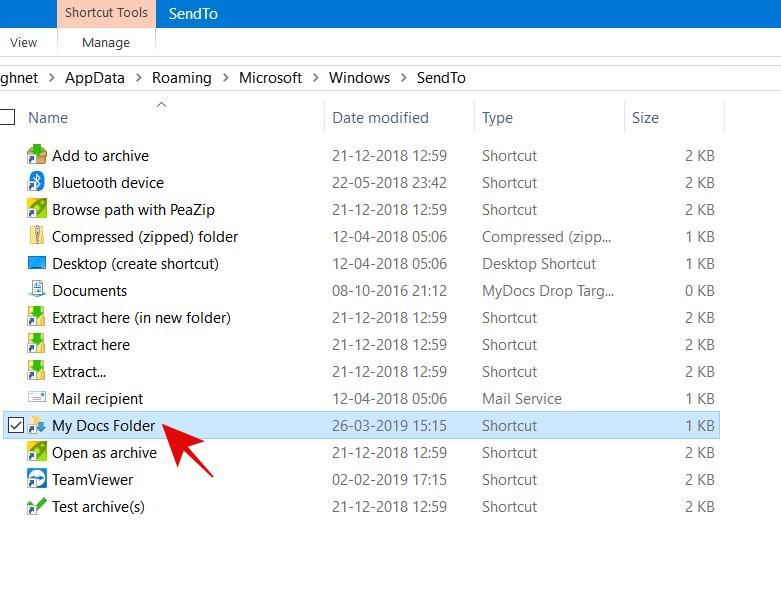
How to Personalize Send-To Menu
The File Explorer has a “Send to” option in its context menu. You can customize the options here to make it more useful to you. For example, let’s say you usually store documents in a folder, so you can add this folder to this menu and transfer files instantly using “Send to“. Simply follow these steps to do it:
- Press Win + R to launch Run.
- Type
shell:sendtoand press Enter. - This will open the folder with the shortcuts in the “Send to” menu.
- You can add and remove send-to options by adding or removing the shortcuts in this folder. For example, for the above example, I just created a shortcut of the folder to hold documents and paste it there.
Bonus: Keyboard Shortcuts
Did you know? It is much easier to navigate the File Explorer using keyboard shortcuts and get common tasks done quickly. I believe keyboard shortcuts are a must for every ‘productivity ninja‘. So, here are the must-know ones for you:
| Shortcut Keys | Action in the File Explorer |
|---|---|
| Win + E | Launch the File Explorer |
| F11 | Minimize and maximize it |
| F3 | Search for files and folders |
| F4 | Jump to the address bar |
| Ctrl + Shift + N | Create a new folder |
| Ctrl + N | Open the folder in a new window |
| Alt + → | View next folder |
| Backspace or Alt + ↠| View the previous folder |
| Tab | Step through each element |
| Num Lock + + | Show contents of a folder |
| Num Lock + – | Collapse a folder |
| Num Lock + * | Show subfolders |
| ↑, ↓, â†Â, and → | Navigate around files and folders |
| Alt + Enter | Display Properties for an item |
Happy learning!