Dropbox is ridiculously simple of all cloud storage solutions along with being quite powerful at the same time. So, in this post, I am going to highlight various hidden tips and tricks to gain control of Dropbox and do much more than just placing files and syncing them. Let’s check them out.
Here is a shortcut to each tip that’ll be covered in this article:
- Request files from anyone, get them in Dropbox
- Preview almost any file formats
- Re-access deleted (or left) shared folder
- Check files’ recent activities
- Work on files as team
- Access files without Internet
- Boost synchronisation speed
- Delete files without leaving tracks
- Access older versions of files
- Smart bookmarks with Dropbox
- Get direct download links
- Share screenshots on the fly
- Sync only files and folders you need
- Check Dropbox files activities
- Auto-sync your memories
1. Request files from anyone, get them in Dropbox
If you think only you can upload files to your Dropbox, then you’re wrong. File Requests feature allows you to collect and receive files – big or small – from anyone right into your Dropbox. And the more interesting thing is that through this feature even the people who don’t have an account on Dropbox can send you files .
Just follow these simple steps to request files anonymously :
- Log in to your Dropbox.
- Open “File requests” from the left sidebar.
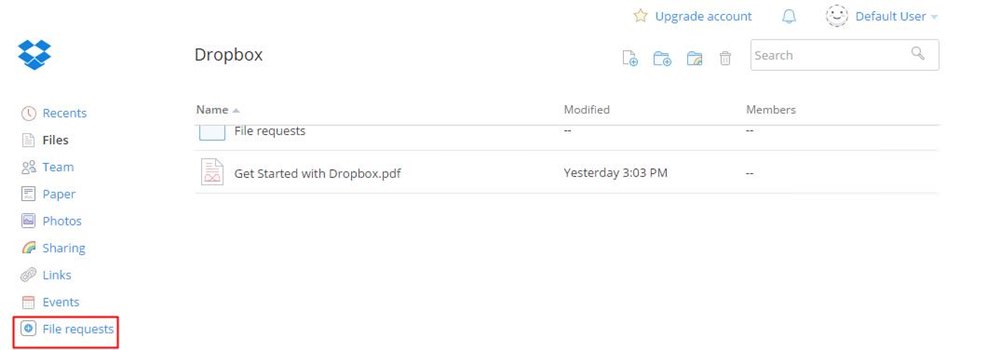
- Click on to “Create a file request” .
- Write a small description of your request, and click “Change folder” to set the folder for storing the requested files. Then click “Next” .

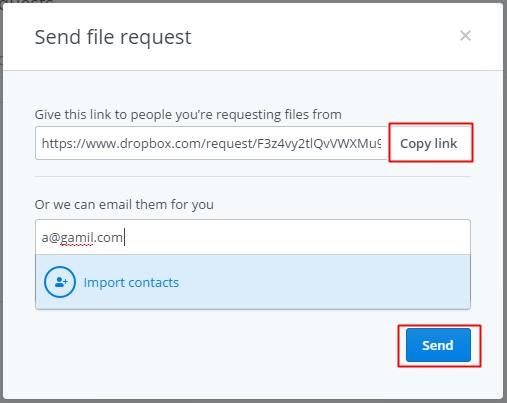
- Now copy the given link and share with anyone you want to receive the files from. You can also enter their emails and click “Send” to send them an invitation directly.
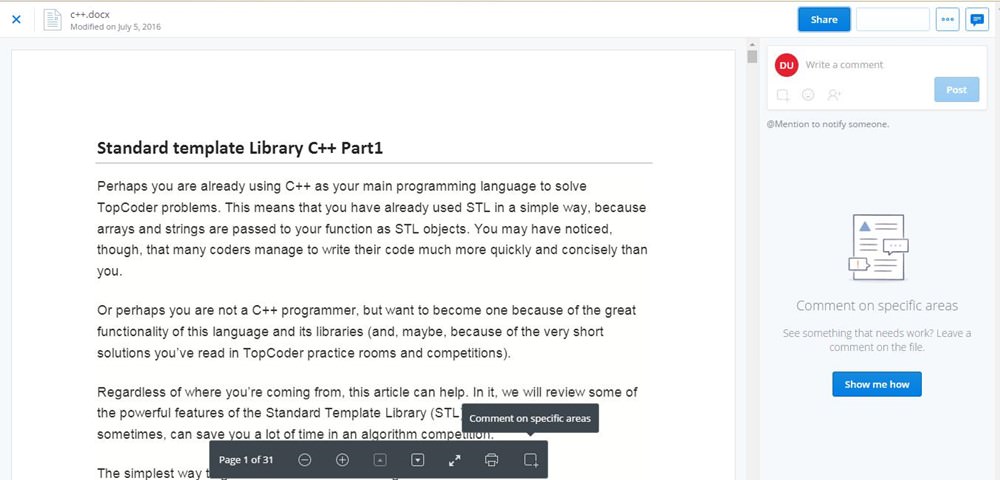
2. Preview almost any file format
If you got a file from a friend and your computer can’t open that file , then just upload it to your Dropbox. Its “file preview” feature can give you a preview of many types of files including PDF, PSD, AI, PNG, JPG, SVG, BMP and a lot more.

You can also read and edit your docs, sheets, and presentations with a simple integration with Office Online – a free basic version of Microsoft Office that runs in your browser.
Here’s how to preview or edit files directly in Dropbox:
- Open any file in Dropbox.
- In the preview window, click on the arrow next to “Open” button.
- Choose among “Microsoft Word/Excel/PowerPoint Online” to edit the file.
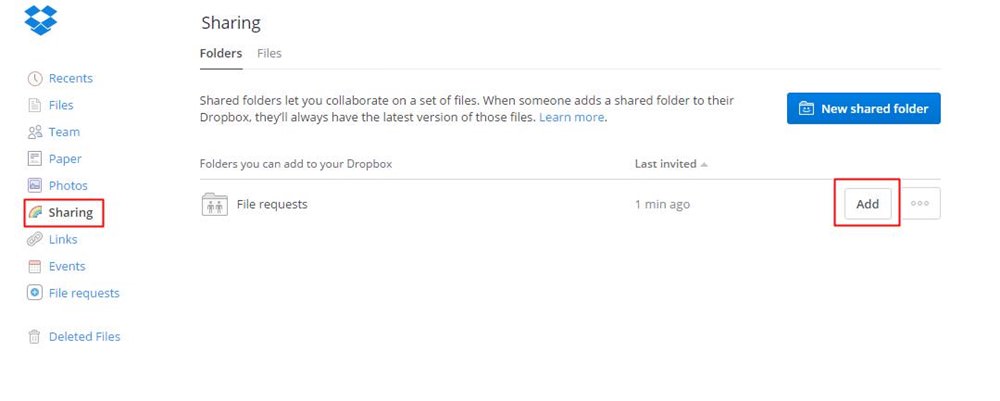
3. Re-access deleted (or left) shared folder
It is possible to access a shared folder that you left accidentally or otherwise by deleting it from your Dropbox. Simply follow the steps below:
- Click “Sharing” in the left sidebar.
- Below “Folders you can add to your Dropbox” section select the folder that you want to re-join and click “Add” .
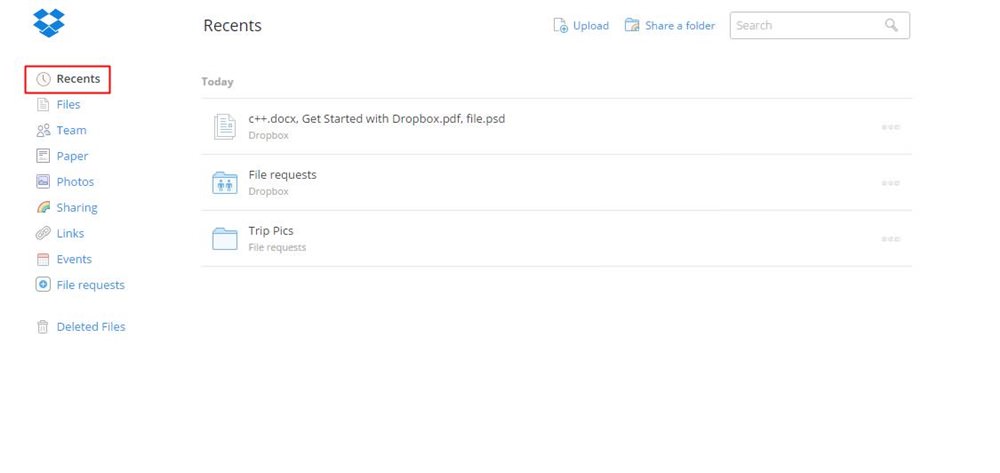
4. Check recent activities of your files
If you need to update the spreadsheet you worked on before vacations, you can easily find it in the list of all recent files from “Recents” in the left sidebar. This section in Dropbox shows an updated list of files that you have opened or modified recently .
You can also share, download, comment, delete or even view previous versions of your files directly from this option.
5. Work on files as team
If you work in a team or collaborate with others on a project , then Team Dropbox is for you. This feature allows you to work in a team where one can share files with whole team or selected groups, and everyone has different privileges . And the best part is that it’s free!
Each free team shares one team folder with configuration options to organize and manage access to the shared content. You can also create groups to share files or folders with everyone in the group at once – quite similar to Friend Lists in Facebook.
Here’s how to create a new Team Dropbox account :
- In Dropbox, click the “Team” option from the left sidebar and click “Create free team” .
- Enter the team’s name, choose “Create a new Team Dropbox” and type in your personal/work email address and password for this team, then click “Continue” .

- Invite members to join your team (if needed) and click “Continue” .
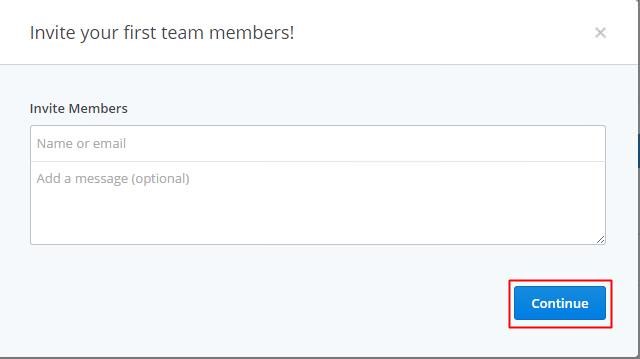
- Click “Create team Dropbox” and you’re done.
6. Access files without Internet
While you’re on the go (i.e., using a mobile device), you may need access to some specific files. However, you may not find an Internet connection everywhere you go. For such scenarios, Dropbox’s Offline feature comes to your rescue.
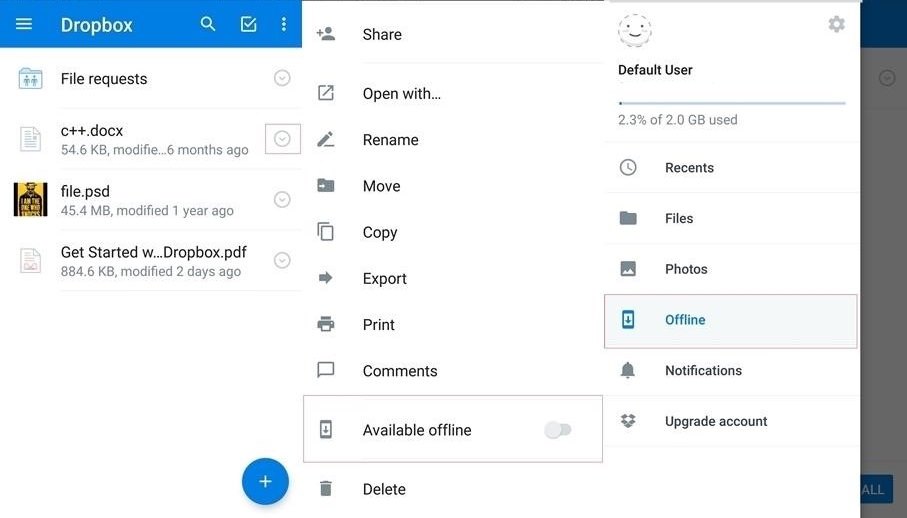
For your must-have files, this is how you can get them offline :
- In Dropbox’s mobile app, find the files you need to view offline .
- Tap the icon on right and switch on the “Available offline” toggle, and Dropbox will download the files to your device for you to view them without Internet.
- You can view the offline files, by clicking on “Offline” .
7. Boost synchronisation speed
To avoid interfering with your Internet usage , Dropbox automatically throttles itself to 75% of your connection’s maximum upload speed to prevent any noticeable speed slowdown for you. This means slow upload/sync speed for you, but here’s a trick to avoid the same.
If you’d like to change Dropbox’s bandwidth settings , follow the steps below:
- Right-click the Dropbox icon in the system tray.
- Click the gear icon and select “Preferences” from the menu.
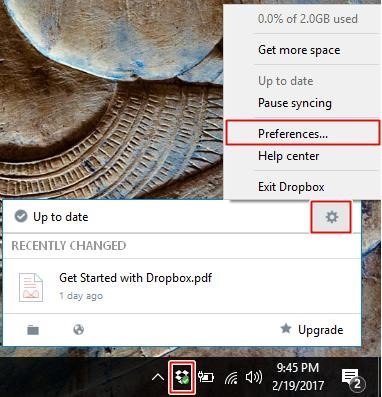
- Click on the " Bandwidth " tab.
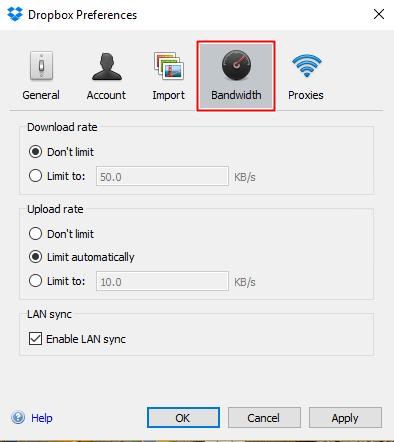
- Select “Don’t limit” under “Upload rate” to speed up the upload/sync process.
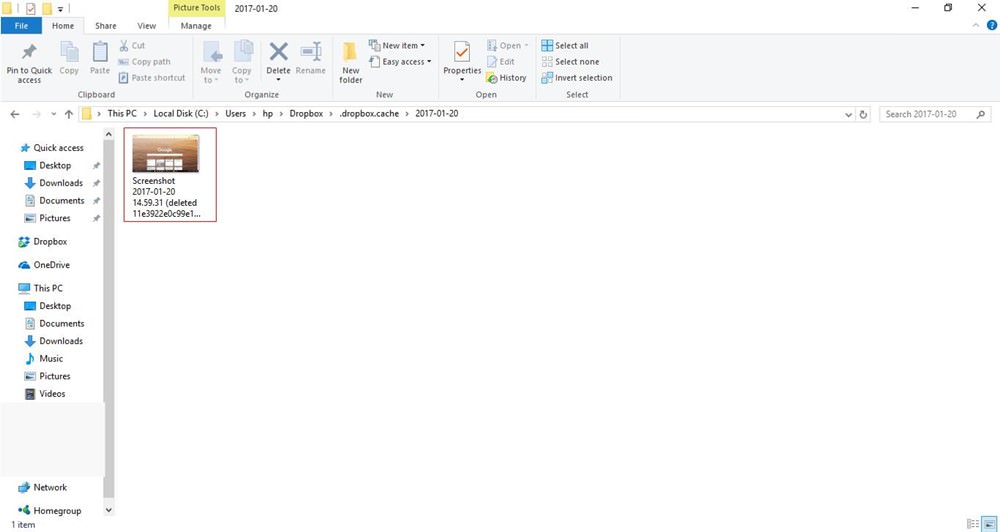
8. Delete files without leaving tracks
If you wrongly placed a sensitive file in your Dropbox folder but need to delete the file urgently , then don’t worry, you can do it by clearing the Dropbox’s cache folder. It’s a hidden folder named “.dropbox.cache” inside “Dropbox” folder.
Dropbox keeps a cache of files for efficiency and emergency purposes. If you delete a file from your Dropbox, the file may still be held in the cache folder .
To delete sensitive files permanently , you can manually clear the cache using below steps:
- Open the file manager, and enter the following in the location bar and click Enter: “%HOMEPATH%\Dropbox.dropbox.cache” (without quotes).
- This will take you directly to the Dropbox’s cache folder from where you can delete the files or folders you want.
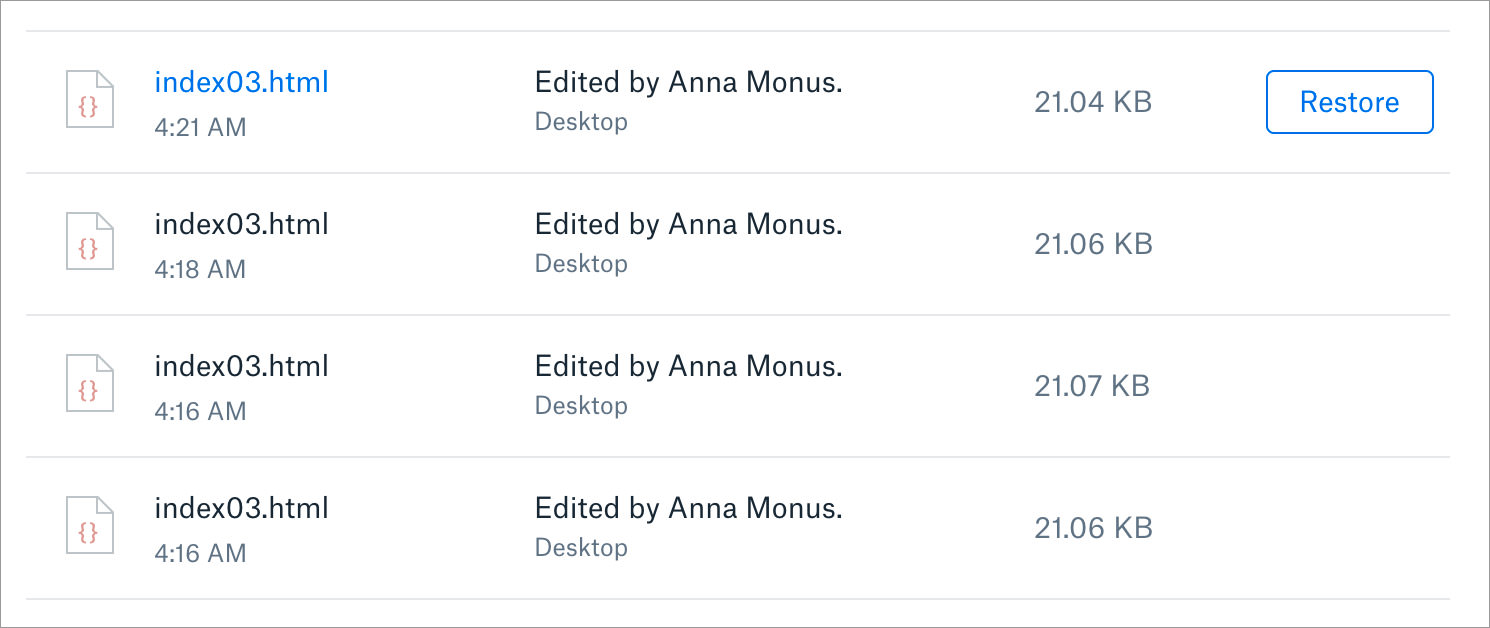
9. Access older versions of files
Dropbox stores older versions of your files for 30 days. That means you can easily restore a file in case you made some wrong changes or want to check out its previous version. This feature works similar to the File History feature of Windows 10.
To get the old version of a file , you can follow the below-mentioned steps:
- Click the three dots beside the file whose previous version you’d like to see and select “Version history” .
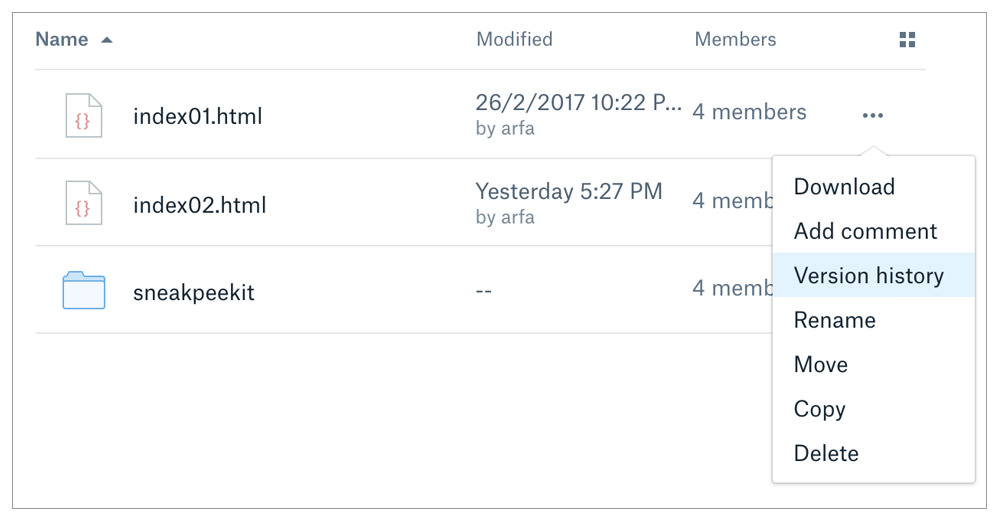
- Select one of the versions to preview and click “Restore” to restore that version.
10. Smart bookmarks with Dropbox
If you always think of storing your bookmarks in the cloud for having them on all your devices, then nothing can be a better option for this than Dropbox. A feature has now been added to store and sync bookmarks by just dropping them in Dropbox.
You can drop URLs anywhere into Dropbox, of course, but it’s better to create a bookmarks folder to store all URLs at a single place . Please do note that Microsoft Edge, unlike Google Chrome and Mozilla Firefox, doesn’t support the drag-and-drop feature in our tests.
Here’s how you can easily store and sync bookmarks using Dropbox:
- Create a new folder named “Bookmarks” in Dropbox (or any name you prefer to use).
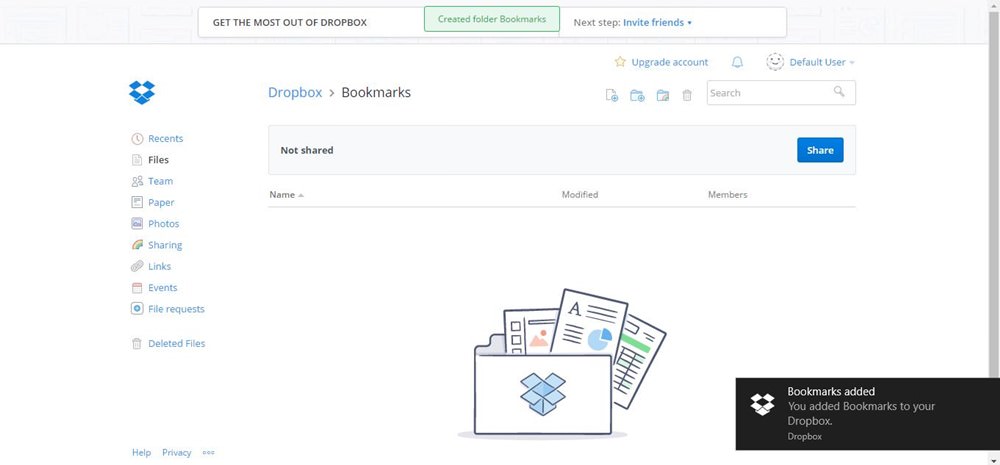
- Drag the little icon shown left of location bar in your browser to the Dropbox tab or window, and drop the link into the “Bookmarks” folder.
![]()
11. Get direct download links
Whenever you click on a Dropbox link, your browser displays a new page with the file and an option to download the file. There’s a trick, however, that forces the browser to start downloading the file immediately instead of displaying the page first.
If you wish to download the file directly in one go , then simply change the Dropbox link having " dl=0 " query parameter at the end to “dl=1” and it will become a direct download link .


12. Share screenshots on the fly
If you’re tired of taking screenshots, dragging them into Dropbox and then sharing its link with others, then here’s a quicker way of sharing screenshots using Dropbox. You’ll also love this trick if you use some third-party tool to share screenshots with others .
All you need to do is enable Dropbox’s screenshot sharing feature , as given below:
- Right-click the “Dropbox” icon in the system tray.
- Click the “gear” icon and choose “Preferences” .
- Switch to the Import tab, check “Share screenshots using Dropbox” and press “OK” .
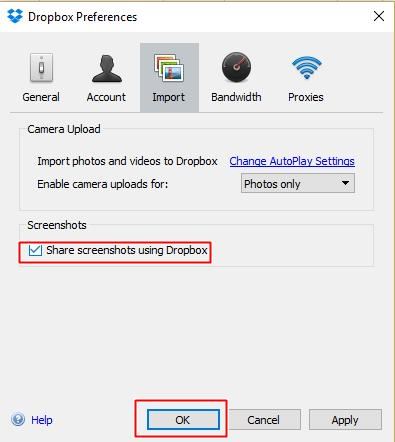
- Now take screenshots using Ctrl + Print keys and Dropbox will auto-save them to “Dropbox/screenshots” and copy its link to your clipboard automatically, which you can use to share the screenshot quickly than ever .
13. Sync required files and folders only
Selective Sync is a feature of the Dropbox client that allows you to select and sync only the folders you wish to sync on your computer. It’s especially handy if you want to save storage space on your system or to save your Internet connection’s bandwidth.
To enable the Selective Sync feature , please follow the given steps:
- Right-click on the “Dropbox” icon in the system tray.
- Click the “gear” icon and select “Preferences” .
- Switch to the “Account” tab, click “Selective Sync” and press “OK” .
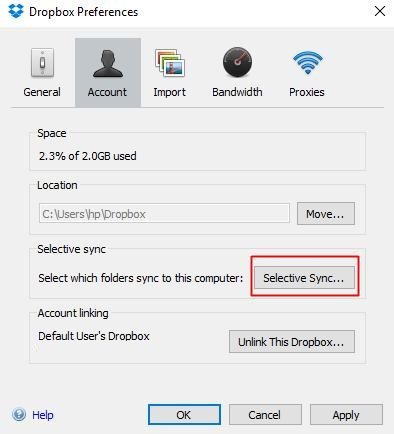
- In the Selective Sync window, uncheck any folder that you don’t need to sync to your computer’s hard drive then click “Update” button and press “OK” to save.
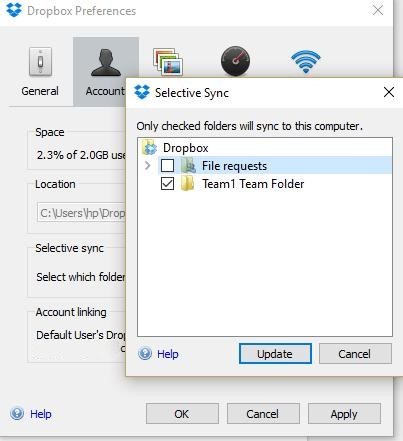
Note: Any folder that you deselect in above step will be removed from your computer , but will be available through dropbox.com and on your other devices, of course.
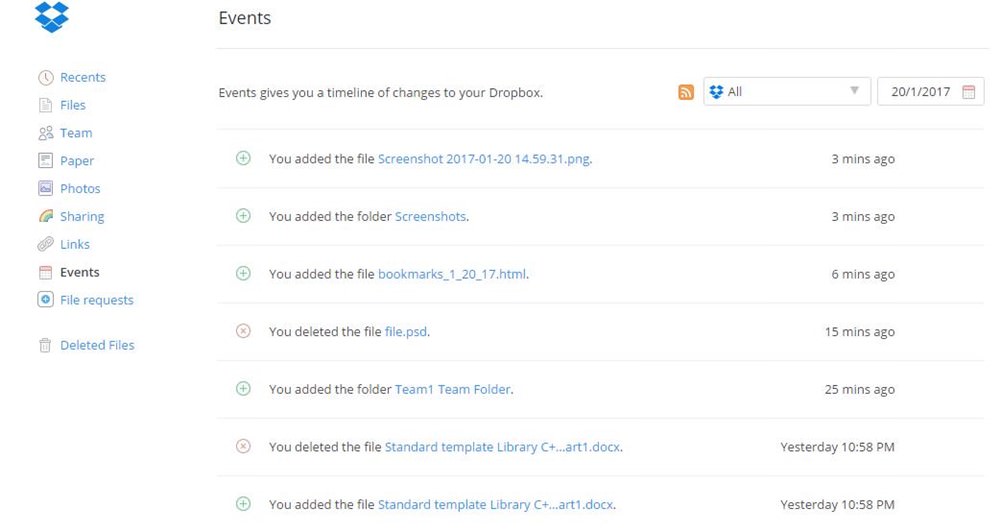
14. Check Dropbox files activities
The “Events” log enables you to view information about various activities happening in your Dropbox. The event log helps you track the events like when you create, share, delete and restore files and folders. The log lets you filter the events according to category and date , and also allows sorting the log entries for easy viewing.
Here’s how you can view the Dropbox’s event log:
- In Dropbox, click “Events” in the left sidebar.
- You’ll see a timeline of events or activities of your account.
15. Auto-sync your memories
Dropbox lets you upload your photos and videos and view them in an online gallery without using any third-party tool. Using this feature, you can check out the photos/videos stored in your Dropbox without the need of downloading them first. Hence, you can use your favorite cloud as the go-to storage space for safe-keeping your precious memories .
To view your photos/videos in Dropbox , follow these steps:
- Upload the photos to Dropbox.
- Open dropbox.com and choose “Photos” from sidebar.
- Here you’ll see all your photos organized as a gallery .

Bonus:
Sync data of portable apps
Dropbox can synchronize any data on your computer and that’s even true for your app or browser data across multiple computers. Every time you make a change in the folder, your Dropbox will auto-sync the changes to its cloud and your other devices.
Using the same feature, you can simply sync the data or settings of any portable app across your various computers for easy usage. Imagine having all your bookmarks and history on all of your devices without logging in to Chrome or using Firefox Sync.
Here’s how you can sync a portable app’s data or settings. We’ve taken Thunderbird as an example but you can apply below steps to any portable app:
- Download the portable version of the app (here, Firefox Thunderbird).
- Install the portable app in the “Dropbox” folder.
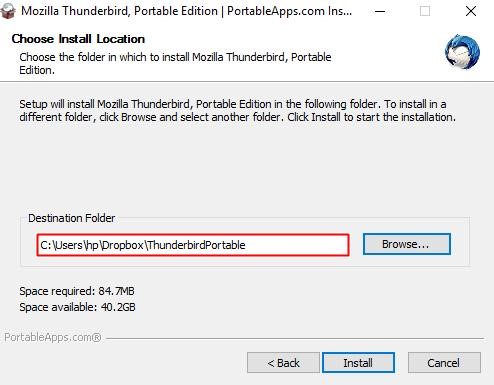
- Launch and use the portable app as any other software and Dropbox will sync all your data or configuration changes with all your computers (via Dropbox’s cloud).
That was all about the various less-known aka secret tips and tricks to make the best use of Dropbox to solve your everyday problems and improve your productivity. Happy dropboxing! (Source: hongkiat/Onehack.us)
Enjoy Folks!