


How To Speed up Windows 10 May 2019 update Version 1903 !!!
Did you notice Windows computer, Laptop Running slow and unresponsive after upgrade to Windows 10 version 1903? Here we have collected some useful Tips & Tricks to Improve and Optimize Windows 10 1903 performance without swapping out any hardware. And help to speed up Windows 10, Optimize Windows 1903 performance.
Post Contents :
Click here to check the list...
1 How to Speed up windows 10 1903
1.1 Disable Startup Running Apps
1.2 Turn off Windows Tips and Suggestions
1.3 Disable Background Apps
1.4 Disable Effects & Animations
1.5 Disable transparency
1.6 Remove Bloatware
1.7 Run Performance Monitor
1.8 Optimize Virtual Memory
1.9 Use High-Performance Mode
1.10 Turn On Fast startup and Hibernate option
1.11 Disable Search Indexing
1.12 Disable Sync Feature
1.13 Use Storage Sense To Automatically Free Up Space
1.14 Defragment Disk Drive
1.15 Check Virus Infection / Run Ccleaner / Fix Registry Errors
1.16 Fix Registry Errors
1.17 Run the Troubleshooter
1.18 Check Disk Drive Error
2 Optimize Windows 10
How to Speed up windows 10 1903
There is no doubt Windows 10 is the Best ever fastest OS by Microsoft Compared to previous windows 8.1 and 7 versions. But with day to day use, apps install/Uninstall, Buggy update installation, System file corruption makes windows 10 1903 slower . Also with every new release, Windows provides new features and updates that demand more system resources. This may result in increased resource consumption , resulting in system slowness or unresponsiveness.
There are numerous tips and tricks that can help minimize unnecessary resource usage, and Speed up Windows 10 performance. Here we have collected various windows 10 1903 optimization tips , techniques to customize and speed up Windows 10 , so you can experience a fast, smooth and super-responsive system.
Disable Startup Running Apps
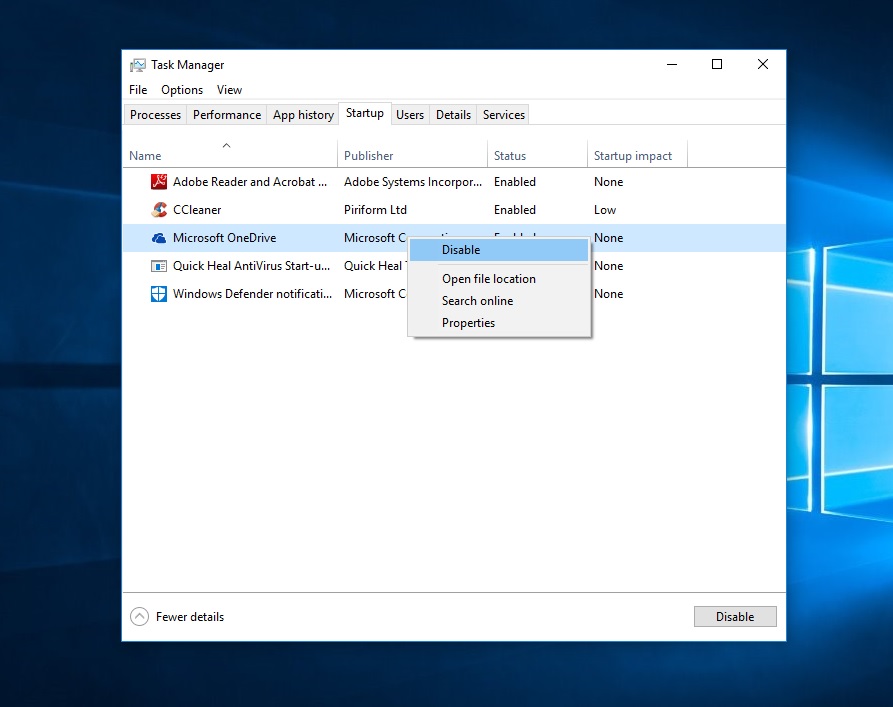
Most commonly you may notice Windows Running very slow / Not responding at startup if there is a huge list of startup programs (apps that start along with the system). These startup apps slow down the bootup process and degrade the device’s performance. Disabling such apps speeds up the performance of the system and improves the overall responsiveness.
To Disable These Startup programs:
- Right Click on Taskbar and select Task Manager.
- Then move to the Startup tab, to Display list of startup programs.
- If you see a program that doesn’t need to be there, right-click it and click Disable .
Turn off Windows Tips and Suggestions
In an effort to be helpful, Windows 10 will sometimes give you tips on how to get the most out of the OS. It scans your computer in order to do this, a process that can have a slight impact on performance.
To turn off these tips and Suggestions:
- Press Keyboard shortcut Windows + I to Open Settings .
- Click on System then Notifications & actions
- Then toggle off Get tips, tricks, and suggestions as you use Windows.
Disable Background Apps

Again Apps running in the background take system resources, heat up your PC and reduce its overall performance. That’s why it’s better to disable them to speed up Windows 10 performance and start them manually whenever you required.
To Disable Background Running Apps on Windows 10:
- Open Settings and click on Privacy.
- Go to the last option in the left panel Background apps.
- Here switch off toggles to turn off background apps you don’t need or use.
Disable Effects & Animations
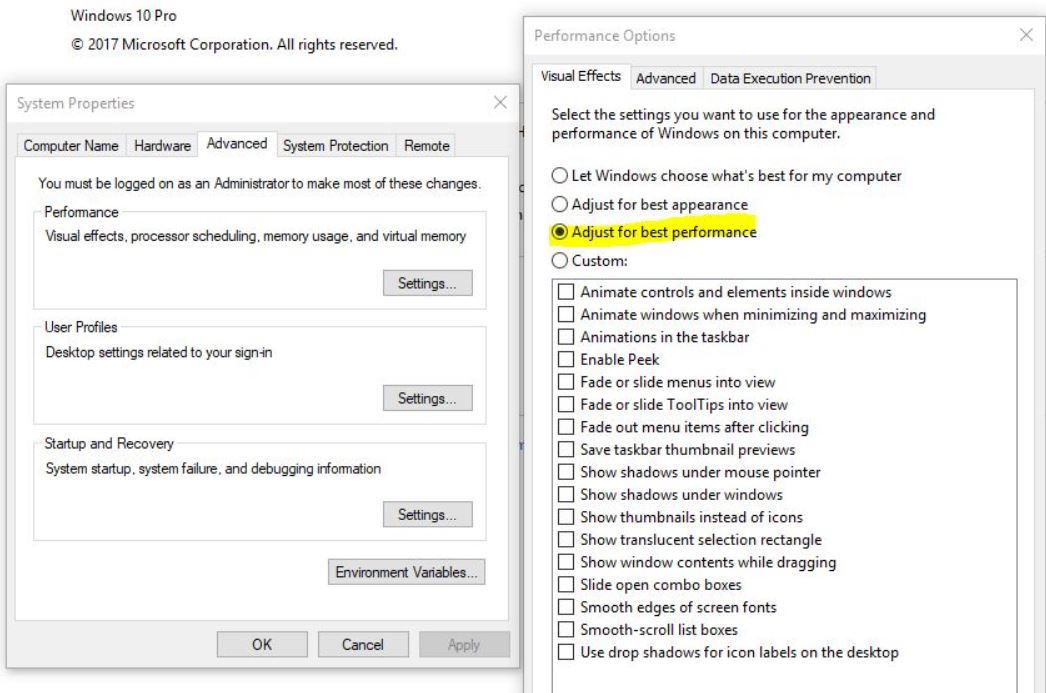
Another reason for windows running slow can be visual effects and animations that increase the burden on the system resources. In the latest PCs, visual effects and animations may not cause a huge impact on power and speed. However, in older PCs, these do play a role so turning them off is your best option to optimize the performance.
To disable visual effects and animations
- Press Win + R, type sysdm.cpl and hit enter key.
- Then move to the Advanced tab and click Settings under Performance.
- Next, under Visual Effects , choose the option Adjust for best performance
Note: you may also select Custom and uncheck all the checkboxes
Disable transparency
Having the taskbar, start menu, and action center transparent can be good to your eyes, but the feature consumes some of the resources on your PC. You can disable transparency by visiting Settings > Personalization > Colors. Turn off the toggle button that says ” Make Start, taskbar, and action center transparent.
Remove Bloatware
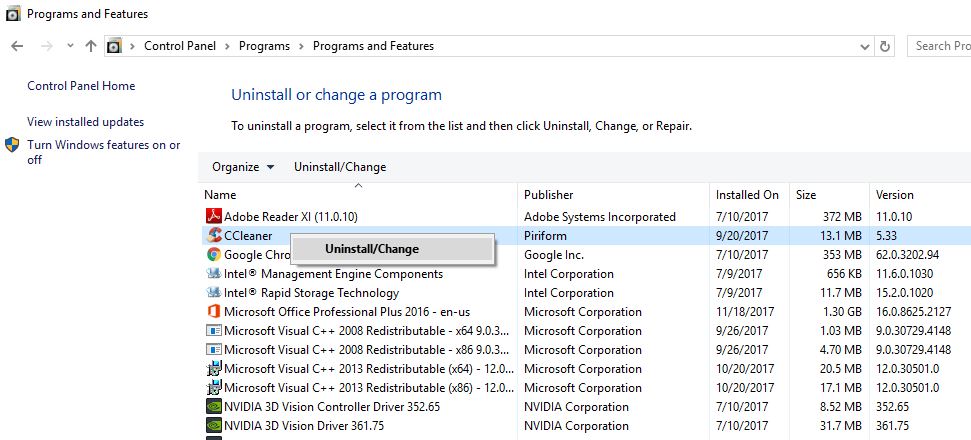
Again the unnecessary installed unwanted software, aka bloatware are One of the biggest factors that slow down any Windows-based system. They use unnecessary disk space, use system resources which cause windows running slow. That’s why Removing such apps boosts the system’s performance, especially if you download lots of programs but don’t or rarely use them.
To remove bloatware or unused apps:
- Right, Click on the start menu select control panel.
- Click on Programs and open Programs and Features.
- Select Uninstall/Change to remove unwanted programs, one at a time.
- Follow the instructions in the uninstall dialog boxes to uninstall the software
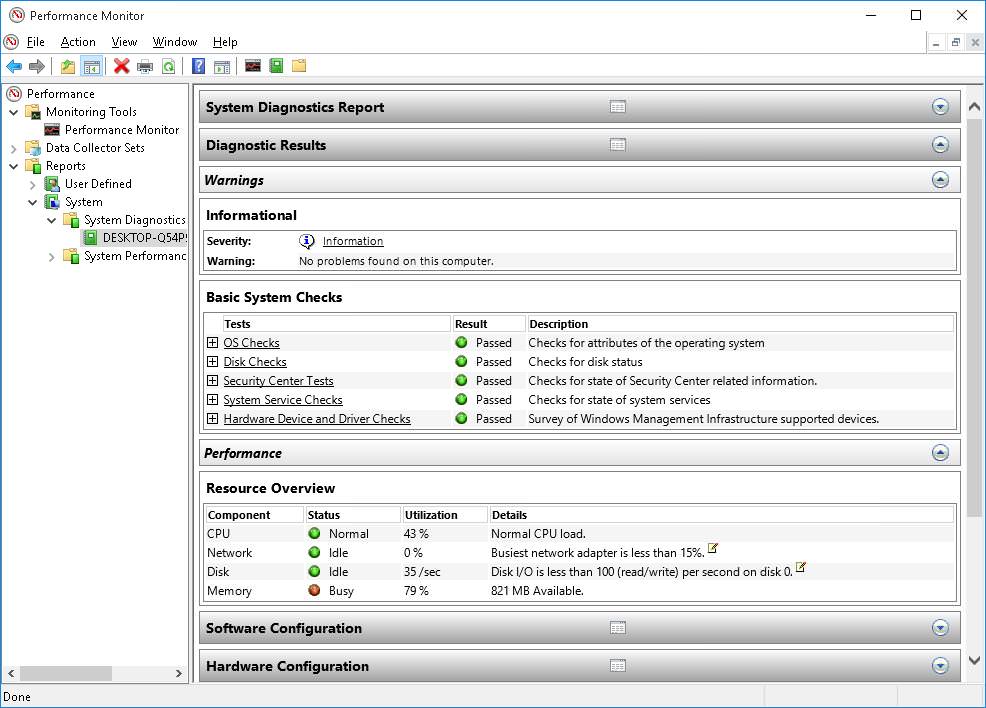
Run Performance Monitor
Windows 10 has a useful real-time performance monitoring tool called Performance Monitor . It details system and hardware resources, performance issues and services, and also suggests solutions for the listed problems.
To check and monitor system performance:
- Click on Start menu type performance monitor and hit the enter key.
- Then select the last option Reports on the left > System > System Diagnostics option.
- The tool will work on your request and gather all the information about your system and produce a detailed performance report.
- Do look at the Warnings section to find the issues present on your PC .
- Check their descriptions, use Windows 10’s Troubleshooter or search the web for their solution.
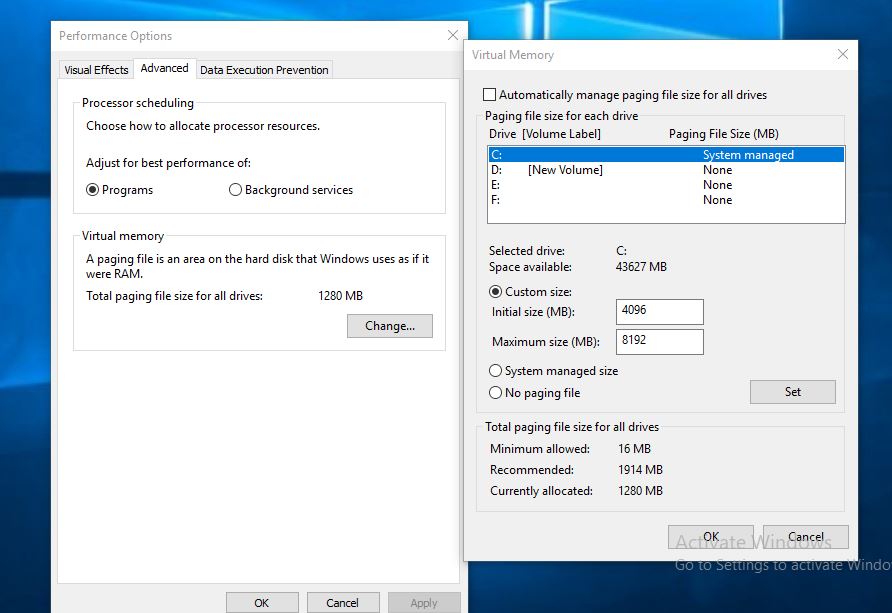
Optimize Virtual Memory
Virtual memory is a software-level optimization for improving the responsiveness of any system. The operating system uses virtual memory whenever it’s short of actual memory (RAM). Though Windows 10 manages this setting, yet configuring it manually gives much better results.
To manually optimize Virtual memory:
- Press Win + R, type sysdm.cpl and hit the enter key.
- On System, properties move to the Advanced tab and click Settings under Performance.
- On performance, options move to Advanced tab click on the Change button under Virtual Memory.
- A new virtual memory window appears, uncheck Automatically manage paging file size for all drives.
- Select the C: drive and then click the radio button for Custom size.
- Then set the Initial size (MB) to the size of your RAM and Maximum size (MB) to double the size of your RAM
(for ex., if the size of the RAM is 4GB, set the initial size to 4000 MB and maximum size to 8000 MB).
- Click the Set button and then OK (and restart when asked for)
Use High-Performance Mode
The ‘ High Performance ’ mode in Power options helps you make the best out of your PC. The CPU can utilize its full potential, while the high-performance mode prevents various components like hard drives, WiFi cards, etc. from going into power-saving states.
You can Enable High-performance mode from Control Panel and go to Hardware and Sound > Power Options to see which power plan you are currently using. For better performance, make sure you are using a High Performance or Balanced plan (or a plan from the PC manufacturer that says it’s balanced).

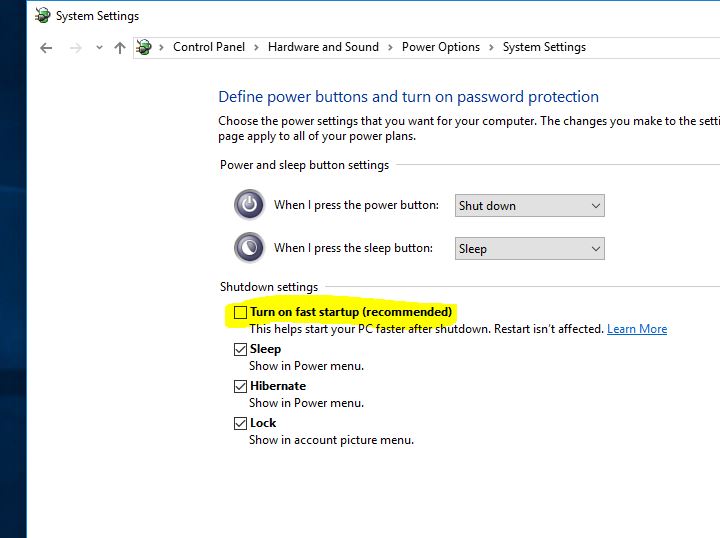
Turn On Fast startup and Hibernate option
Microsoft Added Fast Startup Feature, helps in starting your PC faster after a shutdown by cutting down on boot-up time, using caching for some necessary resources into a single file on the hard disk. At the time of startup, this master file is loaded back into the RAM that speeds up the process manifolds.
Note: This option does not affect the restart process.
You can enable or disable Fast startup From Control Panel → Hardware and Sound and look under Power Options in a new window → click on Change what the power buttons do → Change settings that are currently unavailable. Here Tick the box next to Turn on fast startup (recommended) and click save.
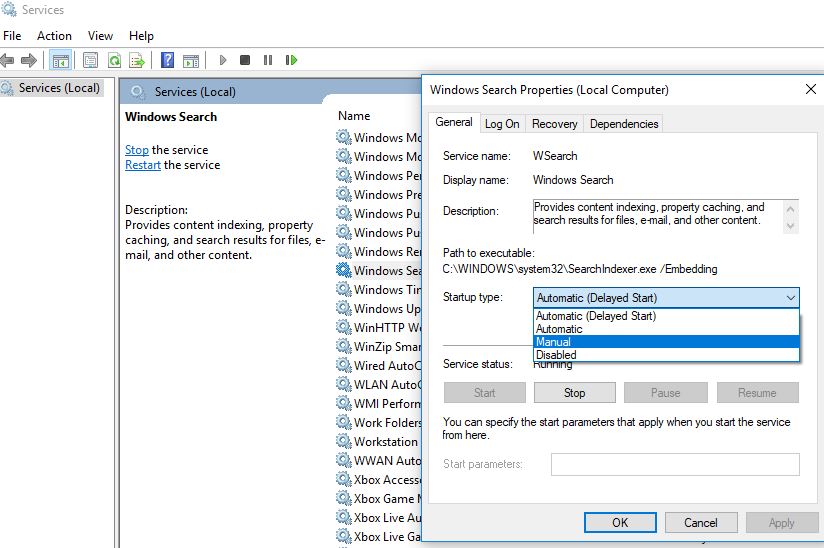
Disable Search Indexing
Search indexing improves the search tool’s responses and speeds up searching in Windows 10. It weakens the performance, however, as it runs in the background and utilizes a lot of system resources . Owing to this reason, if you do searches occasionally, then it’s best to disable it.
To disable search indexing,
- Press Win + R, type services.msc and hit the enter key.
- On Windows, services scroll down look for service named windows search
- Double click on it to open its properties
- Here change the Startup type to manual or Disabled
- Then stop the service next to service status. Do the same with
Disable Sync Feature
Windows 10 syncs many things like passwords, browser settings, system and language preferences etc. with your Microsoft account. Consequently, this feature c onsumes system resources and bandwidth of your web connection. So, consider disabling the sync feature, if you don’t need it, as it helps improve the performance.
To disable the Sync feature on a Windows 10 PC ,
- Click on the Start > Settings > Accounts option
- In the left pane, select the last option Sync your settings
- Toggle off the Sync settings
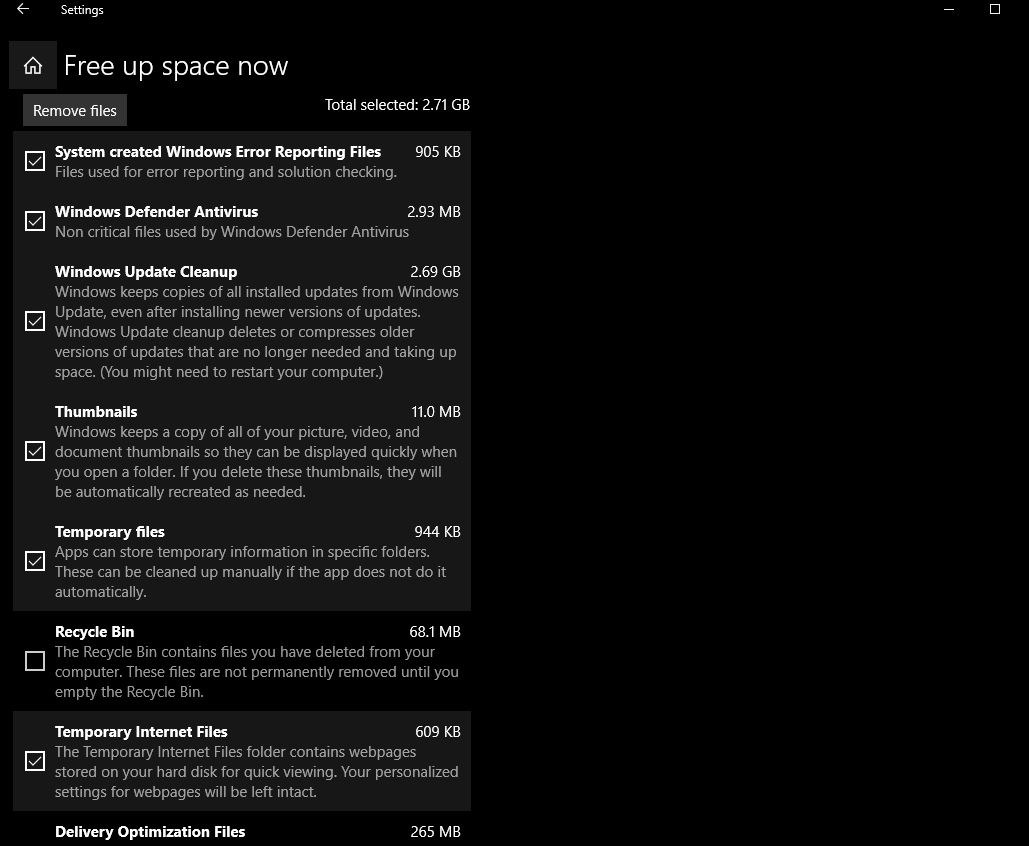
Use Storage Sense To Automatically Free Up Space
Over time, your computer gets filled with lots of useless data that occupies space which could be utilized by programs. Which may slow down overall read/write operations. Windows 10 October 2018 Update included Storage sense is similar to the old Disk Cleanup Utility found in older versions of Windows that monitors your system for old and unused files and actively removes them on a regular schedule.
To free up disk space using storage sense open Settings → System → Storage here click on “ Free up space now ” in blue text. This will present you with a list containing all of the different types of data that you can remove with a brief overview of what each file is, as well as identifying how much space you’ll reclaim by deleting it. Check the temporary files that you want to delete to free up space, and click remove files. Also, check how to configure Storage sense to automatically Free up space on windows 10.
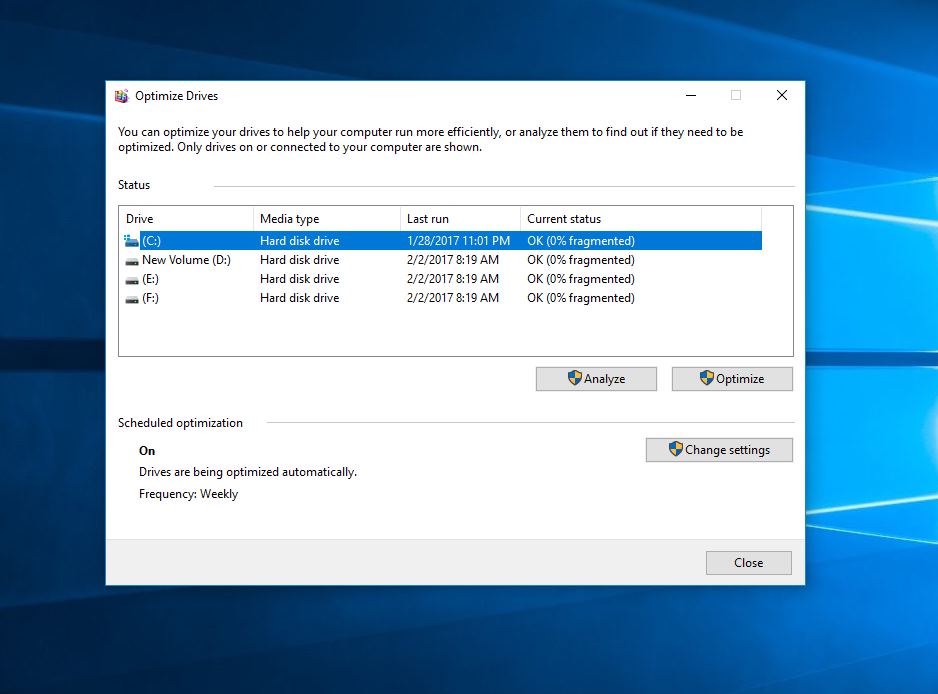
Defragment Disk Drive
Defragmenting your hard drive is one of the most basic ways to speed up your computer. This consolidates the different parts of your files into the smallest possible sequential area on the disk. This means the read/write heads have to travel smaller distances so will be faster at completing requests.
For those of you with physical HDDs, regular defrags are an essential way of ensuring your computer remains up to speed. To defrag the hard drive, click on the Start button and click the File Explorer link. Right-click Local Disk C: and choose Properties. Select the Tools tab, then click “Optimize and Defragment Drive”.
Check Virus Infection / Run Ccleaner / Fix Registry Errors
Some Times Virus malware infection Cause Windows running slow and perform buggy. We recommend Install a good antivirus / antimalware application with latest updates and perform a full system scan. Also, run Third-party utility Ccleaner to optimize system performance and fix broken registry errors.
CCleaner is a disk cleanup tool that deletes temporary files, cookies, cache and other junk data that requires regular cleaning to keep the system running smoothly. To delete temporary and unneeded files using CCleaner, Download and install the CCleaner tool from its download page. Launch CCleaner tool and then choose the Cleaner icon, Select the things to clean and click Run Cleaner button.
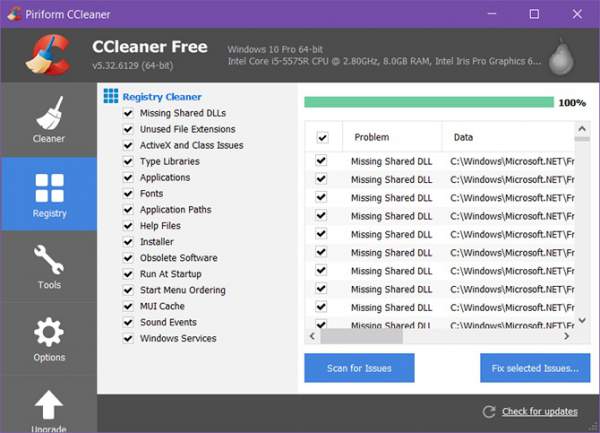
Fix Registry Errors
Also, Ccleaner having a registry cleaner tool that helps clean various types of problematic entries in the registry and even offers a backup for the registry before executing a cleanup. open Ccleaner, click on Registry icon on the right. Then Select the issues to fix and click on Scan for Issues button After the scan is complete, click on Fix selected issues button.
Run the Troubleshooter
Run Then Windows 10 built-in tool to find problems and solve them automatically without the user’s help. If there are issues affecting your PC but you can’t find them yourself, then it’s easy to find and fix those using the troubleshooting tool. You can troubleshoot your system by following these steps:
Open Control Panel Click System and Security and under the Security and Maintenance, choose to Troubleshoot computer problems option In the new window. look for the option System and Security, click on all three of them, one-by-one, and follow the onscreen instructions
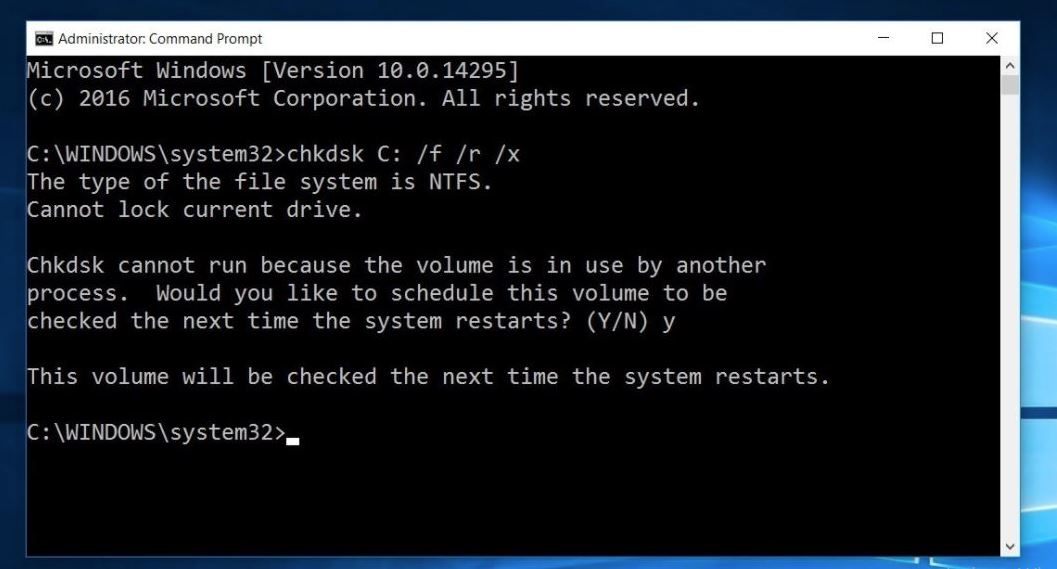
Check Disk Drive Error
Again with regularly read/write operations, power failures and various other reasons, your computer’s disks may get corrupted or damaged at some of the places. This would result slow down the system and can even cause hangups and freezes. That cause you can run the CHKDSK utility to Check and fix disk Drive errors.
Optimize Windows 10
Also corrupted, missing system files sometimes cause Different startup problems and Slow down the system performance. Especially after recent windows upgrade if system files get damaged or corrupted which may result buggy system performance. Run the System file checker ( SFC utility ) to make sure corrupted damaged system files not causing the issue.
Open Command prompt as administrator, then type sfc /scannow and hit the enter key. This will scan for missing or damaged system files if found any the sfc utility restore them from a special folder located on %WinDir%\System32\dllcache. After 100% complete the scanning process Restart windows, If SFC failed to repair the corrupted system files then RUN The DISM command. Which repair the system image and allow SFC to do its job.
 !
!