Angry IP Scanner
Angry IP Scanner is a program for finding computers and other devices on the network, scanning ports and information gathering.
Port Scanner for Windows
Although the title says that Angry IP Scanner is a port scanner for Windows, in fact it is a cross-platform scanner that works great on Linux as well as on Mac. But Linux has Nmap – a powerful network scanner with many options and additional functions for information gathering about hosts on the network. By the way, Nmap also works on Windows and even has a graphical interface, but many Windows users find it difficult to deal with the command line and numerous Nmap options, and many of them simply don’t need such an abundance of functions. So, Angry IP Scanner is a simple and intuitive program for finding hosts and scanning ports of computers, sites, servers, phones and any other online devices.
How to install Angry IP Scanner
Angry IP Scanner is cross-platform due to the fact that it is written in Java. Therefore, start by installing the Java environment.
How to install Angry IP Scanner on Windows
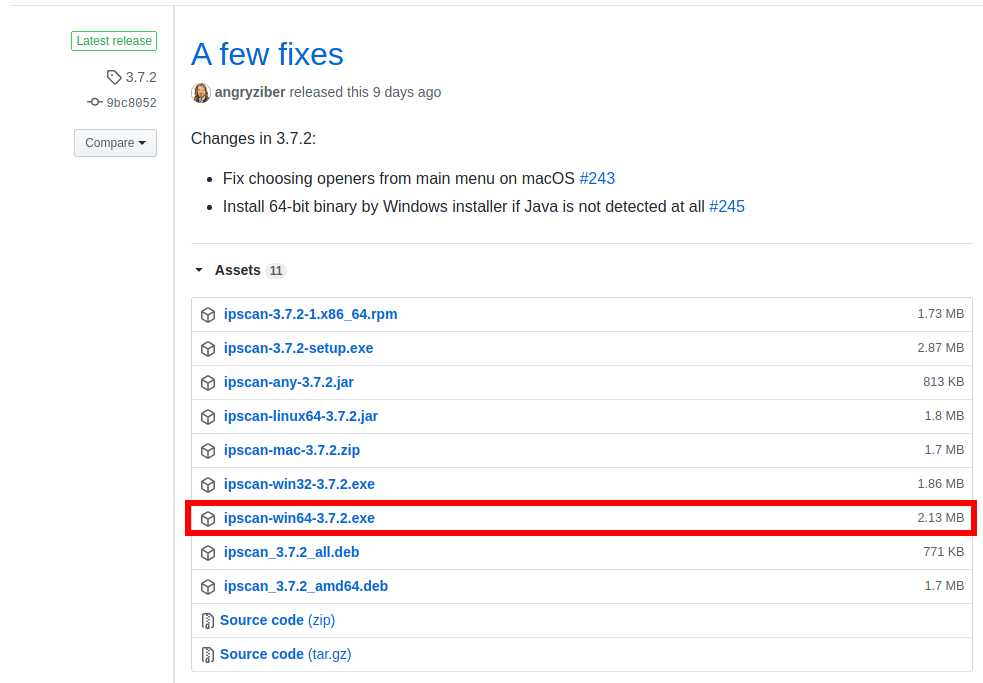
Download Angry IP Scanner at: https://github.com/angryip/ipscan/releases
Select the ipscan-win64-*.exe file – it does not require installation, that is, it is a portable version.
How to install Angry IP Scanner on Kali Linux
1 `wget -O ipscan.jar https:` `//github` `.com`curl -s https:` `//github` `.com` `/angryip/ipscan/releases` `| ` `grep` `-E -o ` `'/angryip/ipscan/releases/download/[0-9.]+/ipscan-linux64[0-9.-]+.jar'` `| ` `head` `-n 1``
2 `sudo` `mv` `ipscan.jar ` `/opt/`
3 `echo` `-e ` `'#!/bin/bash'` `"\njava -jar -Xmx1024m /opt/ipscan.jar"` `| ` `sudo` `tee` `/usr/local/bin/ipscan` `> ` `/dev/null`
4 `sudo` `chmod` `+x ` `/usr/local/bin/ipscan`
Run like this:
1 ipscan
Install Angry IP Scanner in BlackArch
1 sudo pacman -S ipscan
How to use Angry IP Scanner
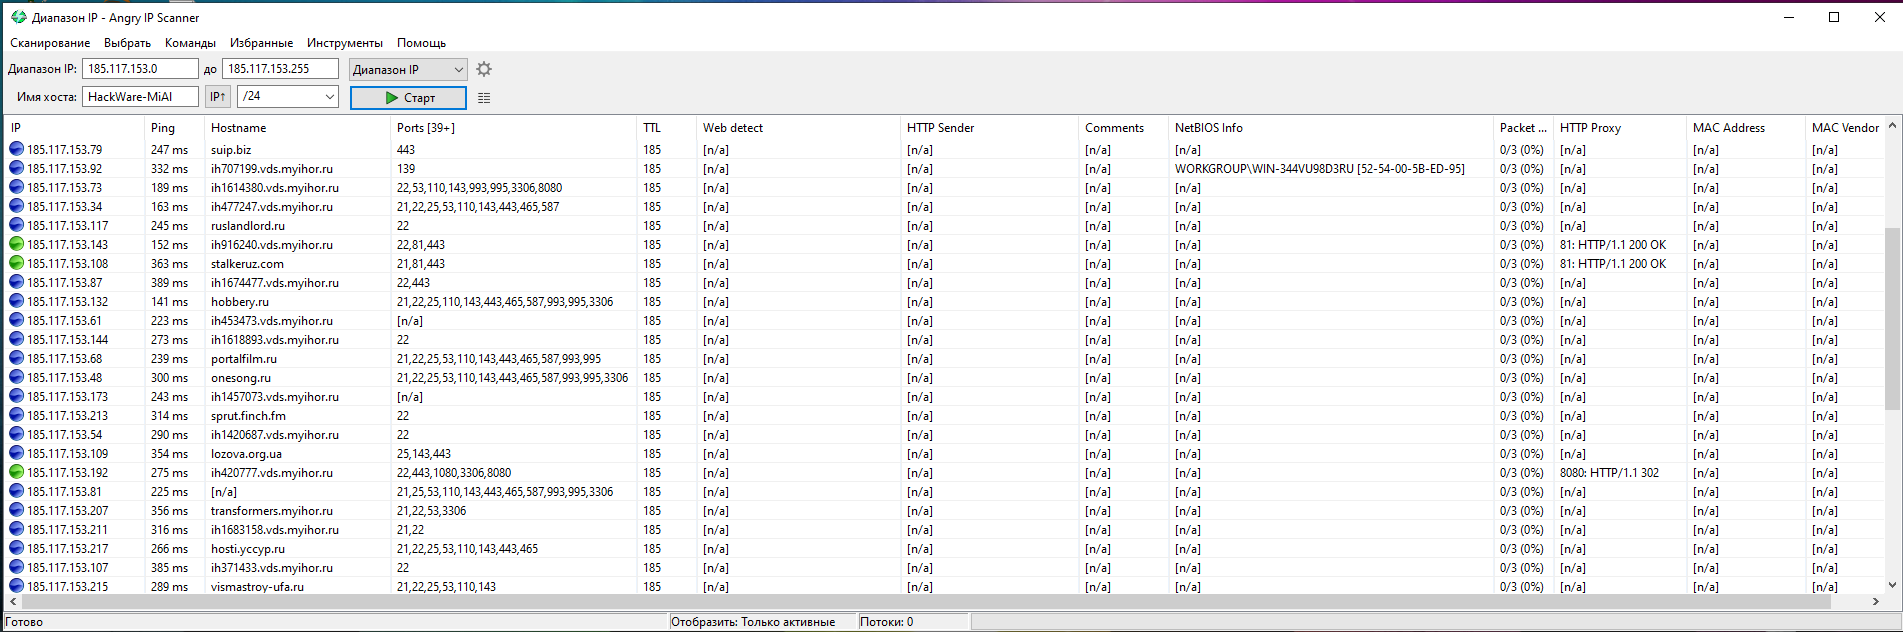
You can pay attention that I have already automatically entered the IP range – this is the local network to which the computer is connected:

To scan the local network, just click the “Start” button. Based on the scan result, brief information is displayed:
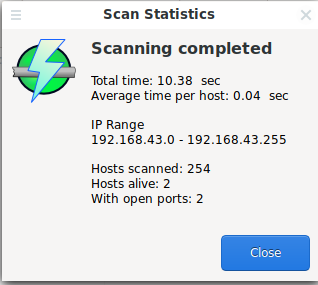
That is, 2 active hosts were found on my network and each of them has open ports.

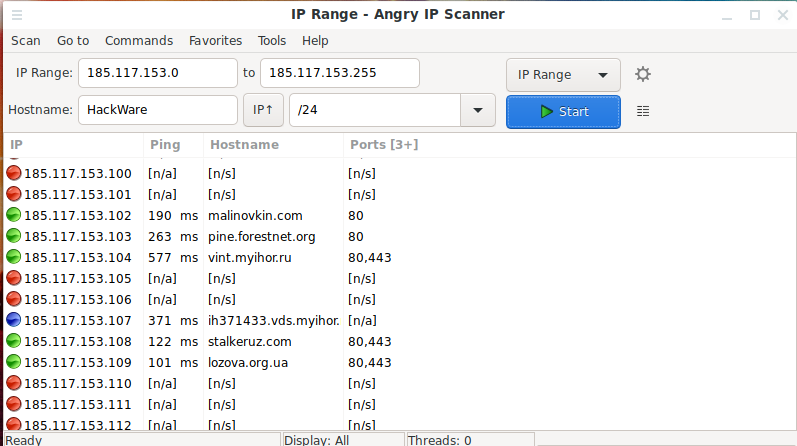
You can specify the range of IP addresses to scan:

Or specify a range using the network ID and subnet mask to scan:
Moreover, the network identifier must be entered in the left window of the upper line, and the subnet mask in the right drop-down menu of the second line.
How to change scanned ports in Angry IP Scanner
By default, Angry IP Scanner scans only three ports: 80,443,8080 . For example, Nmap by default scans the 1000 most popular ports. Ports 80,443,8080 are usually listened by web servers. To search for other services, I compiled a list of the most common ports (in the comments to this article, you can supplement the list with your wishes):
1 21,22,23,25,53,80,81,110,119,137,139,143,443,445,465,587,993,995,1080,1194,3306,3389,5500,5800,5900-5906,8080,9001,9030,9050,9051,9090,9091,9100
To change the list of ports in Angry IP Scanner, go to “Tools” → “Preferences” . In the window that opens, go to the “ Ports ” tab:
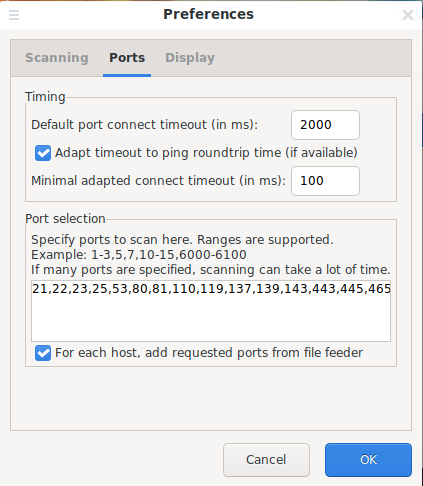
You can enter any ports you are interested in. They must be comma separated without spaces, you can specify ranges with a hyphen, for example: 19-22,80,1000-2000.

How to scan open ports on sites in Angry IP Scanner
In Angry IP Scanner, you can scan open ports not only at IP addresses, but also open ports on sites. To do this, in the IP Range field and in the “ to ” field, enter the same site address, and delete the contents of all other fields:

The IP address of this site will be determined and open ports will be scanned.

How to Collect Host Information Using Angry IP Scanner
The Nmap scanner can determine the version of the operating system and the version of network services on the scanned hosts, Angry IP Scanner can also gather information, by default the following data is gathered:
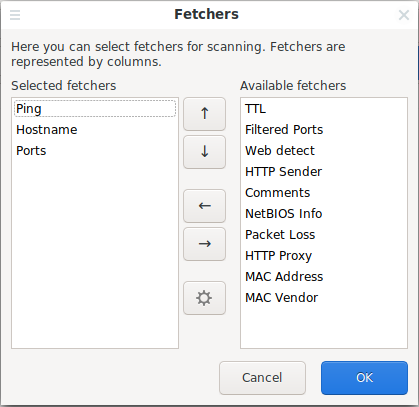
To change these settings, go to the menu item “Tools” → “Fetchers” :

Now the scan results show additional information about the hosts:
How to show only active hosts in Angry IP Scanner
Go to the menu “Tools” → “Preferences ”. In the window that opens, go to the “ Display ” tab, select “ Alive hosts (responding to pings) onl y”:

How to scan a host if it does not respond to pings
If a host does not respond to ping, then this does not necessarily mean that it is offline (although more often offline). If you are sure that the host is online or it is important for you to find all the active hosts, then first try changing the ping method.
You can also force ports to be scanned even on hosts that do not respond to any ping. To do this, go to the menu “Tools” → “Preferences ”. In the window that opens, go to the “ Scan ” tab, select the “ Scan dead hosts, which don’t reply to pings ” option:
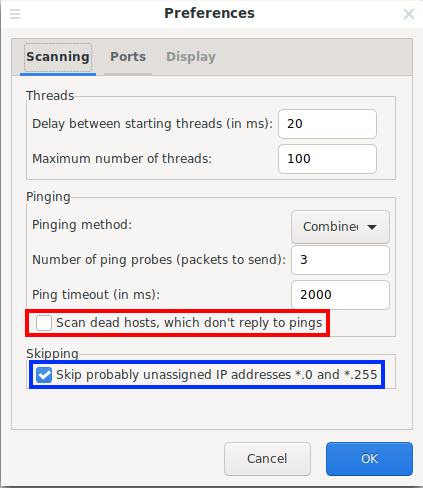
Do I need to use the option “Skip probably unassigned IP addresses *.0 and *.255”
On the global network, addresses of the form *.0 and *.255 are usually valid, so you should not use the option “ **Skip probably unassigned IP addresses .0 and .255 ”.
Network Terms in Angry IP Scanner
Further tips from the program itself:
Angry IP Scanner is an IP address scanner tool.
It is used for scanning of IP addresses with the goal of finding alive hosts and gathering interesting information about each of them.
You can start by specifying the IP addresses to scan (your local IP is entered by default) and clicking the Start button.
Main terminology:
Feeder - generator of IP addresses for scanning. Angry IP Scanner provides various kinds of feeders: IP Range, Random, and IP List File. You can select a feeder using the combo box next to the Start button.
Fetcher - gathers specific information about a host, e.g. ping time, hostname, open ports. Fetchers usually represent columns in the scanning results list. You can select additional fetchers by choosing “Tools->Select fetchers” from the menu.
Alive host - is the host, responding to pinging. These are blue in the results list.
Dead hos t - is the host, not responding to pinging (red in the list). However, it may still have ports open (if firewall blocks pings). In order to scan these hosts fully, check “scan dead hosts” in the Tools->Preferences dialog.
Open port - a TCP port, responding to connection attempts. Hosts with open ports are green in the results list.
Filtered port - a TCP port, not responding that it is closed (no RST packet). These ports are usually specifically blocked by firewalls for some reason.
Pinging (checking if hosts are alive):
Angry IP Scanner can use different methods for pinging hosts. You can choose between them in the Preferences dialog.
ICMP echo - is the standard method used by the ‘ping’ program. This one requires administrator or root privileges on most platforms. Note that some firewall software disables sending of ICMP echo reply packets, making alive hosts appear like dead.
UDP - sends UDP packets (datagrams) to one of the host’s ports and sees if there is any response (either positive or negative). This is non-standard, but works without special privileges.
TCP - tries to connect to port 80 (http) on the host. This may work better than UDP for some networks, but usually it is worse.
UDP and TCP pinging most often doesn’t properly detect routers or other network equipment.
TTL (time to live ) - this fetcher works only with ICMP pinging method. Its initial value is usually 64 or 128, and the difference represents the distance to the host in number of nodes it has traveled.
The results lis t displays the scanning results, one line per each scanned address.
Using the Preferences dialog, you may configure to display:
- all scanned hosts
- only alive hosts
- only hosts with any ports open
Special values (also configurable):
- [n/s] - not scanned value that wasn’t scanned at all (eg if the host is dead)
- [n/a] - the value is not available, but was scanned.
Source: miloserdov
Happy learning folks!