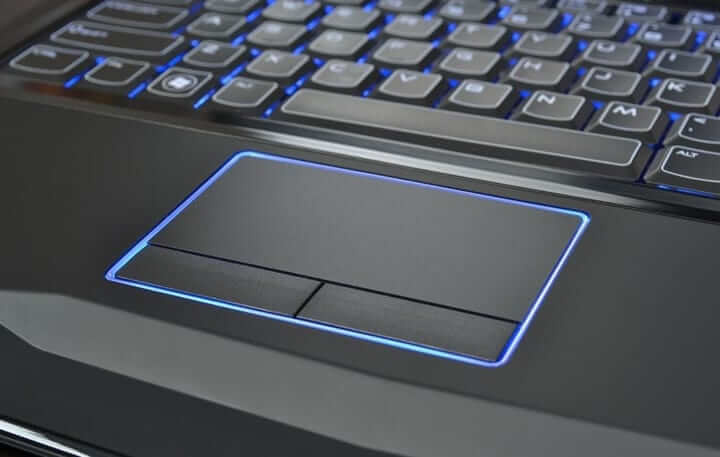
The touchpad is an age-old feature, having long since replaced the “pointing stick” (or what I liked to call the “nipple”) as the standardized alternative to mouse control on a laptop. But if your touchpad stops working while you’re on the move, or in any other situation when you don’t have a spare mouse handy, you can end up stranded.
But don’t start training yourself to use Windows with only a keyboard just yet. Here’s our collection of tips on how to fix a malfunctioning touchpad (starting with the simplest).
Note: you’ll need an external mouse or touchscreen to go through with some of these tips. Also, the following fixes are for laptops running Windows OS.
1. Touchpad Disable Zone
Unbeknownst to many laptop users, there may be a small square logo at the top left corner of your laptop touchpad. If you have this logo, then double-tapping it enables and disables your touchpad, so there’s a chance that you disabled it accidentally.
Try double-tapping that logo to see if your touchpad comes back to life.
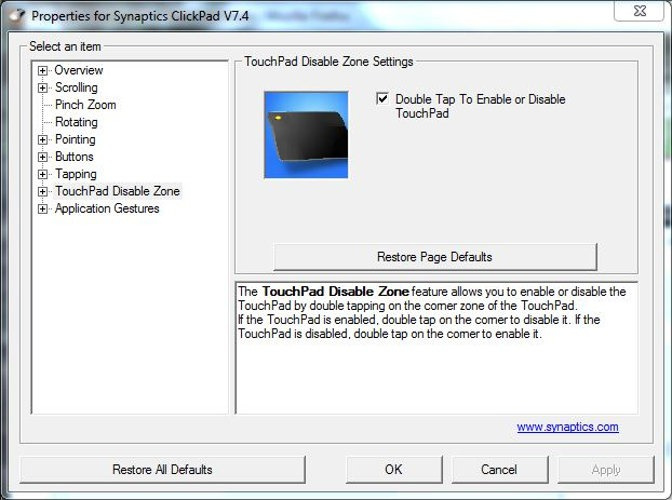
If you find yourself disabling your touchpad accidentally this way, you can disable this feature by going to “Settings → Devices → Touchpad → Additional settings → Touchpad Entry → Settings → Touchpad Disable Zone → Untick ‘Double Tap to Disable Touchpad’”.
2. Is the Trackpad Disabled in the BIOS?
There’s a chance that, for reasons unknown, your laptop touchpad is disabled in the motherboard BIOS of your laptop (this could happen after a firmware update, for example).
To check if this is the case, enter the BIOS by repeatedly pressing the Delete or F2 key as your PC is booting. (The button you need to press may vary).

Likewise, the BIOS for different motherboards has a different layout, but your goal is to find an option called “Internal Pointing Device” or similar, then make sure it’s set enabled. This may be under the “Advanced” heading if you have one. Once you’ve done this, select the option to “Save Changes and Exit.”
3. Re-Enable Your Touchpad Using the “Fn” Key
This happened to me several years ago. Perhaps while trying to use a “Fn” key to change the volume on my laptop, I disabled my touchpad by pressing the wrong button. For weeks I didn’t know what the issue was, which wasn’t helped by the touchpad function icon on my keyboard looking just like a monitor icon, and it took me a while to realise that maybe it was in fact a touchpad icon.
While holding the “Fn” key, press every function button (the “F” keys) with a symbol on it that looks like it could be your touchpad to see if it switches back on. (Bear in mind, you might turn off your screen this way, so just press that button again if that happens.)
4. Remove Other Mouse Drivers
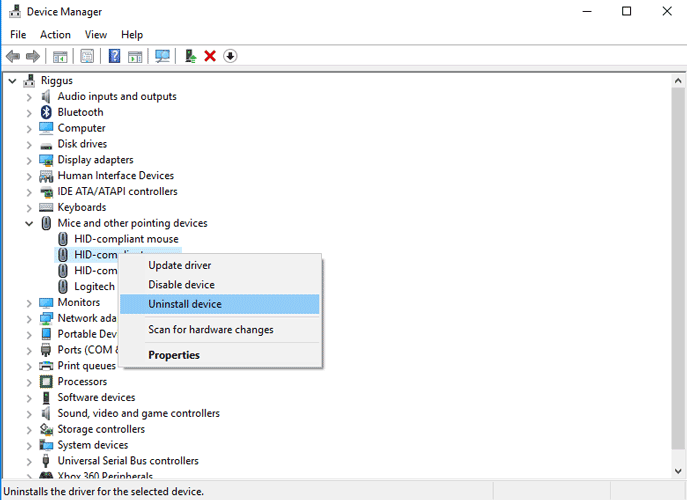
Have you plugged a whole bunch of mice into your laptop in the past and never removed their drivers? If so, there’s a chance that their drivers are interfering with your touchpad. (Some mouse drivers even disable your touchpad automatically!) Go to Device Manager, click the arrow next to “Mice and other pointing devices,” then right-click and uninstall mice one by one until your touchpad starts working again.
5. Update or Roll Back Touchpad Driver
While you’re in Device Manager, right-click your touchpad in the list (It may be called Dell TouchPad, Lenovo TouchPad, Synaptics, or similar, depending on the brand of your PC.), and make sure that it’s definitely enabled. If it is, click “Update driver” to see if there are any updates for it that might help.
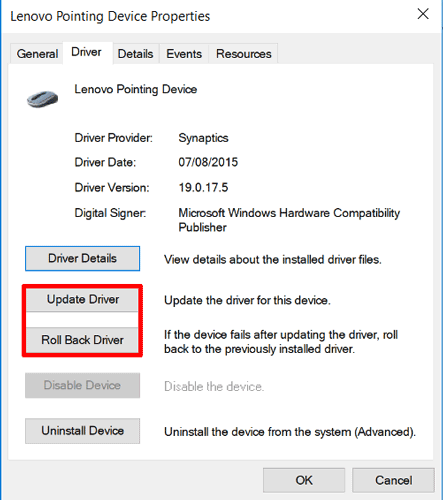
Finally, a lot of people reported that their touchpads stopped working properly after getting Windows 10, which means that the W10 driver for your touchpad may be misbehaving. In Device Manager right-click your touchpad, then click “Properties” and “Roll Back Driver” to see if a previous version of the driver fixes the problem.
6. Enable Your Touchpad in “Mouse Properties”
In a lot of cases Device Manager doesn’t handle the enabling and disabling of your touchpad. If your touchpad somehow got disabled, then to switch it back on you’ll need to go to your Windows mouse properties to re-enable it.
Type mouse into the Windows Search bar and go to Mouse Settings. Here, click “Additional mouse options,” then in the new window go to “Device Settings,” “Touchpad,” or whatever tab is at the far right of the window.
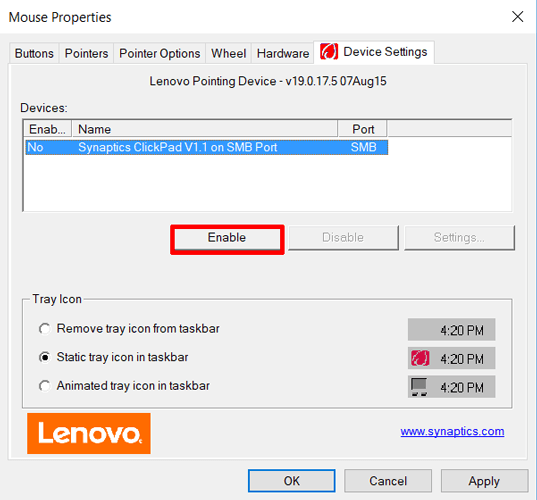
Find your touchpad in the list, select it, then click “Enable.”
7. Disable Tablet PC Input Service
If your Windows 10 laptop is a hybrid and has a touchscreen, then there’s a possibility that the Tablet PC Input Service, which controls stylus functionality, is interfering with your touchpad. If you don’t really use the stylus anyway, then it won’t be a big loss to disable it. If you do use it, however, you have to decide whether you want to go through the inconvenience of toggling this service on and off each time you want to use your touchpad.

To disable Tablet Input Service, hit Win + R, then type services.msc in the box. In the list of services, scroll down until you find “TabletInputService” or “Tablet PC Input Service.” Right-click it, then disable it.
Conclusion
Hopefully all your touchpad-fixing solutions are right here, but if you can think of any more, then let us know. Remember that different laptops may have different software for their touchpad, so these instructions may vary slightly, but for the most part they should point you in the right direction.