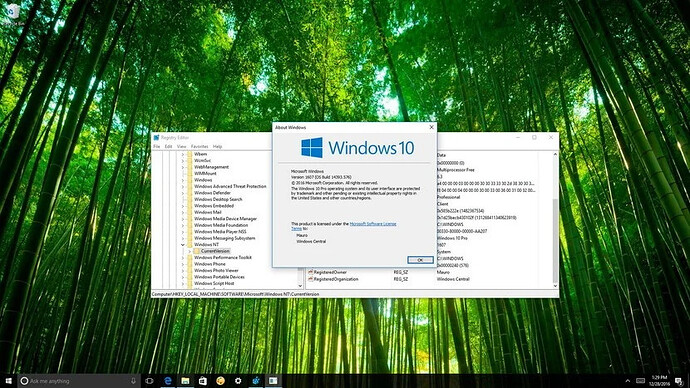
Here are the steps to have Windows 10 show the correct registered owner and organization information on your computer.
Windows 10 by default no longer lets users set their registered owner and organization information during installation. Instead, the operating system uses default information, such as your email address if you’re using a Microsoft account, “user name” and “org name” when starting with a local account, or “Windows User” if you’re installing an Insider preview build.
About Windows: Insider preview (left), Local account (middle), Microsoft account (right)
Typically, you’ll only see this information on About Windows, but while there are still a lot of apps that look for these names to customize the experience on Windows 10, or your computer is part of an organization, it’s a good idea to add the correct information.
In this Windows 10 guide, we’ll walk you through the steps to change the registered owner and organization information on your PC using the Registry.
How to change registered owner and organization info using the Registry
Important: As always, this is a friendly reminder warning you know that editing the registry is risky, and it can cause irreversible damage to your installation if you don’t do it correctly. It’s recommended to make a full backup of your computer before proceeding.
- Use the Windows key + R keyboard shortcut to open the Run command.
- Type regedit, and click OK to open the Registry.
- Browse the following path:
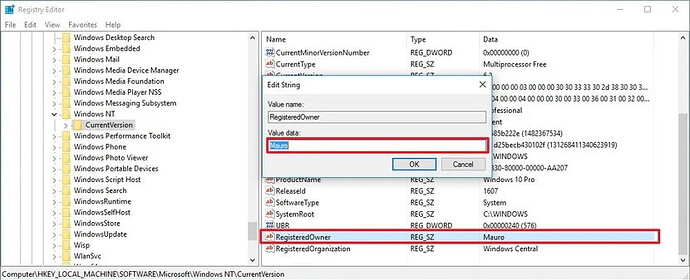
HKEY_LOCAL_MACHINE\SOFTWARE\Microsoft\Windows NT\CurrentVersion - Inside the CurrentVersion (folder) key look for the RegisteredOwner String Value. If you don’t have the string, you’ll need to create it:
- Right-click on the CurrentVersion (folder) key, select New, and click on String Value.
- Name the new String Value RegisteredOwner and press Enter.
- Double-click the RegisteredOwner String Value and enter the registered owner information, which usually it’s just your name.
- Click OK.
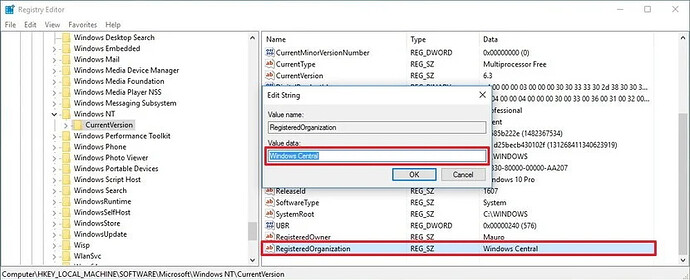
- Inside the CurrentVersion (folder) key look for the RegisteredOrganization String Value. If you don’t have the string, you’ll need to create it:
- Right-click on the CurrentVersion (folder) key, select New, and click on String Value.
- Name the new String Value RegisteredOrganization and press Enter.
- Double-click the RegisteredOrganization String Value and enter the organization name.
- Click OK.
- Close the Registry to complete the task.
Once you completed the steps, you can check the new information by using the Windows key + R keyboard shortcut and running the winver command to see About Windows with the new information. (Source: windowscentral)
Happy learning!


