You can Try this: How To Recover Deleted Data On Android | NO ROOT | NO PC
Else follow other solutions below:
Where Do Deleted Files Go on Android?
Although Android doesn’t have a recycle bin for deleted files, files do not completely disappear from your phone memory after they are deleted. This is why it is possible to restore deleted files on Android.
When you delete a file in Android, your Android phone doesn’t move the file to another place, nor does it wipe the deleted files from your memory space. What happens is that the deleted file still remains on the same spot of your memory space , only that the space it occupies is marked as “unused” and becomes available for new data to write in. Once the spot is used by new data, the deleted files are overwritten and deleted permanently.
How Can I Recover Permanently Deleted Files in Android Phone?
As we have learned that deleted files are still in our Android phones, so long as we perform Android file recovery before the deleted files are overwritten, the deleted files can be restored.
To make sure that you can retrieve the deleted files in Android, there are two things to do:
- Stop creating new data;
- Recover the deleted files as soon as possible .
Many things you do on a phone can create new data: install or update apps, download music, take photos… Therefore, put your Android phone in Airplane mode to stop receiving new messages or downloading new files, and try to use the phone as less as possible.
Then, with a reliable Android file recovery application, you can start to recover deleted files from your Android phone. And instead of recovering deleted files from Android without computer by a file recovery app, which could potentially overwrite the deleted files when the app is installed, you have a better chance to recover the deleted files with a desktop Android data recovery application on a computer.
So you are recommended to install FonePaw Android Data Recovery, a data recovery program for Windows PC or Mac to undelete photos, audio files, videos and more on Android in one click.
Recover Deleted Files from Android (Take Samsung as an example)
FonePaw Android Data Recovery is designed to recover deleted/lost data on Samsung Galaxy, Google Nexus, LG, Sony, HTC, Motorola, Huawei, OnePlus, AUSU, ZTE and more. It can recover deleted photos, videos, music, text messages, WhatsApp, contacts, call logs and document files on Android phones. It can recover Android files within a few clicks. Here is how to use it.
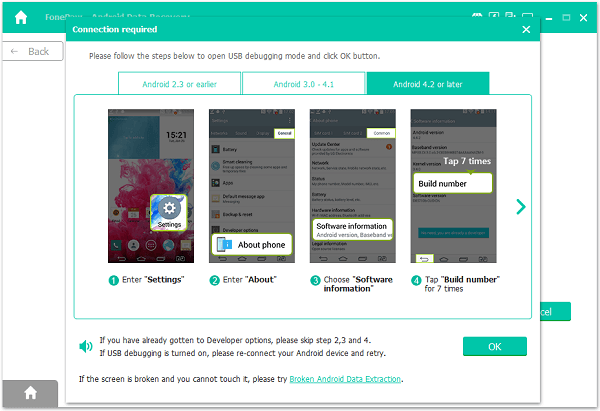
STEP 1. Connect Android to PC
To start with, install and run the phone memory recovery for Android on your computer. Then connect Samsung phone (Galaxy S7/S8/S9/Note 9) to PC with a USB cable. USB debugging needs to be enabled on your Android phone for the Android Data Recovery program to communicate with the phone. Follow the on-screen instruction to enable USB debugging.

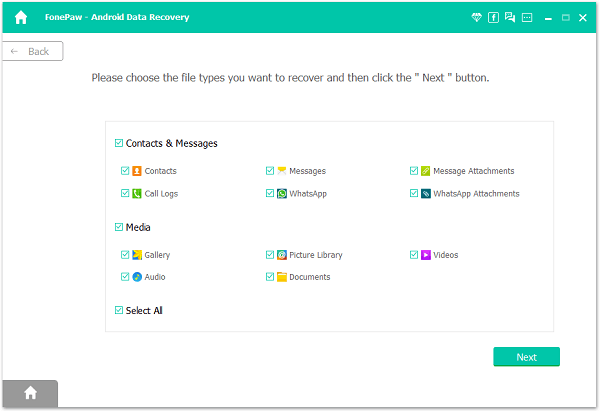
STEP 2. Choose File Types to Recover
After USB debugging is turned on, the Samsung is successfully connected to the program, you will be asked to select files types that you want to restore. Tick documents, photos, messages or other deleted files that you need, and then click the “Next” button.
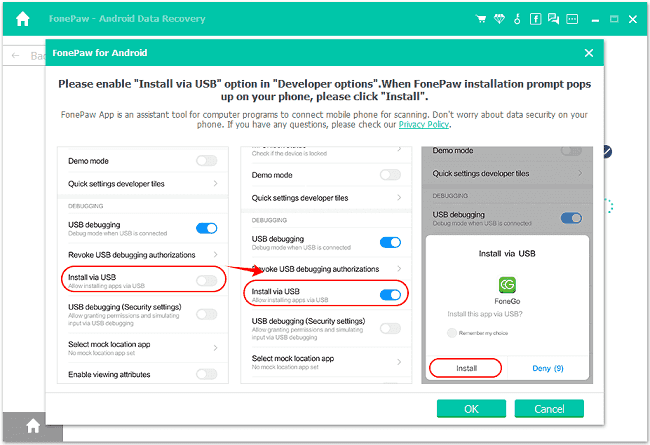
STEP 3. Install FonePaw App to Get Permissions
The program will prompt you to install the FonePaw app, an app that is used to grant privileges for the program to access files on your Android. Only by using the app can the desktop program read and recover deleted files from your phone.
Therefore, follow the on-screen instruction to enable Install via USB and allow the FonePaw app to be installed on your phone.
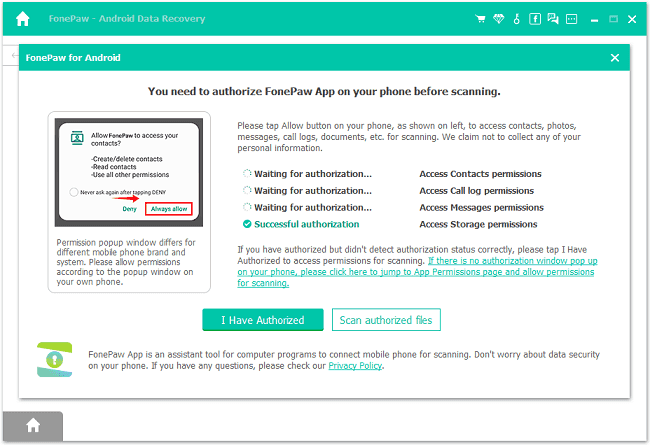
STEP 4. Get the Privileges to Scan Deleted Files
After the FonePaw app is installed, it will give the pop-up notification for you to allow access to contacts, messages, storage, call logs to scan out deleted files. Tap Allow to all messages and click Scan Authorized Files to begin searching for deleted files on your Android phone.

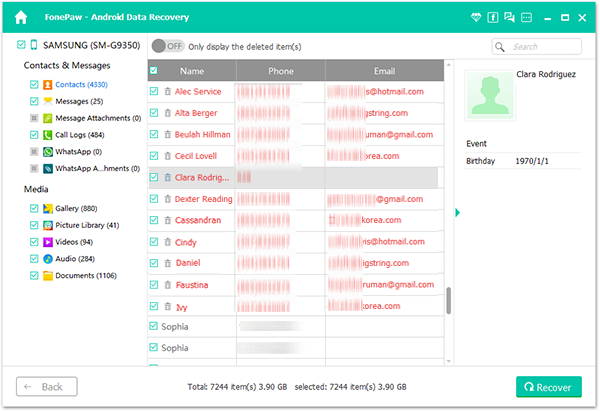
Step 5. Check Deleted Files Under Standard Scan
Once the program gets permission, it will start a standard scan, which can find out thumbnails of deleted photos as well as existing files on your Android phone. If you need to find more deleted files, click Deep Scan and wait patiently for phone file recovery to finish.
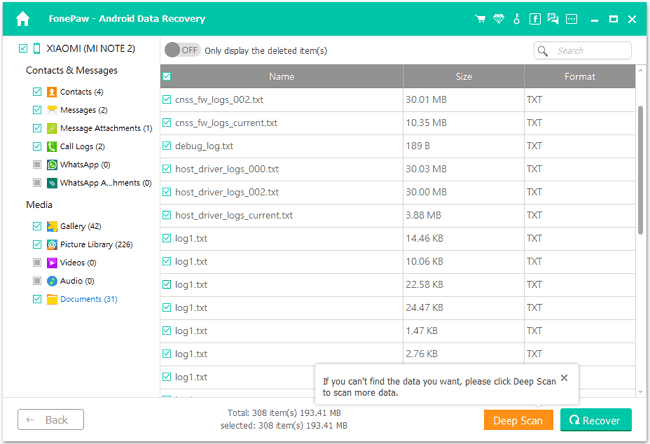
STEP 6. Recover Lost Files from Android Under Deep Scan
When Deep Scan is finished, all your Android files will be displayed. To look at only the deleted files, tap the “ON” icon on the top to set to display the deleted items only. Select the deleted files that you are looking for and click “Recover” . The deleted files will be retrieved and saved on your computer.
That is how to get back deleted items from Android phones and tablets.
Does It Possible to Recover Deleted Files from Android without Root?
Some users are looking for a method to recover deleted data on Android without root, however, we are sorry to tell you that it is impossible to retrieve the deleted data unless the phone is rooted . The deleted files are in the part of the file system that is only accessible with root privilege.
So if you really need to get the deleted files back, give the data recovery program root access to the phone. After the data are back, you can unroot your phone anytime you want.
Solution 1: Root Android Phone in Recovery Mode
To begin with, you should get your phone well prepared for the rooting, including:
- Make sure that your phone is fully charged or at least 60% charged. In low battery, the phone may crash during the rooting;
- Back up important files on your phone, such as messages, contacts, photos, videos to computer or locally. It is more recommendable that you have a copy of the important files on PC. And Android Data Recovery is the exact tool that can help you to make a thorough backup of your phone data on PC;
- Completely exit background applications in your phone, especially antivirus and battery checkup applications.
After the above preparation, you may get started with the rooting:
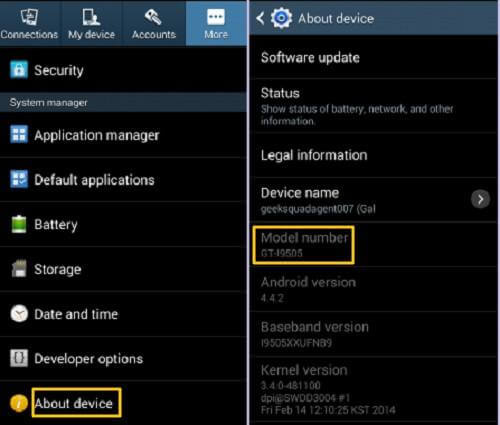
Step 1. Identify the model number of your device. For example, if you are using Samsung S3, you may go to “Settings” > “About phone” > “Model number” and find the model number.
Step 2. Download suitable root package online according to the model number of your device . The package is usually a zip file, which you can often find in forums such as xda-developers.
Step 3. Enable USB Debugging on your mobile phone and connect your mobile phone to the computer.
Step 4. Copy the zip file, and place the file in the SD card of your phone. Please don’t paste the file into any folder of the SD card. Just place it into the main directory(root) of your SD card .
Step 5. Power off your mobile phone.
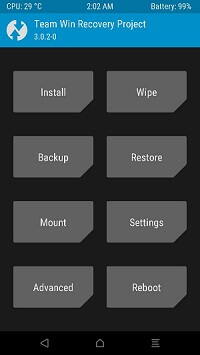
Step 6. Put the phone into recovery mode. Take Samsung device as example, keep pressing the “Volume Up” button, “Home” button and “Power” Button at the same time until you see the following page (Tip: other device such as ZTE, LG, OnePlus, Huawei, Nexus may have different button combinations to enter recovery mode ).
Step 7. In the recovery menu, use the “Volume Up” and “Volume Down” button to highlight the option “Apply update from sd card”. Press the home button to enter the option.
Step 8. Select the zip file that you have downloaded on SD card. The rooting process willl begin.
Step 9. Wait till the rooting is completed. Then select “reboot system now” and press “Home” button to reboot your phone (Tip: When installing some zip files, the phone will reboot automatically).
Now you’ll see the Super User has installed on your phone.
Solution 2: Unroot Android with Ease
Unrooting Android phone in recovery mode is very similar to that of rooting the phone. Again, you need to back up important files to PC with Android Data Recovery, preparing for the risk of data loss and keep your phone fully charged.
Step 1. Download proper unroot zip file to your computer. Then copy the zip file to the main directory of the SD card of your phone.
Step 2. Switch off the phone and put the phone into recovery mode.
Step 3. On the menu of recovery mode, again, choose “Apply update from sd card”. But this time, choose the unroot zip file from SD card.
Step 4. Wait till the unrooting process to finish. Then reboot your phone.
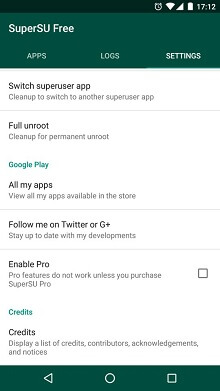
Unroot with SuperSU is strongly-recommended since it is relatively safe while the former method may cause some errors in the process of removing root. Actually, you must have installed the root manager after rooting. Thus, the following steps must be a practical means for you.
Step 1. Launch the app and move to “SETTINGS” to find out “Full unroot” so the process will begin.
Step 2. Tap it and there is a pop-up to inform you that root will be lost if the cleanup succeeds. Just hit “CONTINUE” to fix it.
With the above method, you are able to customize your phone to the way you like. (Source: fonepaw)
Good luck! 
Optional: *You can try this as well: [Giveaway] Coolmuster Lab.Fone for Android 1 Year License