I got the internet for only Whatsapp, now I’m worried can I use it for surfing websites, youtube, other…
Can you please help me out if it’s possible, please!
I got the internet for only Whatsapp, now I’m worried can I use it for surfing websites, youtube, other…
Can you please help me out if it’s possible, please!
You’re talking about the prepaid Social Media Pack services, that now a days some telecom companies are providing for their subscribers for “Free”. ![]()
It is possible to do that, but might be a bit headache for a newbie to put their hands on…
There is nothing technical thing you can do from your side, because that lock is from the provider’s end,
In this tutorial you will learn how to convert any social data pack, Facebook data pack and Youtube data pack into regular data pack. This tutorial is not limited to any one country or any one ISP. This tutorial works for almost every country, ISP or telecommunication company.
The reason this tutorial is important is that most of the times ISP or telecommunication companies provide social data packs. Such as Facebook data pack, Youtube data pack to its users at a much much cheaper rate compared to regular data packs. So would that not be wise to use social data pack to surf the internet for cheap?
Okay then let me tell you what happens in the process very quickly. I’m assuming that you have purchased some kind of social data pack. You use an app that’s called HTTP injector which fools your ISP. Your ISP thinks that you are using the social site that you are subscribed to even when you are surfing other sites or downloading stuff off the internet. And surely your social data pack will be deducted.
Now, let’s start with the stuff you need.
You can download HTTP injector from the link provided above or download it from the play store.
First of all, you will need internet access to of course download the app and also create an SSH account for yourself. Go to “fastssh.com” on the homepage you will see a lot of options saying ‘ssh server in Asia’, ‘ssh server in Europe’ etc. From there you can select any option but it is preferred to select the account of the country which is nearest to your location. This will ensure fast and more stable connections.
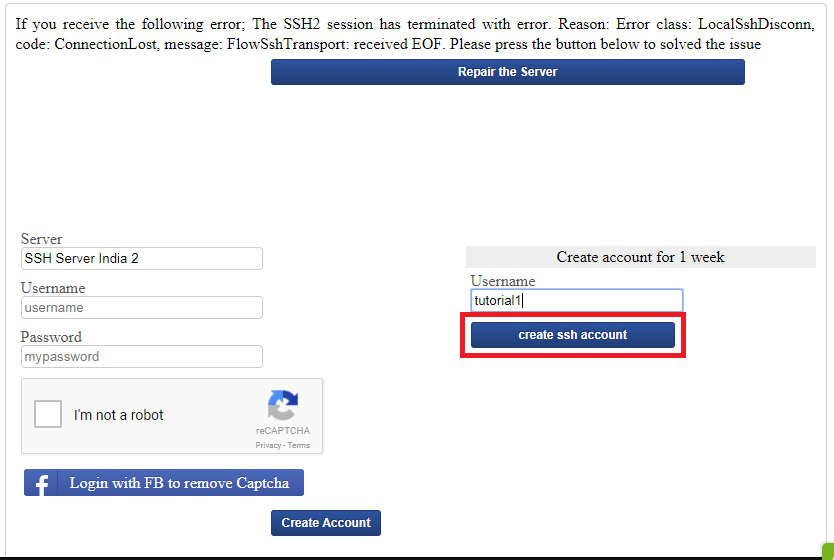
Okay, then I select Asia. After that, you will see the names of the countries of that continent, select the one which is nearest to your location. For now, I select in India. In the next screen, you might see multiple servers to choose from according to what country you selected. For me, there are 2 servers available “SSH server India 1” and “SSH server India 2”. It is preferred that you select the one which has the most number of accounts remaining. If there are no accounts remaining on any of them then go back and select the 2nd nearest country to your location.
In my case, both of them have account remaining but I will go with “SSH server India 2”. Click on ‘create SSH account India 2’. Type in the username you wish under “ Create the account for one week ” header and click on “Create ssh account”. In the next screen scroll down to the bottom and click on “ Continue Create Account “.
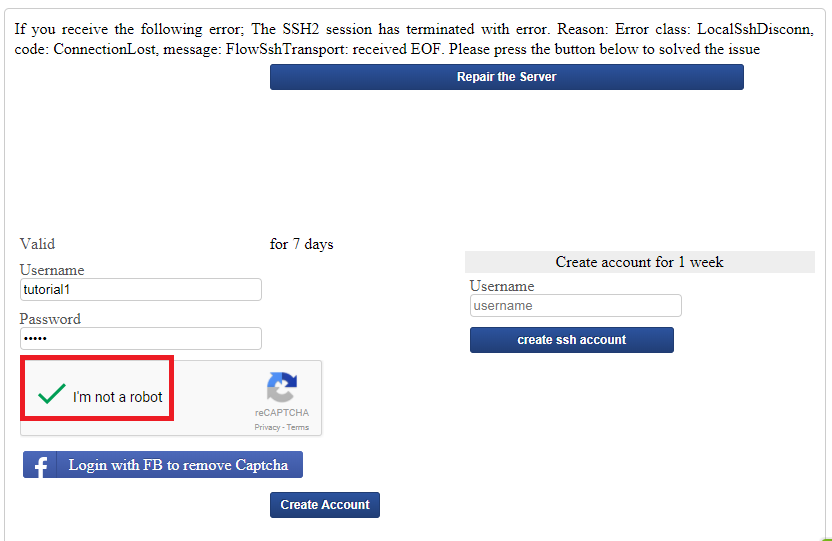
Type in your password and click on I’m not a robot check box. And verify by completing some image identifying task you are provided with. Or you can just click on “ Login with FB to remove the Captcha ” option and log in your facebook account to remove the Captcha or to create an account without verifying.
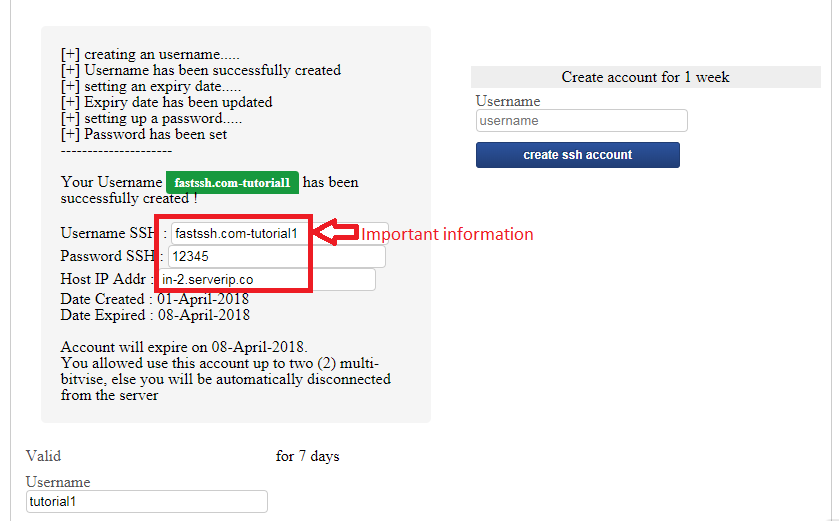
After your account is created take a screenshot of it or even better leave the tab open because you will need the information in the next step. Or even better copy these pieces of information from the page to a text file or any note taking app:
Now that you are done creating an SSH account, next you need to find squid proxy for your particular server. You may also use the proxy provided by your ISP. But most of the times proxy provided by your ISP won’t do the job. So it’s better if you use a squid proxy.
Remember this all server have their own squid proxy. I mean to say one squid proxy won’t work for all servers. You need to find squid proxy for your particular server.
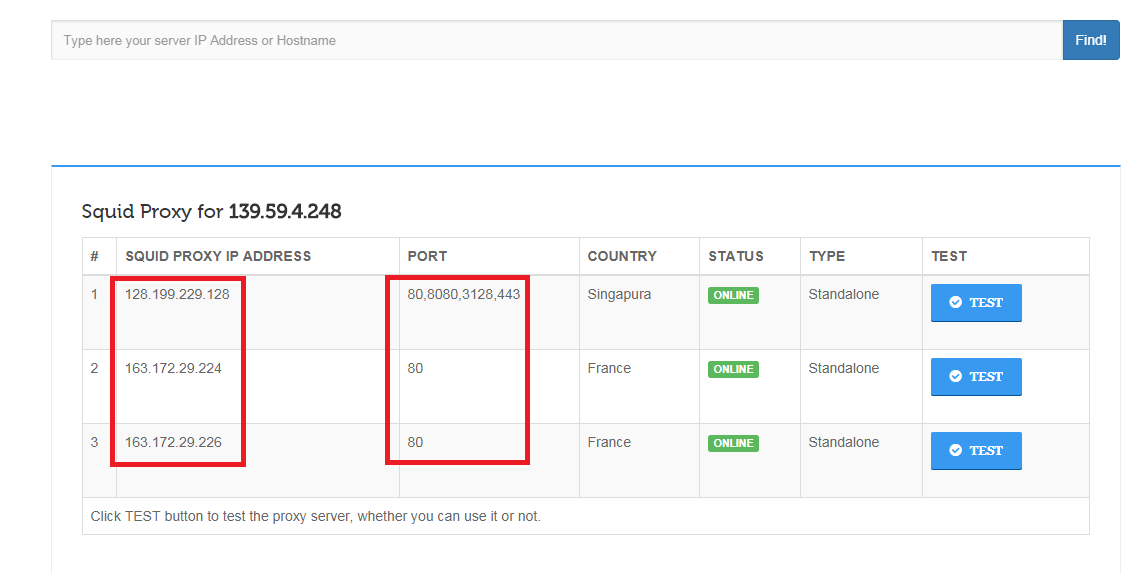
you will need to go to squidproxy.org and paste your server’s host IP address in there and click on “ Find ” to find a squid proxy. Remember you saved the Host IP address in the previous step.
After that, you will need to scroll down a little bit to see the list of squid proxy for your server. You can copy any one of them but copying the first one on the list is preferred. You can also take a screenshot of the page or copy all of the squid proxy and their port to a text file for future use.
Now that you are almost done go ahead and purchase any social data pack like Facebook data pack or Youtube data pack. It is advisable that you do not leave any balance in your account after you have purchased the data pack.
Either use it up for something else or transfer it to your family or friends if your service provider allows it. I’m assuming that you have purchased a Facebook data pack.
Finally, everything you needed to do is done. The battle is won already in a sense. All you need to do now is input the information you acquired from the above steps into the app and generate a payload that’s suitable for your social data pack.
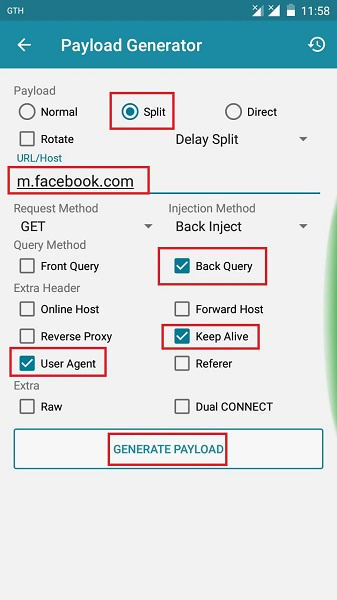
Launch the HTTP injector app then open the options menu and click on “ Payload Generator ” from there. Under “ Payload ” header select “Split ” then in the “ URL/Host ” field enter the address of the site which you can access. I mean enter “m.facebook.com” there if you need to convert facebook data pack into regular data pack, enter “m.youtube.com” if you need to convert youtube data pack into regular data pack and so on.
In my case, I will enter “ m.facebook.com ” because I have purchased a Facebook data pack. after that tick “Back Query” option under “ Query Method ” header. Finally, tick “Keep alive” and “User Agent” under “ Extra Header ” option.
Leave everything else as it is and click on “ GENERATE PAYLOAD ” to generate the payload. Most of the times this payload should work just fine. But if in any case, it doesn’t work for you then play with the “ Payload Generator ” setting, try to make some changes in the payload and try again.
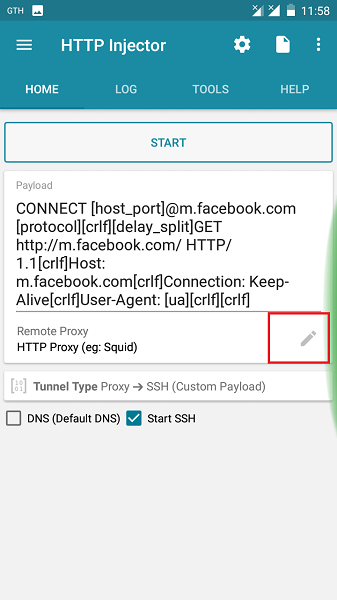
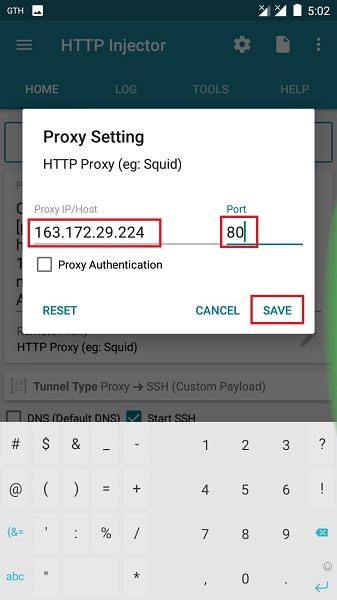
After that go back to the HTTP injector’s homepage and add the squid proxy you acquired earlier under “ Remote Proxy ” header and press “ Save “. For me, it is “ 163.172.29.224 ” and port “ 80 “. I’m not using the first squid which was on the list because my ISP blocked it. So it won’t work. If it is the case with you then you too need to do the same.
Click this edit button first to edit remote proxy setting.
Then type in your proxy and port.
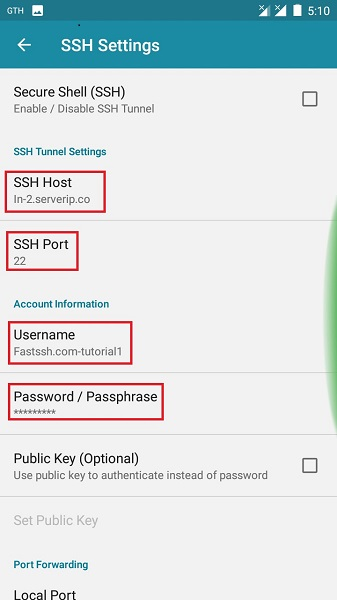
Now click on setting option located in the upper left corner of the app then click on “ Secure Shell (SSH) ” option. There you will see many options. But you need to only fill up “ SSH Host “, “ SSH Port “, “ Username “, and “ Password ” information. Use the information you saved from the Fastssh website while you created your SSH account.
Leave everything else as it is. Go back to the app’s home page and tick both options that say “ DNS ” and “ Start SSH “. Turn your mobile data on and press the “ START ” button to connect. Once HTTP injector is successfully connected you can surf any webpage or download stuff you want without any issues.
If any app like Play store or Youtube is not working properly then try toggling “ DNS ” option on or off.
Credits: awesomedetect, TechWonk Tutorials & Various Forums!