Gmail is one of the most used email service providers; and there is a good reason behind it. First of all, it’s free and accompanies other services from Google. Then, it packs in a lot of features to help you efficiently manage your inbox and boost your productivity. However, it’s not common for people to know all of them.
That’s why I’ve compiled a list of the handiest features of Gmail in this write-up. I will introduce you to those features, discuss their use cases, and tell how to use them in simple-to-follow steps. Sounds exciting?
Let’s get started.
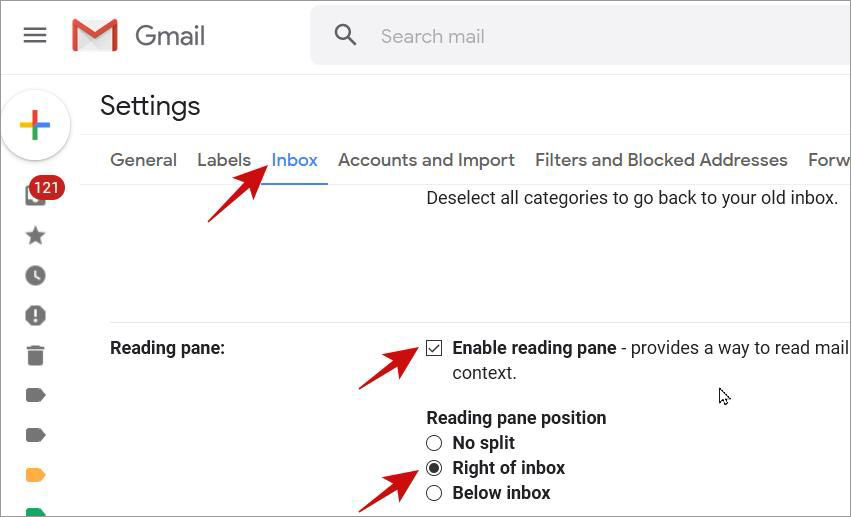
Enable Reading Pane for Quick View
Reading Pane is an awesome feature in Gmail. I remember first using it in Outlook (the email application, not the new email service from Microsoft) many years back.
Since it’s so useful, I used to miss it until it was launched in Gmail as part of the Advanced or Labs feature, and now, it’s an official feature in Gmail.
It divides the whole inbox into two panes: left-right or top-bottom depending on your preference. It allows you to check the list of emails in one pane and preview the complete message in the other pane, speeding up checking emails.
How to enable the Reading Pane in Gmail:
- In Gmail, click on the gear icon, then click See all settings.
- Go to the Inbox tab, and check under the Reading pane.
- Click Enable reading pane and choose Right of inbox.
- Finally, click Save Changes at the bottom.
Enable AI-powered Text Suggestions
Gmail helps you write emails faster by suggesting words and phrases, thanks to its Smart Compose and other AI-enabled features. If you’ve used the Google Keyboard in Android, you must have used the text predictions.
Smart Compose brings similar text predictions to your inbox, allowing you to pick one of the suggested texts by pressing Tab while writing emails in the Compose box.
How to enable predictive text suggestions in Gmail:
- In Gmail, click on the gear icon > See all settings.
- Under the General tab, scroll down to Smart Compose.
- Click Writing suggestions on, then click Save Changes at the bottom.
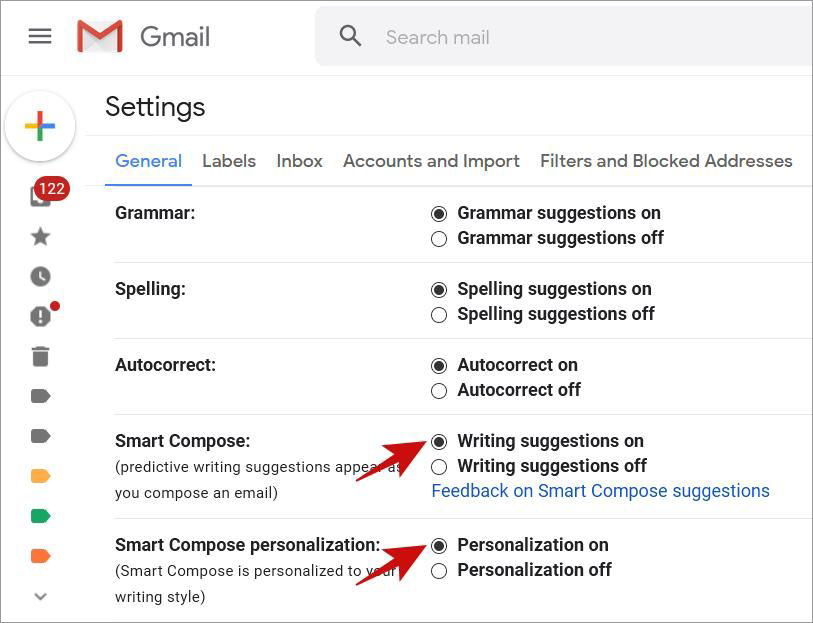
Pro tip: You can also click to enable Personalization on under this option in Settings. It helps Google provide better suggestions per your writing style.
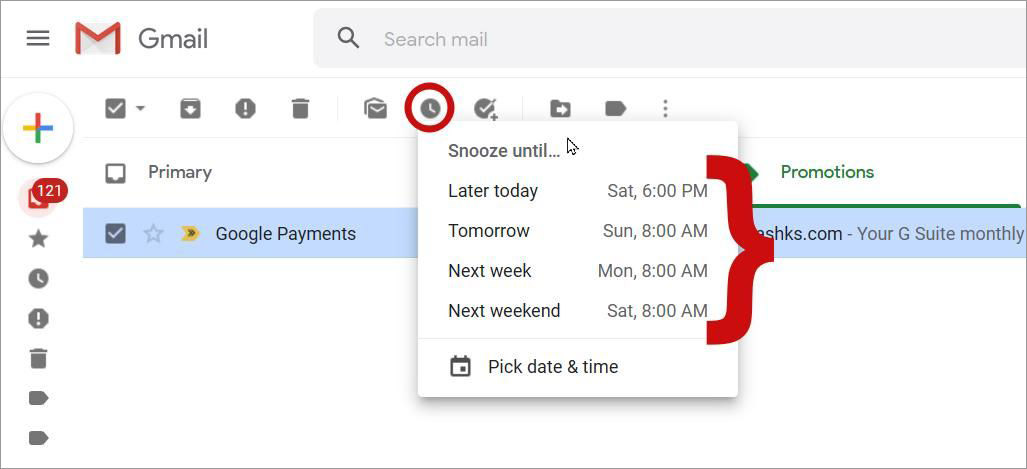
Snooze Emails to Check them Later
When you’re working your way towards Inbox Zero, i.e., you’re checking emails, you may get an email you need to respond to but can’t do it right away. For such emails, Gmail provides a handy feature — Snooze.
You can snooze such emails to hide them from your inbox for now and see them again at the set date/time.
- In Gmail, select the email(s) you want to snooze.
- In the toolbar below the search bar, click on Snooze.
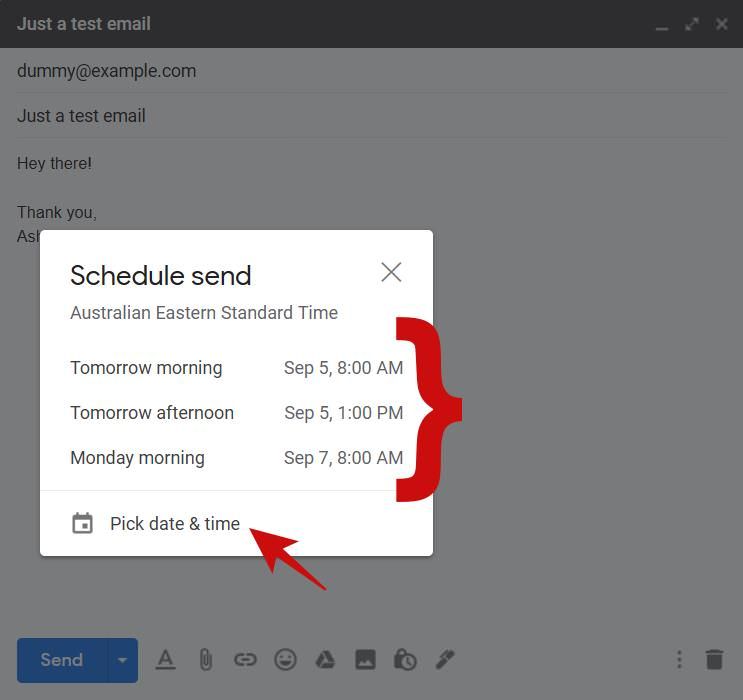
- Choose one of the time slots. Or you can click Pick date & time to select a custom date and time to get a notification for the snoozed email.
Schedule Emails to Auto-send them
Gmail helps you to automate emails by scheduling them, thanks to its Schedule Send feature. You only need to set a schedule for sending an email. Since it’s a feature in Gmail, it helps you avoid third-party tools for scheduling emails.
How to schedule sending an email in Gmail:
- In the Compose window, click on the down arrow next to Send.
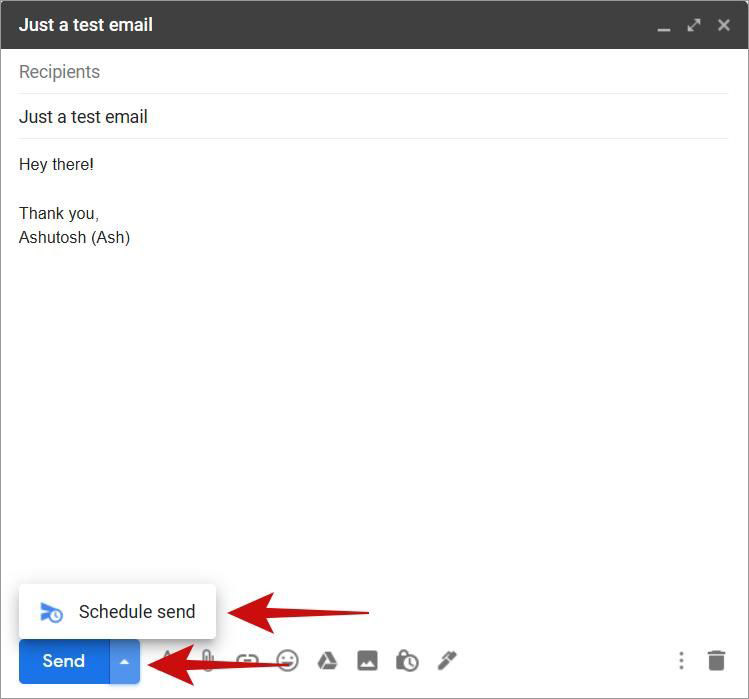
- Click Schedule send, and pick a time slot per preference. You can click Pick date & time to select a custom date and time to send the email.
Use the Confidential Mode for Emails
Gmail allows you to create and send private emails that can’t be copied, downloaded, or forwarded as it gets automatically deleted later, thanks to its Confidential Mode.
This can be done by setting an expiration date for your email. Also, Gmail encrypts your email using a passcode that it sends to the receiver.
How to enable Confidential Mode in Gmail:
- In the Compose box, click on the lock-clock icon at the bottom.
- In the Confidential mode window, set an expiration for the email.
- Then, hit Save, and finally, send the email as you always do in Gmail.
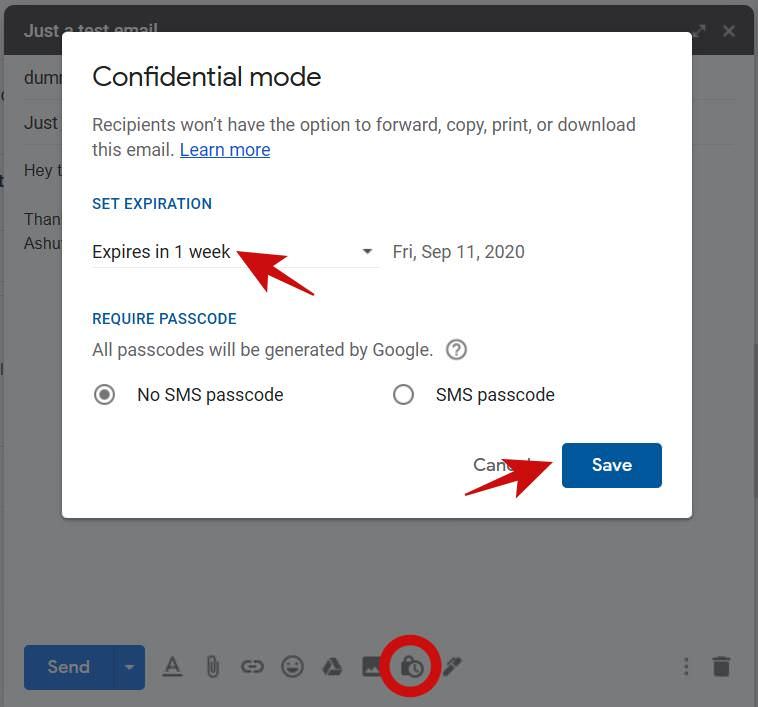
Pro tip: Click on SMS passcode in the Confidential mode window for better security. Gmail — by default — send the passcode via email, but this setting asks Gmail to send the passcode via SMS, adding extra protection like OTPs.
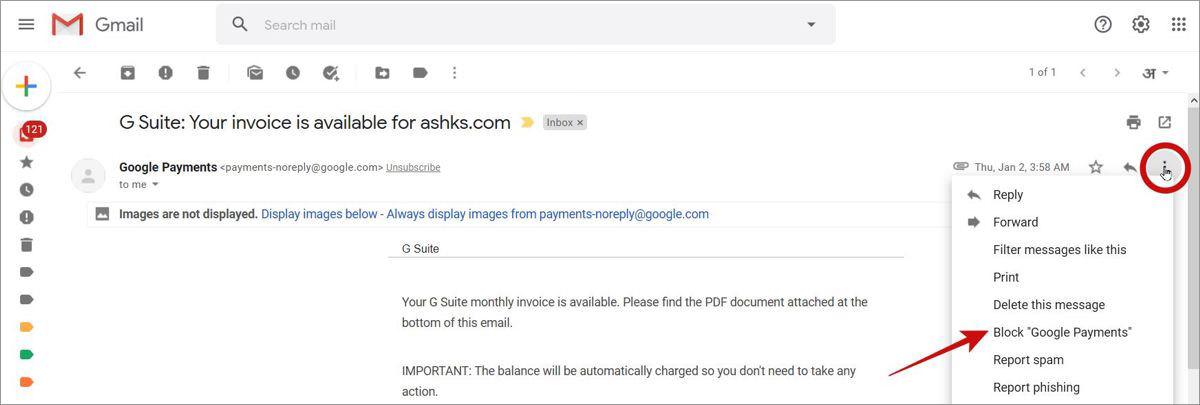
Block Marketing or Unwanted Emails
It’s very common to get marketing, spam, or unwanted emails in your inbox — even with the superb spam protection features in Gmail. However, Gmail has an in-store feature to help you in such situations. You can block a sender from your inbox — all emails from them will get auto-moved to the spam folder.
How to block an unwanted sender in Gmail:
- In Gmail, open the email for which you want to block the sender.
- Click on its More button and click Block “<sender_name>”.
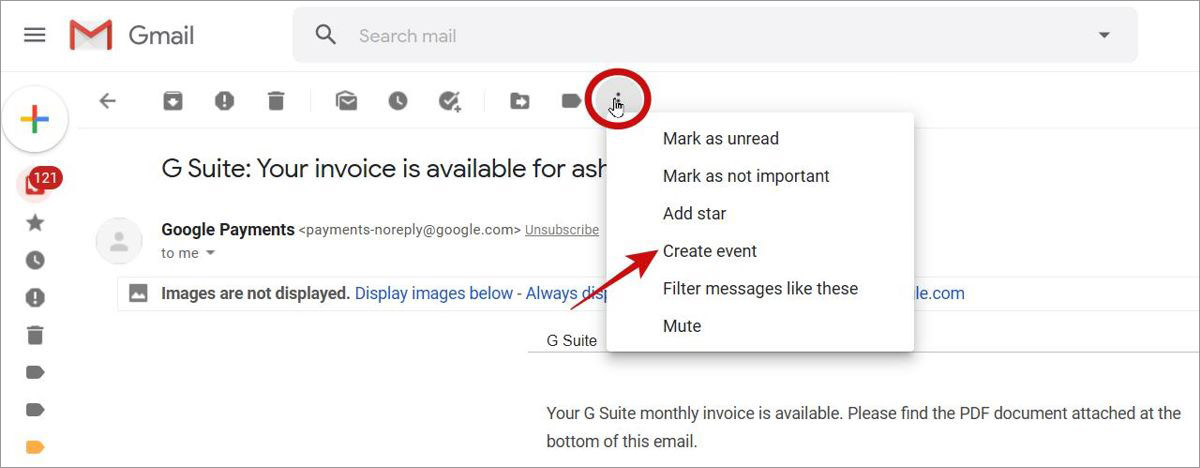
Create Calendar Events from your Emails
If someone sent you an email for setting up a meeting or maybe an invite for an event, you can easily add them to Google Calendar. Gmail helps you achieve it by letting you quickly create events from emails with most info pre-filled.
How to create a calendar event from an email in Gmail:
- In Gmail, open the email for which you want to create an event.
- In the toolbar below the search bar, click on More button > Create event.
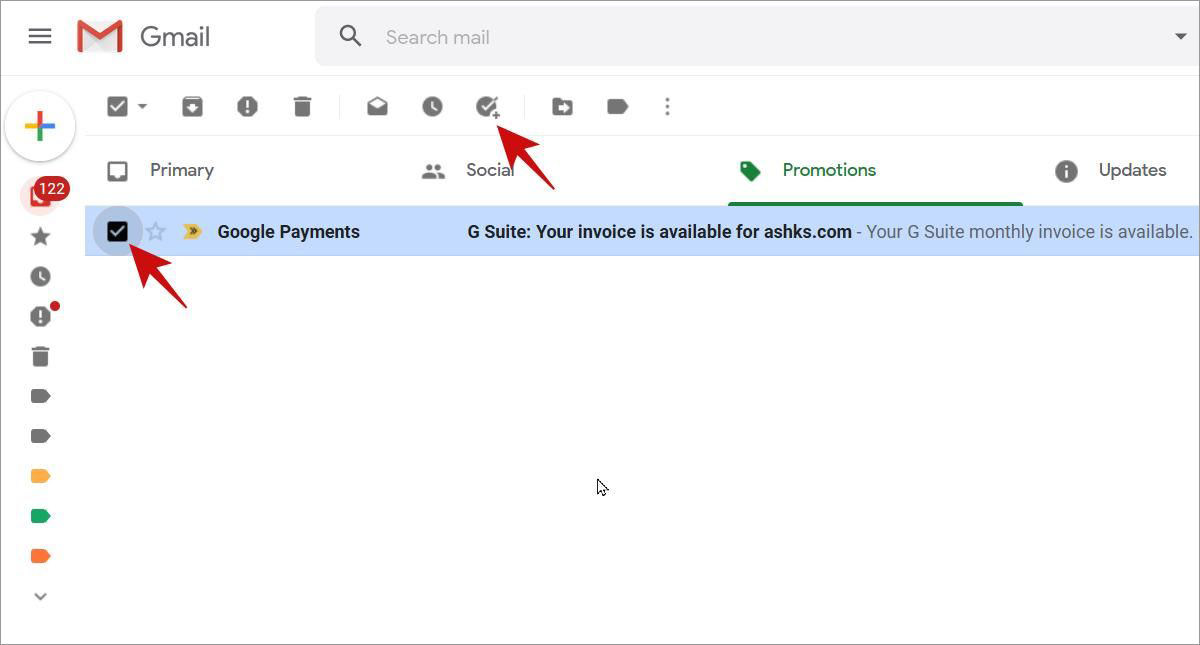
Add important Emails to Google Tasks
Gmail lets you create tasks from important emails right inside the inbox. It helps you to keep track of important information, upcoming projects, etc. You can also set reminders for those tasks to remind yourself on their deadlines.
How to add emails to Google Tasks:
- In Gmail, select the email(s) you want to create a task for.
- In the toolbar below search bar, click on Add to tasks.
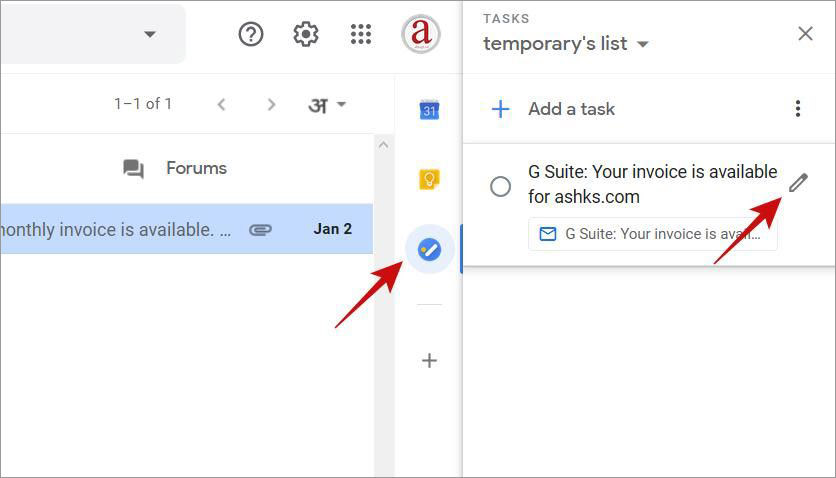
Pro tip: In the sidebar, you’ll see the task > click on the pencil icon to edit it.
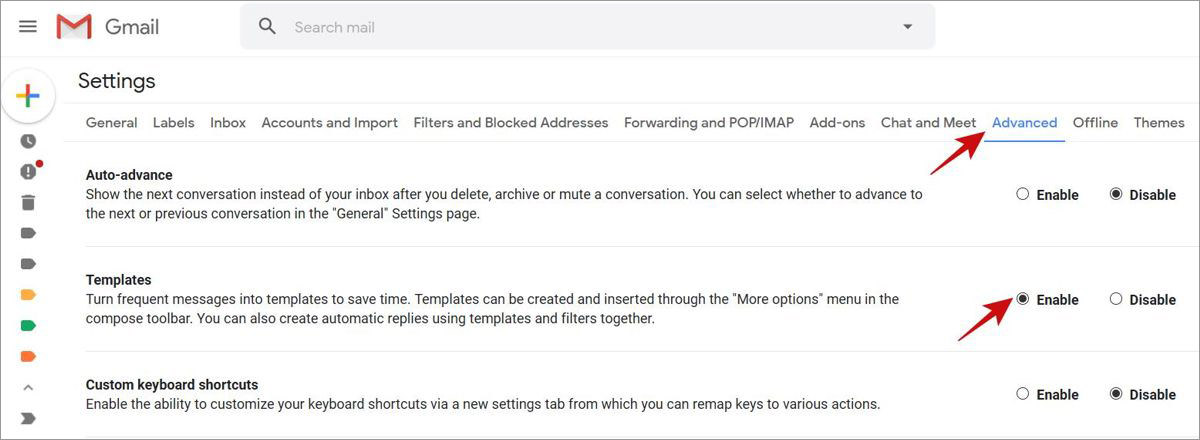
Use Templates to Write Emails Faster
Why write the same email again and again — even if you are just copying and pasting them? Gmail helps you create and save emails as templates, which you can later use to create and send similar emails. It helps you save time and improve productivity — especially if your work requires sending emails.
How to enable Templates in Gmail:
- In Gmail, click on the gear icon, then click See all settings.
- Go to the Advanced tab, and under Templates, click Enable.
How to make use of Templates in Gmail:
- In the Compose box, click the More button and go to Templates.
- Click on a template under INSERT TEMPLATE to insert it to the email.
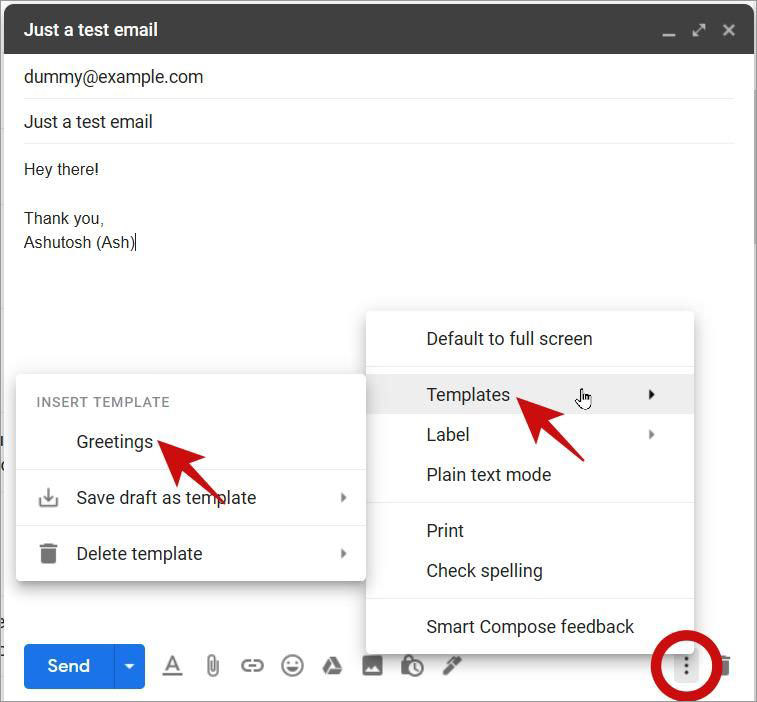
- Or click on Save draft as template for saving the email as a new template.
Switch among Multiple Signatures in Gmail
Email signatures are a superb method for adding additional info about yourself. In organizations, people usually add their designation and contact information as part of their email signatures. The same applies to any person sending emails in the modern age. What’s interesting is, Gmail lets you create multiple signatures, which you can quickly add or switch signatures while writing a new email.
How to add multiple signatures in Gmail:
- In Gmail, click on the gear icon, then click See all settings.
- Under the General tab, scroll down to the Signature option.
- Click Create new, enter a Signature name, and click Create.
- Then, write your new email signature in the given text box.
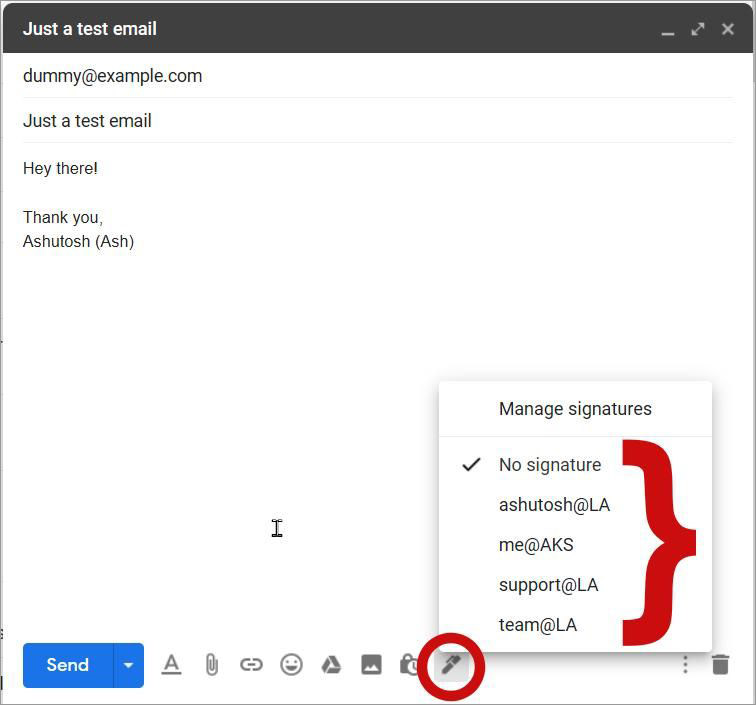
How to switch signature while writing an email in Gmail:
- In the Compose window, click the pen icon at the bottom toolbar.
- Click on one of the signatures to add it to the current email.
Translate Email Messages directly in Gmail
In the modern world where Earth has become small, it’s not uncommon to get an email in a foreign language. Gmail helps in such situations, thanks to its Translate Message feature, which helps you translate an email using Google Translate. You may not find it useful until one day when you need it.
How to translate messages in Gmail:
- In Gmail, open an email you wish to translate.
- Click the More button and click Translate message.
- Then, you’ll see the translate bar at the top of the email’s message. In there, click on the source and target language (or just select the latter).

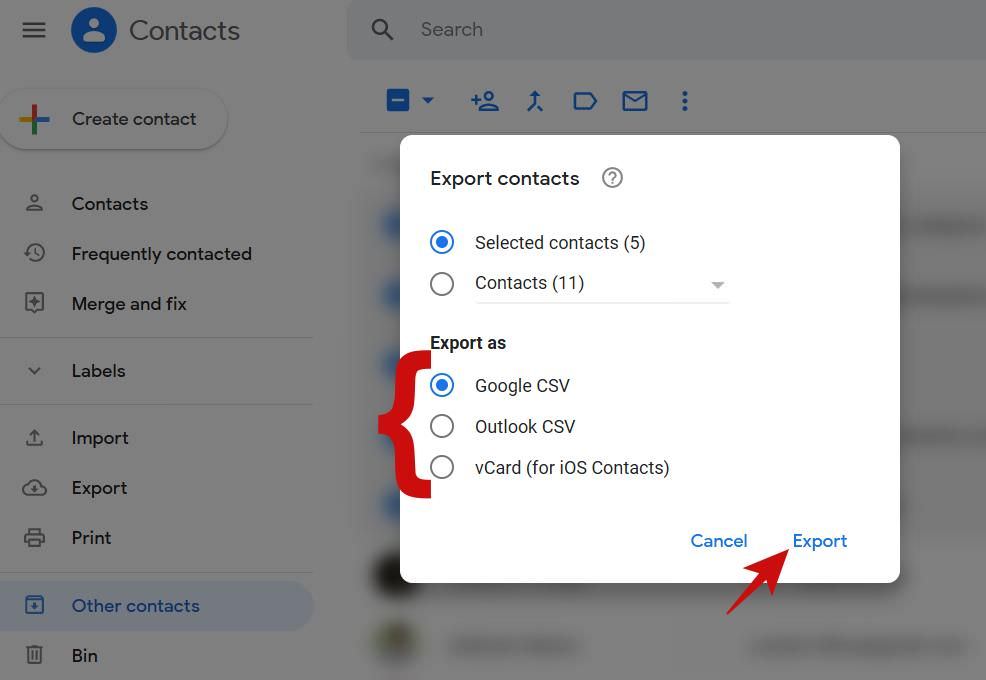
Export Email Addresses of your Contacts
Gmail — or Google Contacts to be exact — allows you to create a backup of all your contacts and export it as CSV. An exported file having all your contacts helps at safe-keeping your data or importing them into some other tool. For example, if you’re building an email or newsletter list, this comes handy.
How to enable creating contacts for emails in Gmail:
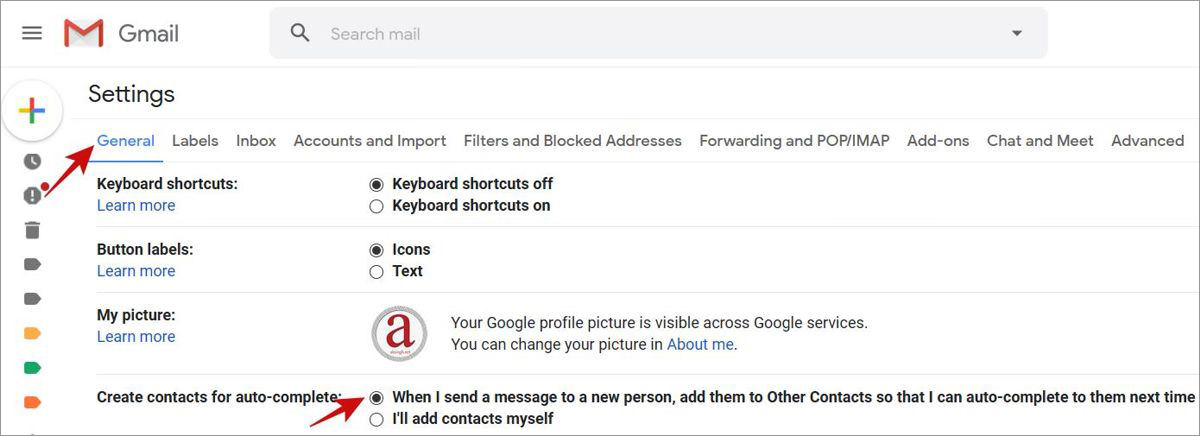
- In Gmail, click on the gear icon, then click See all settings.
- In the General tab, scroll down to Create contacts for auto-complete.
- Click on When I send a message to a new person, add them to Other Contacts so that I can auto-complete to them next time. This setting tells Gmail to auto-create contacts for your outgoing emails in the future.
How to export email addresses from Gmail:
- Open https://contacts.google.com/ in your web browser.
- In Google Contacts, click on Other contacts in the left sidebar.
- Select the contacts you want to export, click on the More button in the toolbar below the search bar, then click on the Export button.
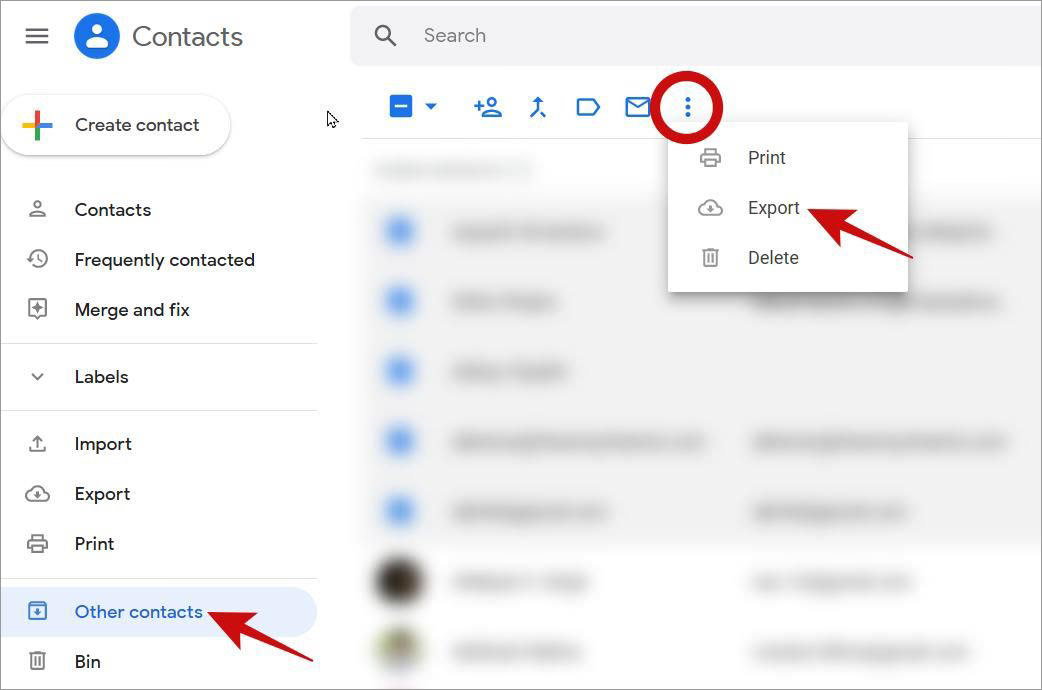
- Choose the format under Export as and click Export to export them.
That’s all about the tips/tricks for getting the most out of Gmail. (Source: 1Hack.us / hongkiat)
Happy learning!