Email is the most critical aspect of our digital identities, seeing that it can unlock the doors to our other digital accounts and assets. That is why we must secure our email accounts to keep our data from getting into wrong hands.
Though Gmail provides powerful security features yet we do not know or use all of them. That is why in this write-up, I am sharing the essential list of tips and tricks to help secure your account from unauthorized access, hacking attempts, and other malpractices. Alright then, let’s get started.
Harden Google Account
We will begin by hardening your Google account since every Gmail account is a Google account at first. I will help you check out the necessary settings to ensure your account is safe against common security problems. Additionally, I’ll show you how to configure a few things to harden its overall security.
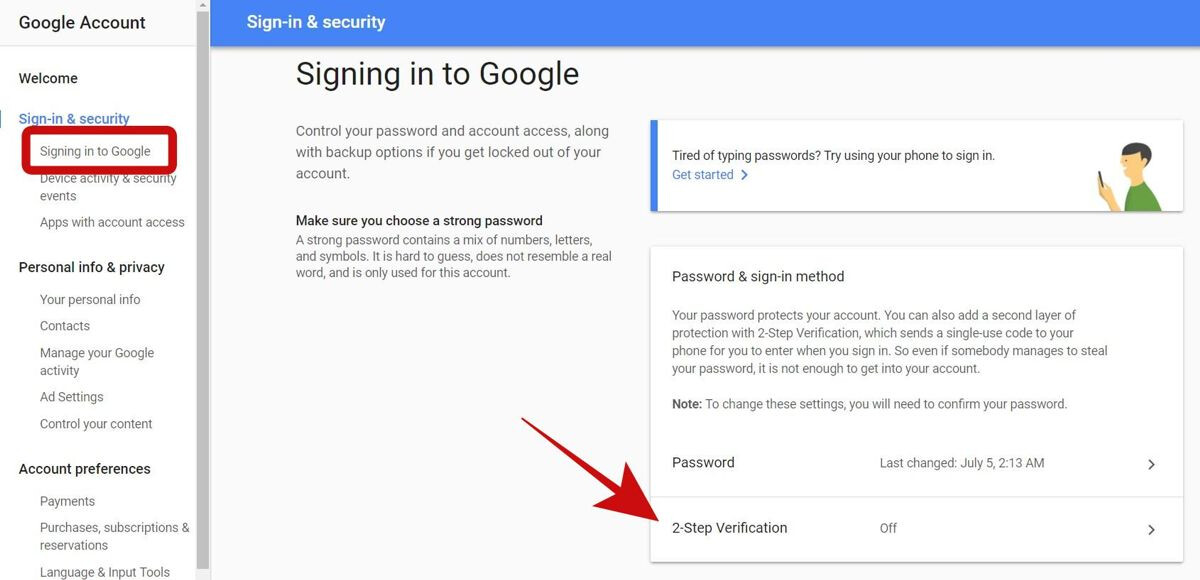
1. Turn on 2-Step Verification
2-Step Verification is an additional security strategy that helps to protect your account better as it asks you for a second authentication secret (other than a password). That is why it is always suggested to activate and use two-step verification for your account. You can enable it by following these steps:
- Open “Sign-in & security” in a browser and click “2-Step Verification“.
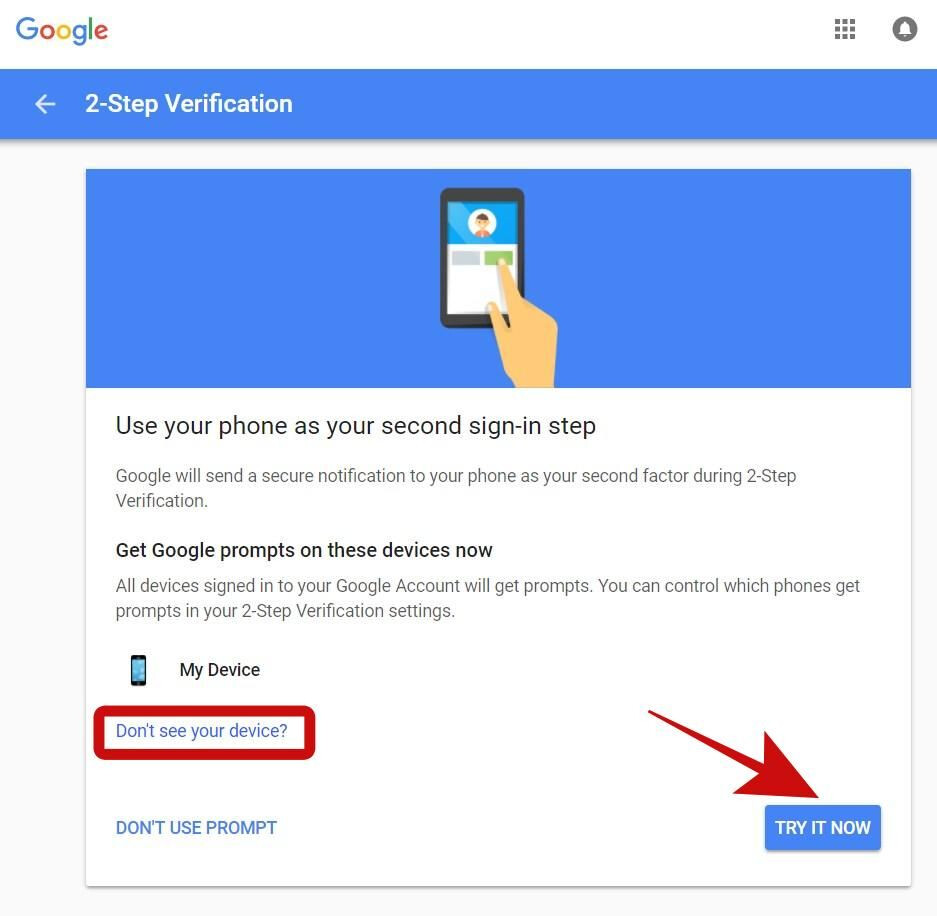
- Click “GET STARTED” on the next screen, then Google will ask you to use your phone as your second sign-in step — a feature named Google Prompt. If you wish to activate it, click “TRY IT NOW“, and if your phone is not shown, click “Don’t see your device?” to add it. However, if you wish to use your phone number instead, click “DON’T USE PROMPT”.
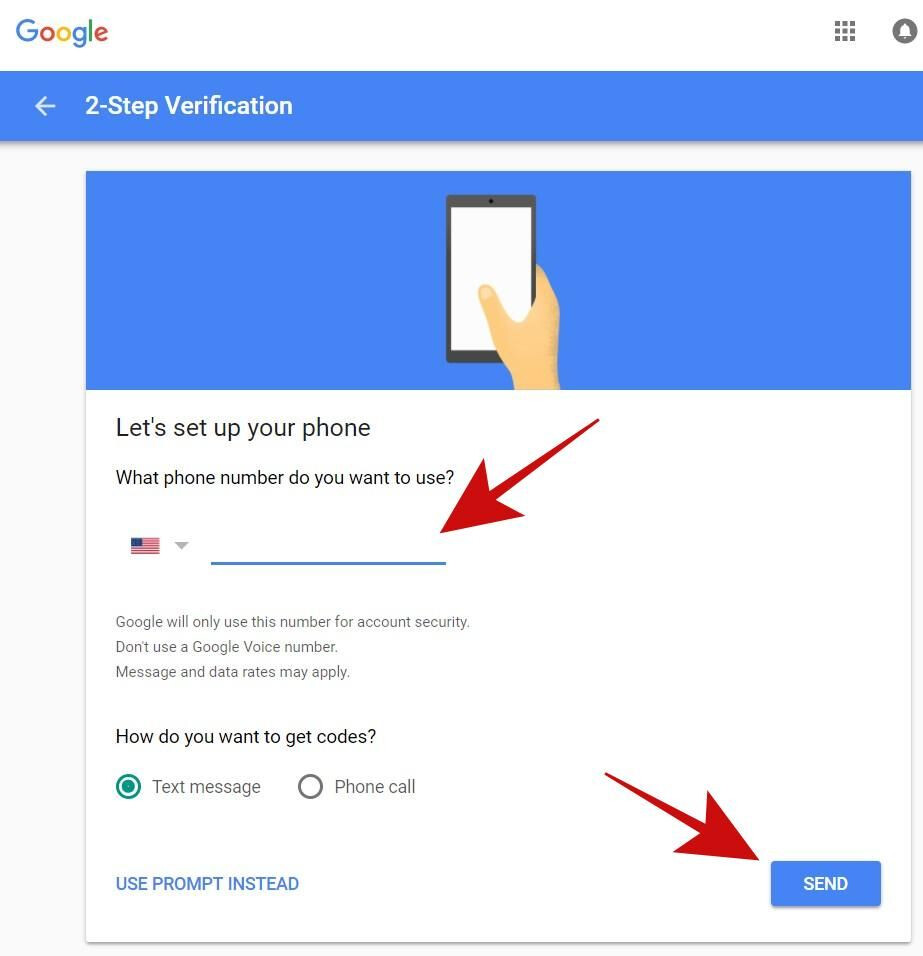
- If you clicked “DON’T USE PROMPT” in the last step and wish to set up your phone number as the two-step verification, then enter your phone number and press SEND. Google will send a verification code on your phone number. Enter it if asked, and you are done setting it up.
2. Set up recovery information
It is always a good idea to add some recovery info in cases where some information becomes inaccessible to you. In order to do that you will have to:
- Open “Sign-in & security” in your browser, and log in if asked.
- Click “Signing in to Google” in the left sidebar, and scroll down to the section named “Account recovery options“.
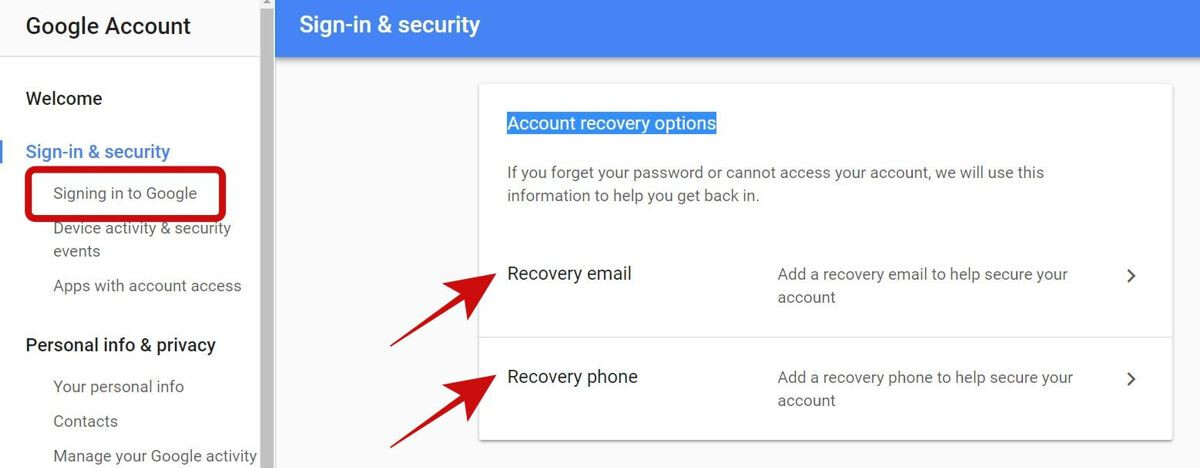
Add or change recovery email
Click on “Recovery email”, then click on “ADD RECOVERY EMAIL“, then type in the email address you wish to add as the recovery email and click DONE. If you wish to edit it, click the pencil icon and change the recovery email.

Add or change recovery phone
Click on “Recovery phone”, then click on “ADD RECOVERY PHONE“, then type in the phone number you wish to add as the recovery phone and click NEXT. Google will ask you to confirm your number, so verify it, and it will get added. If you wish to edit it, click the pencil icon and change the recovery phone.

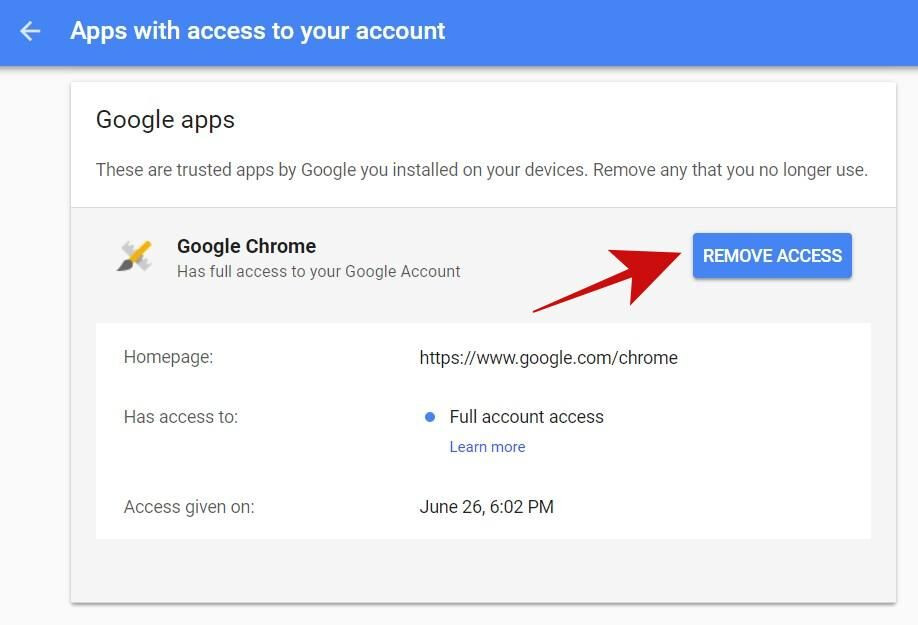
3. Revoke unauthorized apps
Whenever you log in to an app or website using your Google, you permit it to access your account, and it is an “indefinite-time pass” that you permit it. That means it can access your account anytime on its convenience though it can only access the info or services you have allowed it.
However, it is not safe to provide a stranger the key to your house, right? In the same way, it is safer to regularly check your account for unauthorized and unused apps and revoke them to protect your account. Here is how to do it:
- Open “Sign-in & security” in your browser, and log in if asked.
- Click “Apps with account access” on the left, then click “MANAGE APPS“.
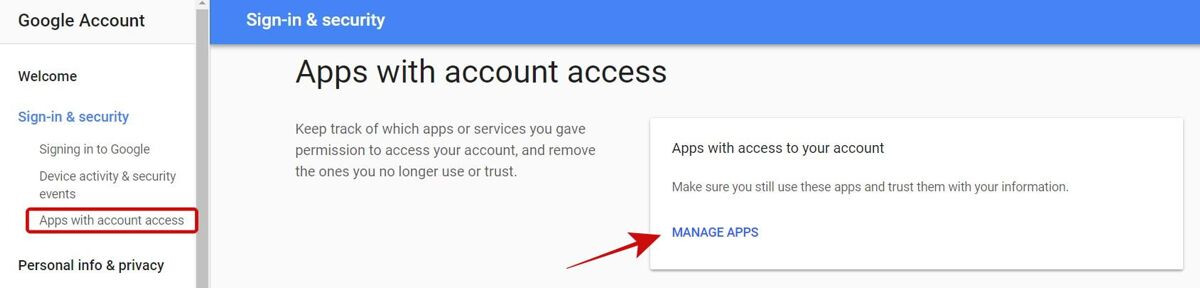
- Now you will see the list of apps connected to your account, i.e., apps that can access your account info based on their approved permissions. You can click on an app to view its details including its access permissions and the approval date and then click “REMOVE ACCESS” to revoke the app. I will suggest revoking all suspicious, unauthorized, and unused apps.
4. Disallow less-secure apps
“Allow less secure apps” is a security-overriding feature that allows apps with low security to access your account. Though it is highly recommended to keep this turned off yet you may have activated this feature for some reason, say to access your emails directly inside an email client like Microsoft Outlook.
Nevertheless, it is best to deactivate this feature, and you can always look for an alternative for the less-secure app you need to have this setting turned on for. For example, you can switch to the new Gmail and use its offline feature to access the emails, respond to them, archive or delete them offline.
- Open “Sign-in & security” in your browser.
- Click “Apps with account access” in the left sidebar, and toggle off the button whose name starts with “Allow less secure apps”.

5. Check crucial account events
An activity log is a helpful security measure to identify and track probable hacking attempts or unauthorized accesses, and Google does maintain an activity log of your account. You must check it regularly and flag any suspicious event, like an unknown account or info update. Let’s see how can check this log:
- Open “Sign-in & security” in your browser.
- Click on “Device activity & security events” from the left.
- You will see two sections named “Recent security events” and “Recently used devices” — check these sections for suspicious events, such as a login from an unknown device or country. Also, you can click “REVIEW EVENTS” and “REVIEW DEVICES” to examine them in detail.
Harden Gmail Account
Once you are done hardening your Google account and configuring all basic security settings, it is now time to work on your Gmail account. Since we are talking about securing your emails in this post, it is of utmost importance to review and understand the safety features of your inbox — Gmail.
1. Check Gmail settings
Let’s first verify the settings of Gmail account to see if everything is alright. Though Gmail does not offer many options yet they are enough to secure your emails. Alright, let’s begin tweaking your inbox settings.
Firstly, click the clog/gear icon to open settings in Gmail, then continue below.

General tab
In this tab, please check the following options:
- Signature: Make sure the signature is neither tampered nor it contains any foreign or unknown links.
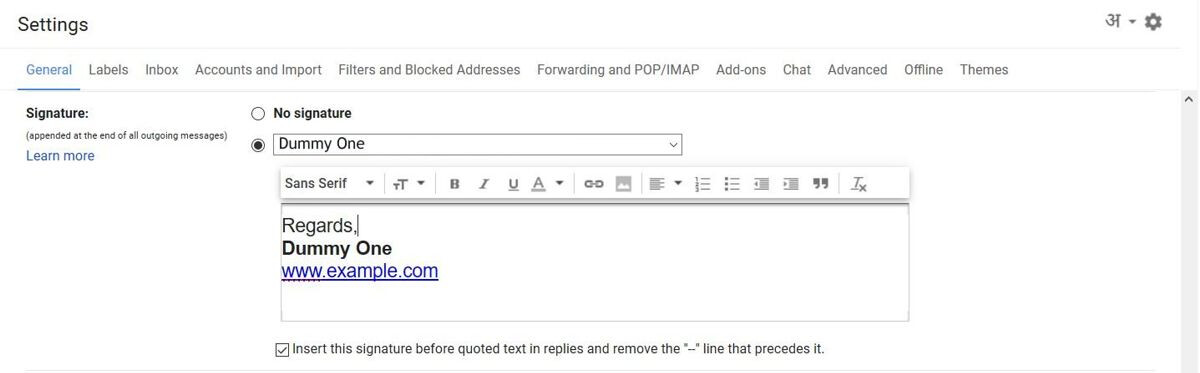
- Vacation responder: It should be turned on or off based on your configuration, and its content is correct.

Accounts and Import tab
In this tab, you need to verify the following options:
- Send mail as: Make sure that all email addresses listed under this section belong to you.
- Check mail from other accounts: All the email addresses listed here must be yours else you will be checking emails of some unknown persons without their permission.
- Grant access to your account: You need to check that this option does not list any unknown address. If it does, that would mean that someone has gained access to your account, and you must revoke him immediately. You can revoke a delegated person, click Delete shown along with it.

Filters and Blocked Addresses tab
Under this tab, you will come across the following:
- Filtered emails: Make sure that you do not have any additional filters. If you do have a suspicious filter, delete it immediately.
- Blocked emails: You can check all the blocked addressed in this section — you will not receive emails from these addresses, so make sure it doesn’t contain any known or essential email address. If it does, unblock it.

Forwarding and POP/IMAP tab
Under this tab, you shall check the following options:
- Forwarding: Make sure that your emails are not being forwarded to someone else without your permission. If you find such an unknown address, remove it to disallow others accessing your emails.
- POP Download: Check that POP is not enabled without you knowing about it.
- IMAP Access: You need to check that IMAP is not enabled if you are not using it.

2. Discard suspicious emails
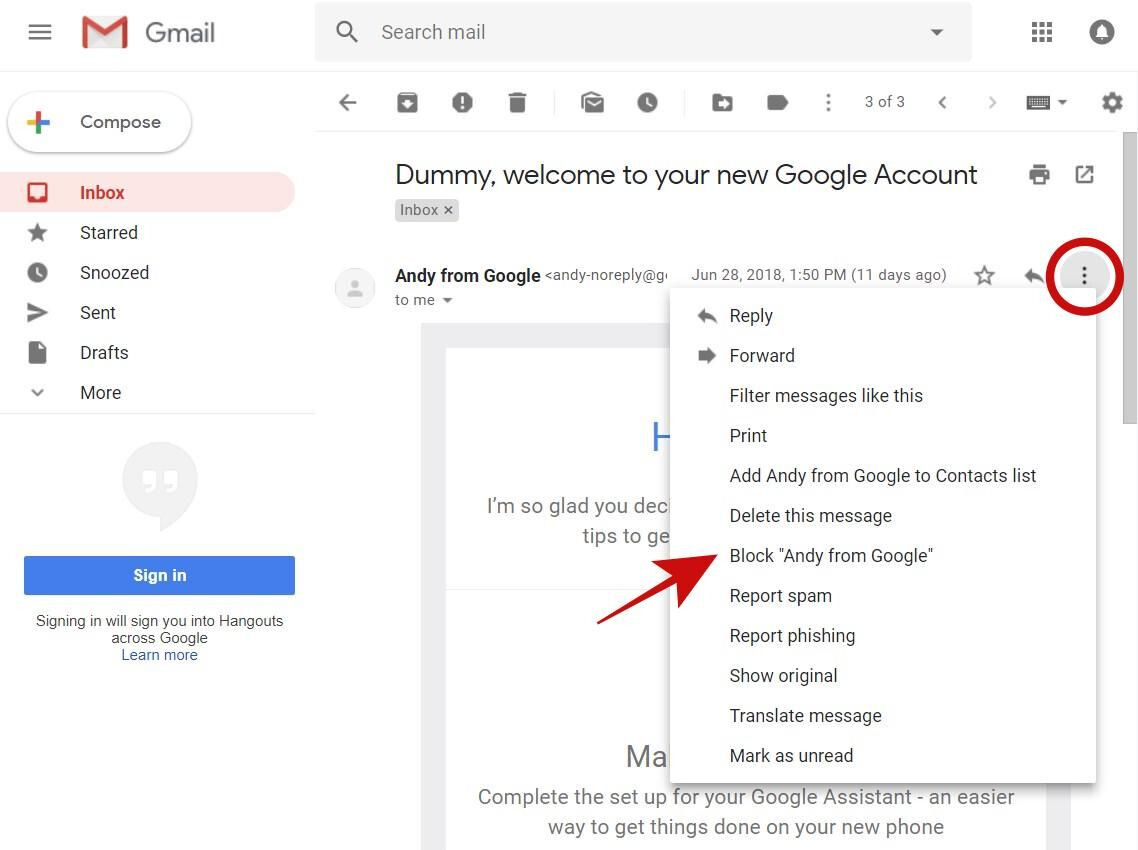
Block an email address
If you receive an email that you find fishy or suspicious, and you do not wish to receive any further emails from the same sender, then you can block the sender. Gmail will automatically send his future emails to Spam in your inbox.
In order to block an email address, follow the below steps:
- Open an email sent from the email address you want to block.
- Click on the options icon in the top-right corner of the message, and choose the option starting with “Block” from the options list.
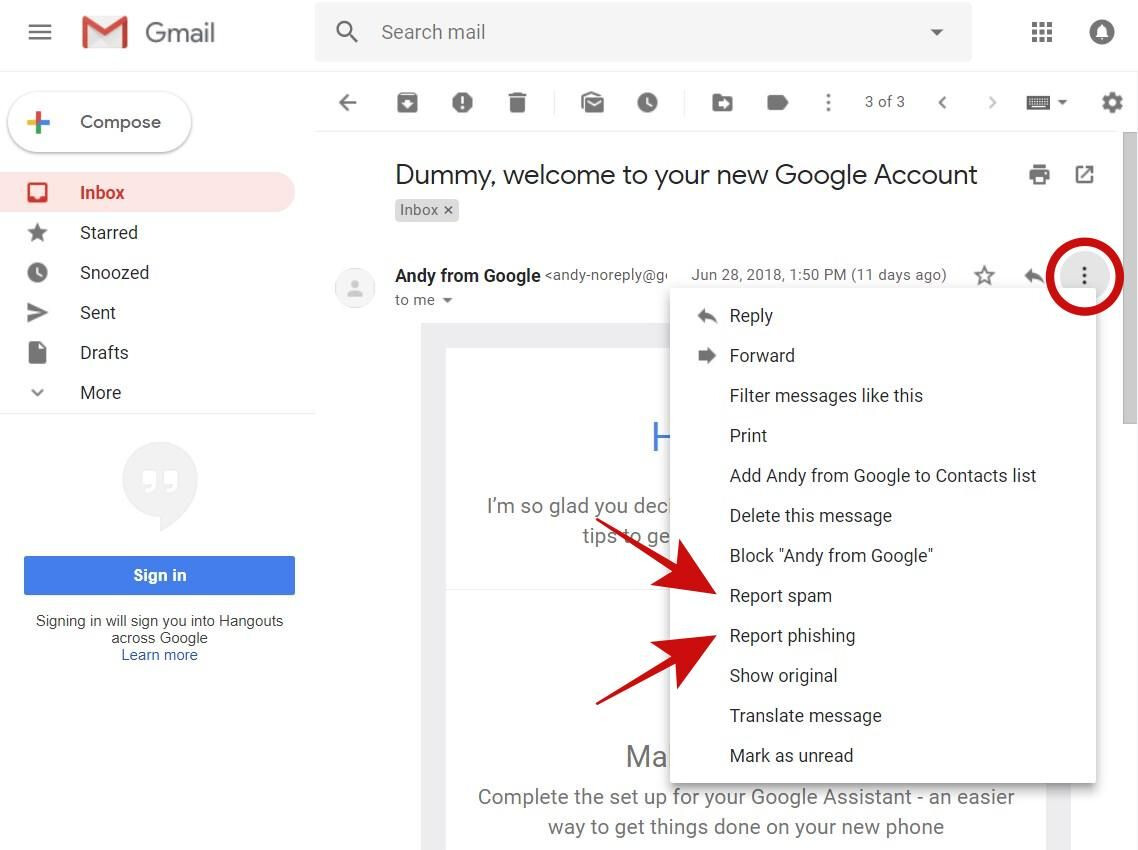
Report phishing/spam emails
It is not uncommon to receive phishing or spam emails, especially if it is your work address, which one usually shares with others. Of course, no one likes to read unwanted emails at their work, and if you feel the same, you can report them and if found legit, Gmail will treat them as spam emails in the future.
If you wish to report suspicious emails, then do the following steps:
- Open a phishing/spam message in Gmail.
- Click on the options icon that is visible in the top-right corner, and choose one of the “Report phishing” or “Report spam” based on the type of the suspicious email you want to report to Google.
I hope you found this post helpful in securing your emails while using Gmail. (Source: hongkiat)
Happy learning!