I’ve been developing websites for the better part of 10 years and one of my biggest issues was always local development and syncing local sites to live tests. Using a local environment is great because it is fast, but it isn’t viewable from afar and transferring somewhere means database operation, renaming tables, values and so on.
In this article, I’ll show you an easy way to run a local server which you can access from your phone and other mobile devices natively, and also broadcast over the Internet, which means sharing your work with clients, without leaving good ol’ localhost.
Using Vagrant To Create A Local Environment
A short while ago I wrote an article here on Hongkiat about using Vagrant so I’ll only go over the basics here. For more info, take a look at the article!
To get started, you’ll need to grab and install VirtualBox and Vagrant. Both are free and used to create a virtual machine which will run your server.
Now, create a folder to store your websites in. Let’s use a directory named “Websites” within our main user directory. That would be /Users/[username]/Websites on OS X and C:/Users/[username]/Websites on Windows.
Create a new folder named wordpress. This is where I’ll create the virtual machine. The idea is that each folder within Websites houses a separate virtual machine. While you can put as many websites on one virtual machine as you’d like, I do like to group them out by platforms — eg: WordPress, Laravel, Custom
For the purposes of this tutorial I’ll be creating a WordPress website.
Inside the WordPress folder we’ll need to create two files, Vagrantfile and install.sh. These will be used to set up our virtual machines. Jeffrey Way has created two great starter files; you can grab his Vagrantfile and install.sh files.
Next, using the terminal, navigate to the WordPress directory and type vagrant up. This will take a while, since the box needs to be downloaded and then installed.
Once the process is complete you should be able to go to 192.168.33.21 and see a properly served page. You content folder should be the html folder within the WordPress directory. You can now start adding files, install WordPress, or anything else you’d like.
Opening Local Sites On The Same Network Using Gulp
While building a site you should be thinking about responsiveness. Small screens can be emulated to some extent by narrowing the browser window, but it’s just not the same experience, especially if you throw retina screens in the mix.
Ideally you’ll want to open your local website on your mobile devices. This is not too difficult to do, provided your devices are on the same network.
To get this done we’ll be using Gulp and Browsersync. Gulp is a tool for the automation of development, Browsersync is a great tool that can not only create a local server but syncronize scrolling, clicks, forms and more across devices.
Installing Gulp
Installing Gulp is very easy. Head on over to the Getting Started page for the instructions. One pre-requisite is NPM (Node Package Manager). The easiest way to get this is to install Node itself. Head on down to the Node Website for instructions.
Once you’ve used the npm install --global gulp command to install gulp globally, you need to add it to your project. The way to do this is to run npm install --save-dev gulp in the root folder of your project, then add a gulpfile.js file there.
At the moment let’s add a single line of code inside that file which indicates that we will be using Gulp itself.
var gulp = require( 'gulp' );
If you’re interested in all the cool things Gulp can do like concatenating scripts, compiling Sass and LESS, optimizing images and so on.
Using Browsersync
Browsersync has a Gulp extension which we can install in two steps. First, let’s use npm to download it, then we add it to our Gulpfile.
Issue the npm install browser-sync gulp --save-dev command in the project root in the terminal; this will download the extension. Then, open the Gulpfile and add the following line to it:
var browserSync = require( 'browser-sync' ).create();
This lets Gulp know that we’ll be using Browsersync. Next we’ll define a task which controls how Browsersync will work.
gulp.task('browser-sync', function() {
  browserSync.init({
    proxy: "192.168.33.21"
  });
});
Once added, you can type gulp browser-sync into the terminal to start a server. You should see something like the image below.
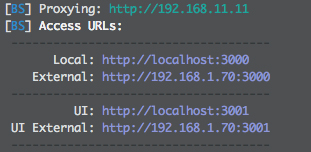
There are four separate URLs there, here’s what they mean:
- Local: The local URL is where you can reach the server on the machine you’re running it on. In our cases you can use
192.168.33.21or you can use the one provided by Borwsersync. - External: This is the URL you can use on any device connected to the network to reach the website. It will work on your local machine, your phone, tablet and so on.
- UI: This URL points to the options for the currently running server. You can see connections, set up network throttling, view history or sync options.
- External UI: This is the same as the UI, but accessible from any device on the network.

Why Use Browsersync?
Now that we’re done with this phase you might be thinking: why use Browsersync at all? The URL 192.168.33.21 can also be reached from any device. While this is so, you would need to install WordPress to this URL.
I usually use virtualhosts and have domains like wordpress.local or myproject.dev. These resolve locally so you can’t visit wordpress.local on your mobile phone and see the same result as on your local computer.
So far so good, we now have a test site which can be accessed from any device on the network. Now it’s time to go global and broadcast our work over the internet.
Using ngrok To Share Our Localhost
ngrok is a tool you can use to create secure tunnels to your localhost. If you sign up (still free) you get password protected tunnels, TCP and multiple simultaneous tunnels.
Installing ngrok
Go to the ngrok download page and grab the version you need. You can run it from the folder it is in or move it to a location that allows you to run it from anywhere. On Mac/Linux you can run the following command:
sudo mv ngrok /usr/local/bin/ngrok
If you get an error that this location doesn’t exist, simply create the missing folders.
Using ngrok
Thankfully this part is extremely simple. Once you’re running your server via Gulp, take a look at the port it is using. In the example above, the local server is running at http://localhost:3000 which means it is using port 3000. In a new terminal tab, run the following command:
ngrok http 3000
This will create an accessible tunnel to your localhost, the result should be something like this:
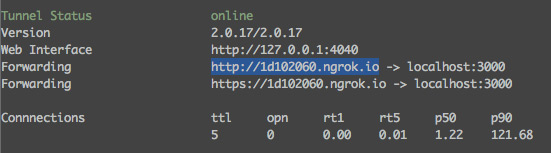
The URL you see next to “Forwarding” is what you can use to access your website from anywhere.
Conclusion
At the end of the day we can now do three things:
- View and work on our project locally
- View our website via any device on the network
- Let others view our work anywhere with a simple link
This will allow you to focus on development instead of racing to keep local and test servers in sync, migrating databases and other worrisome tasks. (Source: hongkiat)
Happy learning!