Welcome to my first post on this website, Today I will teach you people how to make transfers from one drive to another, I am aware another guide exists on this website but it is far from comprehensive and that I what I will be trying to fix via this guide my covering a lot of cases as example. To make this total noob friendly it will start from scratch that i.e. Installing rclone in colab instance and but let that not fool you cuz it will end with some advanced experimental flags

This is the table of contents for those looking for a quick solution
1.Installing rclone in colab instance
2. Making config for google drive(my drive)
3.Making config for google drive(team/shared drive)
4.Making “shared with me” visible to rclone
5.Making config for dropbox(using your own app id)
6.Testing out the configs
7.Making a test transfer to see if everything will go all right(–dry-run)
8.Using rclone’s copy command to sync things up(–update)
9.Speeding up the transfer using args
10.Experimental flags for google drive and rclone
1.Installing rclone in colab instance
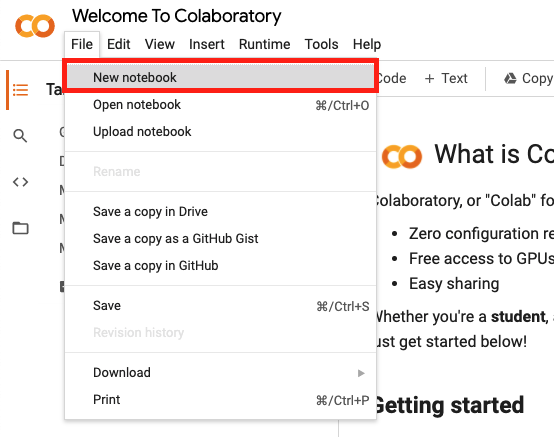
To begin just go to https://colab.research.google.com/ and open a new notebook
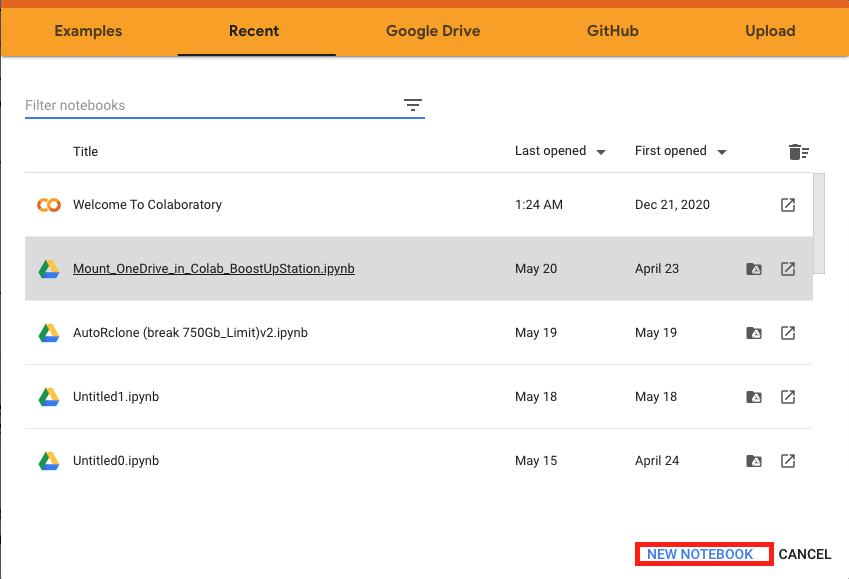
or
After that you will have to type the following snippet in the code box and hit the run button for run box
!wget https://beta.rclone.org/branch/fix-dropbox-batch-sync/v1.55.0-beta.5334.ac7acb9f0.fix-dropbox-batch-sync/rclone-v1.55.0-beta.5334.ac7acb9f0.fix-dropbox-batch-sync-linux-amd64.deb
!apt install ./rclone-v1.55.0-beta.5334.ac7acb9f0.fix-dropbox-batch-sync-linux-amd64.deb
What this will do is that it will download the debian package from one of the rclone’s repo branch where dropbox’s asynchronous mode was being tested(more on that later in this guide) and install it for you .
We are now ready to make configs for our remotes.
Note: If you are looking to transfer data from shared drive to shared drive, you will have to create two configs one for each shared drive and similarly if you are looking to transfer data from my drive to shared drive or vice versa you will need one remote configured with shared drive and one remote configured with my drive. Tho is almost obvious that you need both a source and destination to make transfers happen, I am just putting this out there so eliminate confusion.
2. Making config for google drive(my drive)
To begin making the configs paste the following snippet and run it
!rclone config
I will be walking you through the next steps using what I type when prompted marked with red bold, Enter here means I pressed the enter button
No remotes found - make a new one
n) New remote
s) Set configuration password
q) Quit config
n/s/q> n
name> mydrive
You can enter any name here, just make sure to remember it
Type of storage to configure.
Enter a string value. Press Enter for the default (“”).
Choose a number from below, or type in your own value
1 / 1Fichier
\ “fichier”
2 / Alias for an existing remote
\ “alias”
3 / Amazon Drive
\ “amazon cloud drive”
4 / Amazon S3 Compliant Storage Providers including AWS, Alibaba, Ceph, Digital Ocean, Dreamhost, IBM COS, Minio, and Tencent COS
\ “s3”
5 / Backblaze B2
\ “b2”
6 / Box
\ “box”
7 / Cache a remote
\ “cache”
8 / Citrix Sharefile
\ “sharefile”
9 / Compress a remote
\ “compress”
10 / Dropbox
\ “dropbox”
11 / Encrypt/Decrypt a remote
\ “crypt”
12 / Enterprise File Fabric
\ “filefabric”
13 / FTP Connection
\ “ftp”
14 / Google Cloud Storage (this is not Google Drive)
\ “google cloud storage”
15 / Google Drive
\ “drive”
16 / Google Photos
\ “google photos”
17 / Hadoop distributed file system
\ “hdfs”
18 / Hubic
\ “hubic”
19 / In memory object storage system.
\ “memory”
20 / Jottacloud
\ “jottacloud”
21 / Koofr
\ “koofr”
22 / Local Disk
\ “local”
23 / Mail.ru Cloud
\ “mailru”
24 / Mega
\ “mega”
25 / Microsoft Azure Blob Storage
\ “azureblob”
26 / Microsoft OneDrive
\ “onedrive”
27 / OpenDrive
\ “opendrive”
28 / OpenStack Swift (Rackspace Cloud Files, Memset Memstore, OVH)
\ “swift”
29 / Pcloud
\ “pcloud”
30 / Put.io
\ “putio”
31 / QingCloud Object Storage
\ “qingstor”
32 / SSH/SFTP Connection
\ “sftp”
33 / Sugarsync
\ “sugarsync”
34 / Tardigrade Decentralized Cloud Storage
\ “tardigrade”
35 / Transparently chunk/split large files
\ “chunker”
36 / Union merges the contents of several upstream fs
\ “union”
37 / Webdav
\ “webdav”
38 / Yandex Disk
\ “yandex”
39 / Zoho
\ “zoho”
40 / http Connection
\ “http”
41 / premiumize.me
\ “premiumizeme”
42 / seafile
\ “seafile”
Storage> 15
** See help for drive backend at: https://rclone.org/drive/ **
Google Application Client Id
Setting your own is recommended.
See https://rclone.org/drive/#making-your-own-client-id for how to create your own.
If you leave this blank, it will use an internal key which is low performance.
Enter a string value. Press Enter for the default (“”).
client_id> Enter
OAuth Client Secret
Leave blank normally.
Enter a string value. Press Enter for the default (“”).
client_secret> Enter
Scope that rclone should use when requesting access from drive.
Enter a string value. Press Enter for the default (“”).
Choose a number from below, or type in your own value
1 / Full access all files, excluding Application Data Folder.
\ “drive”
2 / Read-only access to file metadata and file contents.
\ “drive.readonly”
/ Access to files created by rclone only.
3 | These are visible in the drive website.
| File authorization is revoked when the user deauthorizes the app.
\ “drive.file”
/ Allows read and write access to the Application Data folder.
4 | This is not visible in the drive website.
\ “drive.appfolder”
/ Allows read-only access to file metadata but
5 | does not allow any access to read or download file content.
\ “drive.metadata.readonly”
scope> 1
ID of the root folder
Leave blank normally.
Fill in to access “Computers” folders (see docs), or for rclone to use
a non root folder as its starting point.
Enter a string value. Press Enter for the default (“”).
root_folder_id> Enter
Service Account Credentials JSON file path
Leave blank normally.
Needed only if you want use SA instead of interactive login.
Leading ~ will be expanded in the file name as will environment variables such as ${RCLONE_CONFIG_DIR}.
Enter a string value. Press Enter for the default (“”).
service_account_file> Enter
Edit advanced config? (y/n)
y) Yes
n) No (default)
y/n> n
You will now be presented with a link, click on that, choose the account you want to access google drive of and then allow it to access, A code will be presented, copy it, close the tab, paste it in the box as shown and press enter
Use auto config?
- Say Y if not sure
- Say N if you are working on a remote or headless machine
y) Yes (default)
n) No
y/n> n

Configure this as a Shared Drive (Team Drive)?
y) Yes
n) No (default)
y/n> Enter
[gdrive]
type = drive
scope = drive
token = {“access_token”:“HVkspMWBAWnQl6yCYO8Rci7czhG7”,“token_type”:“Bearer”,“refresh_token”:“1//06fFoxLSISJuoCgYIARAAGAYSNwF-L9IrVB0TKhw2KrCY-9j8z2TJQCUnzwFopYwN_jkRomVfoESnkfeQ95Vgv32AWQ4EIdrKE6w”,“expiry”:“2021-05-21T08:55:36.76855263Z”}
y) Yes this is OK (default)
e) Edit this remote
d) Delete this remote
y/e/d> y
Current remotes:
Name Type
==== ====
mydrive drive
e) Edit existing remote
n) New remote
d) Delete remote
r) Rename remote
c) Copy remote
s) Set configuration password
q) Quit config
e/n/d/r/c/s/q> q
3.Making config for google drive(team/shared drive)
This is almost identical to making config for mydrive so I will be only covering the part which is different
Follow the same steps as when making config for my drive till you are asked to configure this a shared drive
Configure this as a Shared Drive (Team Drive)?
y) Yes
n) No (default)
y/n> y
Fetching Shared Drive list…
Choose a number from below, or type in your own value
1 / 1.Shareddrive1
\ “0AH7HM4K3zhx”
2 / 2.Shareddrive2
\ “0AKpPZPb-PKW”
3 / Shareddrive3
\ “0AM_6yidF7ecNUk”
Enter a Shared Drive ID> 1
Choose any shared drive you want, I am choosing one here
[shared]
type = drive
scope = drive
token = {“access_token”:“y0RQLZLq-kNpPXmOpExAaWmFYSDKfOeH1HuSWop6QFxTGaXqDyUhKGkOx9PkdX5W_ksNiVR1Ozk5ACeaQU-R-gl-sw6IUYmaIaGspyNFzIrRK1t2_bqb86xcnxLlkXHHDn19QUmetA8V5mJC9xJ”,“token_type”:“Bearer”,“refresh_token”:“1//065HRUS41NAovCgYIARAAGAYSNwF-L9IramnrdfP2tK3pS6IQjHXf9hdxNAG6JP9xVX_0A9xh9uqXjN6vqof2lRrbjEWDmjCnlvo”,“expiry”:“2021-05-21T09:16:03.693359275Z”}
team_drive = 0AH7HM4K3zhxdUk9PVA
root_folder_id =
y) Yes this is OK (default)
e) Edit this remote
d) Delete this remote
y/e/d> y
Current remotes:
Name Type
==== ====
shared drive
e) Edit existing remote
n) New remote
d) Delete remote
r) Rename remote
c) Copy remote
s) Set configuration password
q) Quit config
e/n/d/r/c/s/q> q
4.Making “shared with me” visible to rclone
For this step all you need to do is to edit the advanced config, keep pressing enter till you get prompted for shared-with-me, type true/yes for it and then follow the usual instructions
This remote will be restricted to only the shared with me folder
5.Making config for dropbox(using your own app id)
So this step config can be made the easy way as well but that I wont cover because it has limitations and will require rclone to be installed on your local machine, instead we will do it little bit hard way
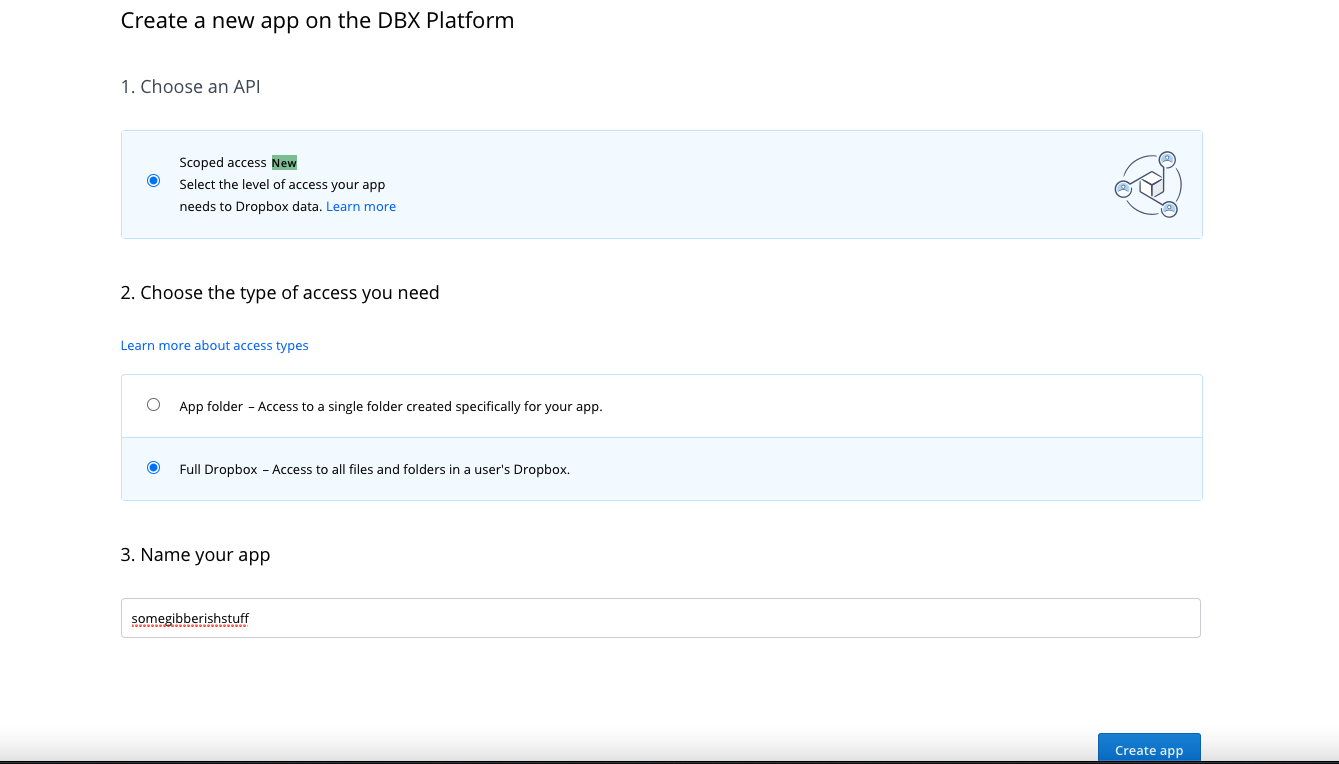
Login to your dropbox and open developer app console from here https://www.dropbox.com/developers/apps
Click on create app

Fill it out like this and click on create app
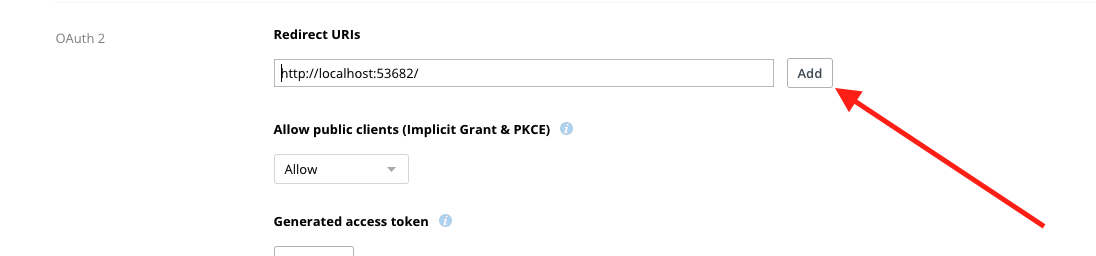
Fill Redirect URIs as http://localhost:53682/ and click on add
Then go to the permissions page and change it to the following as shown
and click on submit

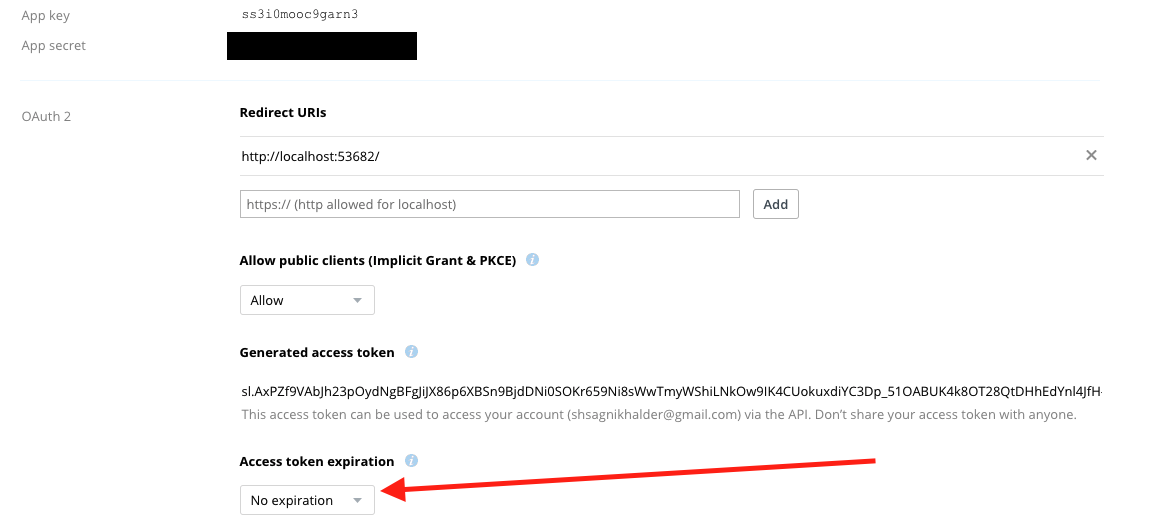
Now go back to the settings page, click on reveal app secret and generate a token set to no expiry
We are ready to make the config, keep the app namem client secret and the token handy as you will need them in the next step
Go to colab and use
!rclone config
and follow these steps
No remotes found - make a new one
n) New remote
s) Set configuration password
q) Quit config
n/s/q>n
name> dropbox
Type of storage to configure.
Enter a string value. Press Enter for the default (“”).
Choose a number from below, or type in your own value
1 / 1Fichier
\ “fichier”
2 / Alias for an existing remote
\ “alias”
3 / Amazon Drive
\ “amazon cloud drive”
4 / Amazon S3 Compliant Storage Providers including AWS, Alibaba, Ceph, Digital Ocean, Dreamhost, IBM COS, Minio, and Tencent COS
\ “s3”
5 / Backblaze B2
\ “b2”
6 / Box
\ “box”
7 / Cache a remote
\ “cache”
8 / Citrix Sharefile
\ “sharefile”
9 / Compress a remote
\ “compress”
10 / Dropbox
\ “dropbox”
11 / Encrypt/Decrypt a remote
\ “crypt”
12 / Enterprise File Fabric
\ “filefabric”
13 / FTP Connection
\ “ftp”
14 / Google Cloud Storage (this is not Google Drive)
\ “google cloud storage”
15 / Google Drive
\ “drive”
16 / Google Photos
\ “google photos”
17 / Hadoop distributed file system
\ “hdfs”
18 / Hubic
\ “hubic”
19 / In memory object storage system.
\ “memory”
20 / Jottacloud
\ “jottacloud”
21 / Koofr
\ “koofr”
22 / Local Disk
\ “local”
23 / Mail.ru Cloud
\ “mailru”
24 / Mega
\ “mega”
25 / Microsoft Azure Blob Storage
\ “azureblob”
26 / Microsoft OneDrive
\ “onedrive”
27 / OpenDrive
\ “opendrive”
28 / OpenStack Swift (Rackspace Cloud Files, Memset Memstore, OVH)
\ “swift”
29 / Pcloud
\ “pcloud”
30 / Put.io
\ “putio”
31 / QingCloud Object Storage
\ “qingstor”
32 / SSH/SFTP Connection
\ “sftp”
33 / Sugarsync
\ “sugarsync”
34 / Tardigrade Decentralized Cloud Storage
\ “tardigrade”
35 / Transparently chunk/split large files
\ “chunker”
36 / Union merges the contents of several upstream fs
\ “union”
37 / Webdav
\ “webdav”
38 / Yandex Disk
\ “yandex”
39 / Zoho
\ “zoho”
40 / http Connection
\ “http”
41 / premiumize.me
\ “premiumizeme”
42 / seafile
\ “seafile”
Storage> 10
** See help for dropbox backend at: https://rclone.org/dropbox/ **
OAuth Client Id
Leave blank normally.
Enter a string value. Press Enter for the default (“”).
client_id> Enter the name of your app
OAuth Client Secret
Leave blank normally.
Enter a string value. Press Enter for the default (“”).
client_secret> Enter the client secret
Edit advanced config? (y/n)
y) Yes
n) No (default)
y/n>y
OAuth Access Token as a JSON blob.
Enter a string value. Press Enter for the default (“”).
token> Paste your token here
Auth server URL.
Leave blank to use the provider defaults.
Enter a string value. Press Enter for the default (“”).
auth_url> ENTER
Token server url.
Leave blank to use the provider defaults.
Enter a string value. Press Enter for the default (“”).
token_url> ENTER
Upload chunk size. (< 150M).
Any files larger than this will be uploaded in chunks of this size.
Note that chunks are buffered in memory (one at a time) so rclone can
deal with retries. Setting this larger will increase the speed
slightly (at most 10% for 128MB in tests) at the cost of using more
memory. It can be set smaller if you are tight on memory.
Enter a size with suffix k,M,G,T. Press Enter for the default (“48M”).
chunk_size> ENTER
Impersonate this user when using a business account.
Note that if you want to use impersonate, you should make sure this
flag is set when running “rclone config” as this will cause rclone to
request the “members.read” scope which it won’t normally. This is
needed to lookup a members email address into the internal ID that
dropbox uses in the API.
Using the “members.read” scope will require a Dropbox Team Admin
to approve during the OAuth flow.
You will have to use your own App (setting your own client_id and
client_secret) to use this option as currently rclone’s default set of
permissions doesn’t include “members.read”. This can be added once
v1.55 or later is in use everywhere.
Enter a string value. Press Enter for the default (“”).
impersonate>
Instructs rclone to work on individual shared files.
In this mode rclone’s features are extremely limited - only list (ls, lsl, etc.)
operations and read operations (e.g. downloading) are supported in this mode.
All other operations will be disabled.
Enter a boolean value (true or false). Press Enter for the default (“false”).
shared_files>
Instructs rclone to work on shared folders.
When this flag is used with no path only the List operation is supported and
all available shared folders will be listed. If you specify a path the first part
will be interpreted as the name of shared folder. Rclone will then try to mount this
shared to the root namespace. On success shared folder rclone proceeds normally.
The shared folder is now pretty much a normal folder and all normal operations
are supported.
Note that we don’t unmount the shared folder afterwards so the
–dropbox-shared-folders can be omitted after the first use of a particular
shared folder.
Enter a boolean value (true or false). Press Enter for the default (“false”).
shared_folders> ENTER
Upload file batching sync|async|off.
This sets the batch mode used by rclone.
For full info see the main docs
This has 3 possible values
- off - no batching
- sync - batch uploads and check completion (default)
- async - batch upload and don’t check completion
Rclone will close any outstanding batches when it exits which may make
a delay on quit.
Enter a string value. Press Enter for the default (“sync”).
batch_mode> ENTER
Max number of files in upload batch.
This sets the batch size of files to upload. It has to be less than 1000.
By default this is 0 which means rclone which calculate the batch size
depending on the setting of batch_mode.
- batch_mode: async - default batch_size is 100
- batch_mode: sync - default batch_size is the same as --transfers
- batch_mode: off - not in use
Rclone will close any outstanding batches when it exits which may make
a delay on quit.
Setting this is a great idea if you are uploading lots of small files
as it will make them a lot quicker. You can use --transfers 32 to
maximise throughput.
Enter a signed integer. Press Enter for the default (“0”).
batch_size> ENTER
Max time to allow an idle upload batch before uploading
If an upload batch is idle for more than this long then it will be
uploaded.
The default for this is 0 which means rclone will choose a sensible
default based on the batch_mode in use.
- batch_mode: async - default batch_timeout is 500ms
- batch_mode: sync - default batch_timeout is 10s
- batch_mode: off - not in use
Enter a duration s,m,h,d,w,M,y. Press Enter for the default (“0s”).
batch_timeout> ENTER
This sets the encoding for the backend.
See: the encoding section in the overview for more info.
Enter a encoder.MultiEncoder value. Press Enter for the default (“Slash,BackSlash,Del,RightSpace,InvalidUtf8,Dot”).
encoding> ENTER
Remote config
Already have a token - refresh?
y) Yes (default)
n) No
y/n> n
[dropbox]
type = dropbox
client_id = redacted
client_secret =redacted
token =redactedlol8OT28QtDHhEdYnl4JfH-cVYg-kZ8Bhxkj2Xk8MKJ0
y) Yes this is OK (default)
e) Edit this remote
d) Delete this remote
y/e/d> y
Current remotes:
Name Type
==== ====
dropbox dropbox
e) Edit existing remote
n) New remote
d) Delete remote
r) Rename remote
c) Copy remote
s) Set configuration password
q) Quit config
e/n/d/r/c/s/q>q
Your dropbox config is now ready to be used and we made it in a way rclone recommends
6.Testing out the configs
This is by far the most simple step, you can type either of these to test your configs out
!rclone lsd remote:
here the word remote means the name you used for your config, say you want to test out the mydrive config and you named it mydrive, the following will list all the directories inside your mydrive
!rclone lsd mydrive:
Similarly other linux commands like ls and size can be used instead of lsd
say you want to check the size of any folder in your cloud drive, use
!rclone size “remote:pathtofolder”
I recommend that you use quotes like shown in the above example because it tackles the problem of having space in directory name, so from here on I will be using it only ![]()
7.Making a test transfer to see if everything will go all right(–dry-run)
So finally we will make a test run of transferring files from one cloud to another
the syntax will be using either of the two depending on what you need, Use move if you want to ‘cut’ and copy for ‘copying’, And as I said, this will only do a test run and no actual copying will take place, Significance of this step will be made clear in a while
The syntax to test the copying is
rclone copy "remote1:pathofthefolder" "remote2:pathofthefolder" --dry-run
This will imitate the following:copy contents of remote 1 in the specified path(if specified that is) to the specified folder in remote 2
You will get as output the list of files that will be transferred if the copying actually takes place
For the majority of the people this will be it, just remove the --dry-run arg and it will copy for real, do read the next contents if you want to optimize this transfer and make it faster
8.Using rclone’s copy command to sync things up
The copy command mentioned above will start everything over, but that usually isnt the case when taking backups and hence that command alone isnt optimal for synchronizing folders as it will waste time copying the files over which are already there, to solve this problem we use the --update arg
rclone copy "remote1:pathofthefolder" "remote2:pathofthefolder" --update
This command will only copy over the stuff from specified path in remote 1 to specified path in remote 2 which arent already present, Now is the time for the --dry-run arg to shine!, you can team it up with the --update arg to see what new files will be copied when you try to sync the folders using
rclone copy "remote1:pathofthefolder" "remote2:pathofthefolder" --update --dry-run
9.Speeding up the transfer using args
For those who dont know colab has a upload speed of 1Gigagbits per second and to make the most out of it we need to optimize the rclone transfers, Lets start with the basics
Using --transfers and --checkers
The transfers arg is self explanatory, it will tell rclone how many transfers to do at once, I think the default is set to 4, in some of the clouds you can amp this number up to 700! and make things go super fast.
The checkers args is often combined with the transfers arg, it just tells rclone how many directories to work with at once, I personally like to keep the number of checkers to 1/4th of that of transfers but there is no hard and fast rule, you know the number of files and the directory structure of files you are dealing with so set it appropriately
syntax is as follows
rclone copy "remote1:pathofthefolder" "remote2:pathofthefolder" --update --transfers=a --checkers=b
Just change a and b to the number you think will be the most suitable, if not sure and just want to see what happens, set ‘a’ to 16 and ‘b’ to 4 and try optimizing from there on.
Now lets suppose you are dealing with a very huge number of files and that is crippling your transfers, the best way to tackle this problem is to use the --fast-list arg
Note: The --fast-list arg will take up a lot of ram, tho on colab until and unless you are being crazy you wont run into any problem as 12GB RAM is provided for use, but still keep this fact in mind, if you run into ram overload problems, try lowering the transfers and checkers before removing the fastlist arg
Also suppose you are to move data within google to google drive(be it mydrive/sharedwithme/team)
using --drive-server-side-across-configs=true can speed things up as well, somtimes drastically
Now lets suppose you arent moving large volume of small files, instead you are moving large files itself. To make things fast here use the --drive-chunk-size=nM arg
Here n needs to be a number which is power of two, This step also consumes ram like a hog, so be cautious, for files over 1GB, just use --drive-chunk-size=128M and it will be fine.
If using dropbox, then use the --dropbox-chunk-size=nM instead
Also coming to dropbox and why I made you all install a specific beta version of rclone is the fact that this particular package has the async mode! Which is far far better when it comes to copying a large volume of small files, to use it just use the following arg
--dropbox-batch-mode async
if dealing with a large volume of small files and if possible please use dropbox instead because of the drive limitations discussed below
10.Experimental flags for google drive and rclone
So the biggest limitation with google drive is the fact that it can only commit 2 files a second which is super slow at times and this limitation will sometimes be the bottleneck, best way to avoid this problem is to obviously just use a zip archive of all the text files, the other way is a workaround which pushed the number of files committed to around 3.5 a second, to do so just use the following args
–tpslimit=60 -vv --drive-pacer-min-sleep=60ms
well the args here are super experimental and might even cause you getting rate limited and hence might do more harm then good, I wont explain the tpslimit and drive-pacer-min-sleep arg but what the -vv one does is that it will run two instances of rclone at once and try syncing that up. So yeah sometimes it might work but it is bound to break, I dont recommend using anything mentioned in section 10, just wanted to put it out there
So yeah thanks to everyone for reading, feel free to ask questions below in the comment section