Best Registry Tweaks To Enable Hidden Features on Windows 10
Did you know Windows 10 has several hidden features and settings that reside within the operating system? But can’t be accessed through any normal because they’re hidden out of sight, And the only way to access them is by means of the Windows registry editor . If you are looking for the Windows 10 hidden features, Here we have some Windows 10 Registry Tweaks To Enable the Hidden Gems . Let’s see how to enable and use these hidden attractive windows features.
Post Contents :
Click here to see...
- 1 Windows 10 Registry Tweaks
- 1.1 Add Your Own Apps to the Context Menu
- 1.2 Shut down Windows more quickly
- 1.3 Open Last Active Window in Taskbar
- 1.4 Increase Taskbar Transparency Level
- 1.5 Disable the Action Center
- 1.6 Disable Login Screen Background Image
- 1.7 Hide Folders From This PC
- 1.8 Boost Security of Virtual Memory
- 1.9 Disable New Volume Control UI and Restore Previous UI
- 1.10 Disable New Battery Fly-out and Restore Previous UI
- 1.11 Disable New Tray Clock and Calendar UI and Restore Previous UI
- 1.12 Remove the OneDrive Button from the File Explorer
Windows 10 Registry Tweaks
To Open Windows registry editor, Press Windows + R, type regedit and ok. Now apply tweaks below to enable hidden features of Windows 10.
Note: Before you edit any part of your system registry, always make a backup of all keys that you intend to edit. You can do this in the Registry editor windows click on file selecting Export. Which saves into a .reg file that can be run to re-apply the old value of that key.
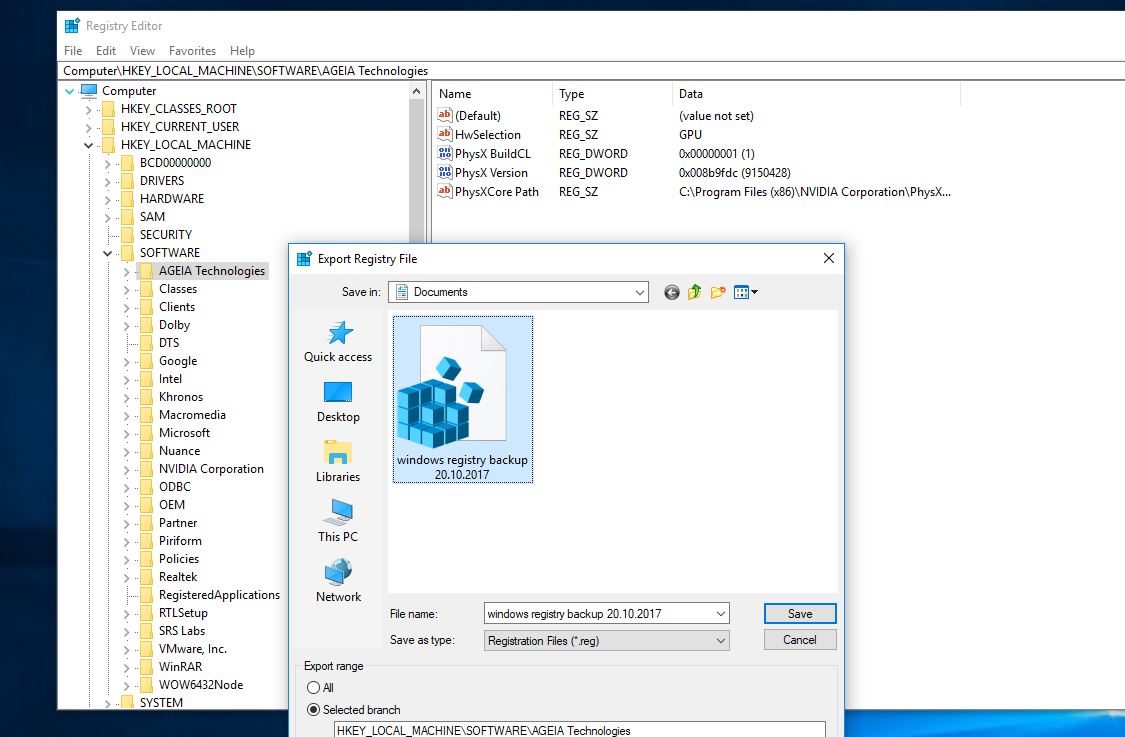
But the easier method is to make a System Restore point, which saves the state of your system, including a snapshot of the registry. If anything goes wrong while making changes on windows registry. You can simply Perform System Restore to revert back windows into the previous working state.
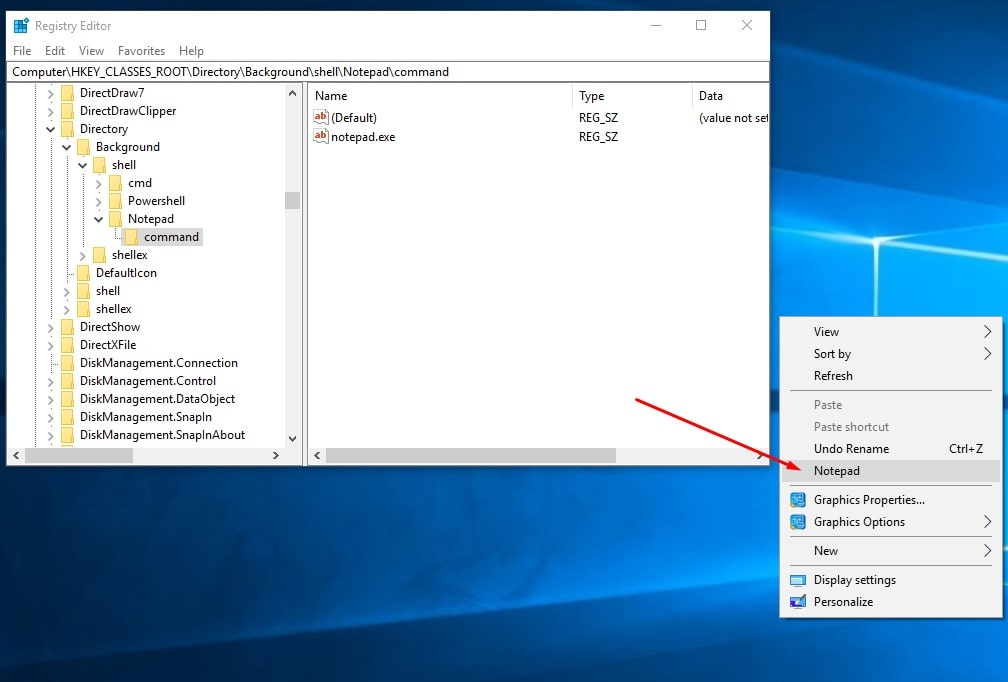
Add Your Own Apps to the Context Menu
Did you know you can add your favorite app to the right-click context menu for quick access? Yes, you can create registry keys to add specific apps to it. We’ll use Notepad as an example.
- Open Windows registry editor and Navigate to:
- Computer\HKEY_CLASSES_ROOT\Directory\Background\shell
- Under the “shell” folder right-click and create a new key called “Notepad,”
- then within that create a key called “command.”
- In the “command” key folder right-click new → string value, then in the Value box type “notepad.exe.”
- That’s it. Now close the Registry Editor, and restart windows to take effect the changes.
- Now right-click on your desktop, and you should see Notepad appear right there in the context menu.
Shut down Windows more quickly
When you shut down or restart Windows, the operating system instructs all running processes to terminate. Sometimes, though, a program won’t do that – and it might be for a good reason, such as an open “save file” dialog that needs your attention. Often, though, the cause is just a badly written program that doesn’t close down promptly like it should. If you don’t like waiting, you can tell Windows to forcibly kill all processes when it’s time to restart. To do so, navigate to HKCU\USER\Control Panel\Desktop
- Create a new DWORD value called “AutoEndTasks”, set it to 1
- Click ok and apply to save changes and restart windows to take effect changes.
- Also, make sure you’ve saved your data before you tell Windows to reboot.
Open Last Active Window in Taskbar
The way Windows 10 organizes open apps, it bunches all open windows of a given app under the same taskbar icon, which you then click to bring up thumbnails of all the open windows contained therein.
This is reasonably useful, but you may well prefer it if clicking the taskbar icon took you straight to the last window you had open within the app – cutting out the thumbnail faff.
To do this, go to the Registry Editor and navigate to:
HKEY_CURRENT_USER\SOFTWARE\Microsoft\Windows\Current\Version\Explorer\Advanced
Here, right-click an empty space in the right-hand pane, select “New → DWORD (32-bit) Value”, then name it “LastActiveClick”. Right-click your newly created registry entry, and change the “Value data” to “1”.
Increase Taskbar Transparency Level
By default, Windows 10 TTaskbarcomes with Aero glass transparency effect but the transparency level is not very high. You can increase the transparency level of Windows 10 Taskbar. And can add an extra clear transparency effect to the Taskbar By Editing some Windows 10 Registry Tweaks. To Do This Navigate to fallowing Registry key :
HKEY_LOCAL_MACHINE\SOFTWARE\Microsoft\Windows\CurrentVersion\Explorer\Advanced
- Here right Click on Advanced, select new DWORD value and name it UseOLEDTaskbarTransparency.
- Double click new created DWORD and set its value to 1.
- Restart Windows to take effect the changes,
- On Next time when login to windows you will notice the Windows 10 Taskbar more transparent.
Note: If you want to restore Taskbar default transparency level in future, delete the DWORDUseOLEDTaskbarTransparency .
Disable the Action Center
A lot of people find the new Action Center to be convenient and useful. But if you’re one who finds it intrusive and unnecessary, then this quick Registry edit tweak will disable it. Open Windows Registry Editor and Navigate to the following key:
HKEY_CURRENT_USER\ SOFTWARE\Policies\Microsoft\Windows\Explorer\policy
Note: If you don’t have a Policies key, Then you’ll have to create one manually. To do this right click on Explorer key and select new. And rename the newly created key Policy .
- Now click on policy key and move to middle pane.
- Here on blank space Right click > new > DWORD and name this DisableNotificationCenter .
- Right-click on the new created DisableNotificationCenter DWORD, select Modify and enter 1 as its value.
- Simply Restart windows to take effect the changes you have made on registry.
- When you start windows next time you will notice the Action center is removed.
- To Restore the action Center in future simply delete the DisableNotificationCenter.
Disable Login Screen Background Image
Before you login windows 10, you may notice spotlight images display there on background, If you are looking for disable the login background picture in Windows 10, Here the registry tweak to disable the login background picture in Windows 10.
- Open Registry Editor, Navigate to the following key
- HKEY_LOCAL_MACHINE\Software\Policies\Microsoft\Windows\System
- Right-click on System and select New> DWORD(32-bit) Value.
- Name it DisableLogonBackgroundImage and set the value to 1.
- That’s all close the Registry editor windows and Restart your computer to take effect the changes. It’ll remove the background image from login screen on next time login.
- If you want to restore Login Screen background image in future, Simply open registry window Navigate to HKEY_LOCAL_MACHINE\SOFTWARE\Policies\Microsoft\Windows\System Here select and delete the DWORD DisableLogonBackgroundImage.
- Restart the windows to take changes effective.
Hide Folders From This PC
The This PC location has been a part of Windows since 8.1, but the annoying thing is that there’s no easy way to remove the default folders like Desktop, Documents, Downloads, Music, Pictures, Videos. For people who don’t use these folders, this is an unnecessary inconvenience. To disable these, you’ll have to navigate to six different registry keys, each one corresponding to one of the six folders in This PC. The locations are
HKEY_LOCAL_MACHINE\SOFTWARE\Microsoft\Windows\CurrentVersion\Explorer\FolderDescriptions <FOLDER-GUID>\ PropertyBag.
Substitute the above with one of these:
- Desktop: {B4BFCC3A-DB2C-424C-B029-7FE99A87C641}
- Documents: {f42ee2d3-909f-4907-8871-4c22fc0bf756}
- Downloads: {7d83ee9b-2244-4e70-b1f5-5393042af1e4}
- Music: {a0c69a99-21c8-4671-8703-7934162fcf1d}
- Pictures: {0ddd015d-b06c-45d5-8c4c-f59713854639}
- Videos: {35286a68-3c57-41a1-bbb1-0eae73d76c95}
Under each one’s PropertyBag key, you’ll see a string value named ThisPCPolicy . (The Desktop folder is the only one that doesn’t have this value by default, so you’ll need to create it manually.) If ThisPCPolicy is set to Show, then the folder is visible. If you change it to Hide, then the folder will be invisible. That’s all!

Boost Security of Virtual Memory
When your computer doesn’t have enough physical RAM, it uses a portion of your hard drive as virtual memory in the form of a pagefile. The thing is, this pagefile still remains on your hard drive after you shut down, and that leaves it prone to tampering. It’s possible to set Windows to delete the pagefile whenever the system shuts down, but this can increase the time it takes to shut down by several minutes, depending on how big your pagefile actually is (anywhere from 2 GB to 16 GB). Only you can decide if the security trade-off is worth it. How you can enable this setting Navigate to HKEY_LOCAL_MACHINE\SYSTEM\CurrentControlSet\Control\SessionManager\Memory Management
in the registry and make sure you have the Memory Management key selected. Right-click on the ClearPageFileAtShutDown DWORD key, select Modify and set its value to 1.
Restart your PC and now Windows will wipe the pagefile every time you shut down.
Disable New Volume Control UI and Restore Previous UI
Microsoft has added a new horizontal UI for volume control slider in Windows 10, Which is shown when you click on the Sound icon in Taskbar notification area. If you don’t like the new UI, you can restore previous vertical volume control slider using the following method:
Negivate to HKEY_LOCAL_MACHINE\Software\Microsoft\WindowsNT\CurrentVersion
- Create a new key MTCUVC under CurrentVersion key.
- Now in right-side pane, create new DWORD EnableMtcUvc and set its value to 0.
- If you want to restore new volume control UI, delete the DWORD EnableMtcUvc .
Disable New Battery Fly-out and Restore Previous UI
You can disable the new Modern (Metro) style Battery fly-out and restore Old classic Battery info UI in Windows 10 Taskbar Notification Area To Do This navigate to HKEY_LOCAL_MACHINE\Software\Microsoft\Windows\CurrentVersion\Immersive\Shell
- Now In right-side pane, create a new DWORD name it UseWin32BatteryFlyout and set its value to 1.
- That’s it. It’ll immediately disable the new Battery fly-out and restore classic UI in system tray.
- If you want to restore new Battery fly-out, delete the new DWORD UseWin32BatteryFlyout.
Disable New Tray Clock and Calendar UI and Restore Previous UI
Windows 10 comes with a new calendar and clock if you want to restore your clock and calendar to windows 7 clock calendar fallow The registry tweak to change your calendar and clock as shown bellow In Registry Editor, go to the following key:
HKEY_LOCAL_MACHINE\Software\Microsoft\Windows\CurrentVersion\ImmersiveShell
- Now In right-side pane, create a new DWORD name it UseWin32TrayClockExperience and set its value to 1.
- That’s it It’ll immediately disable the new Clock and Calendar UI and restore classic UI in system tray.
- If you want to restore new Clock UI, delete the new DWORD UseWin32TrayClockExperience.
Remove the OneDrive Button from the File Explorer
If you don’t use OneDrive or shifted to another cloud storage service after Microsoft decided to downgrade its storage packages, then there is no point of its icon hanging around in the File Explorer. The following image shows how to get rid of it. In the registry editor go to:
HKEY_CLASSES_ROOT\CLSID{018D5C66-4533-4307-9B53-224DE2ED1FE6}
Double-click on “System.IsPinnedToNameSpaceTree” in the right panel and change its value to “0.” This will immediately remove the OneDrive icon. If not, restart the PC.